
Planting Foundation Plants in Front of your Home.
Too often siting foundation plants is poorly done. Most homeowners, and even the so-called professionals seem to plant a lot of stuff, not giving much thought to repetition, color, texture or mass versus specimen planting. In this post I am going to cover and show you how easy it is to make an interesting arrangement of foundation plantings that will give curb appeal to your house.
The Most Common Shapes of Foundation Plants
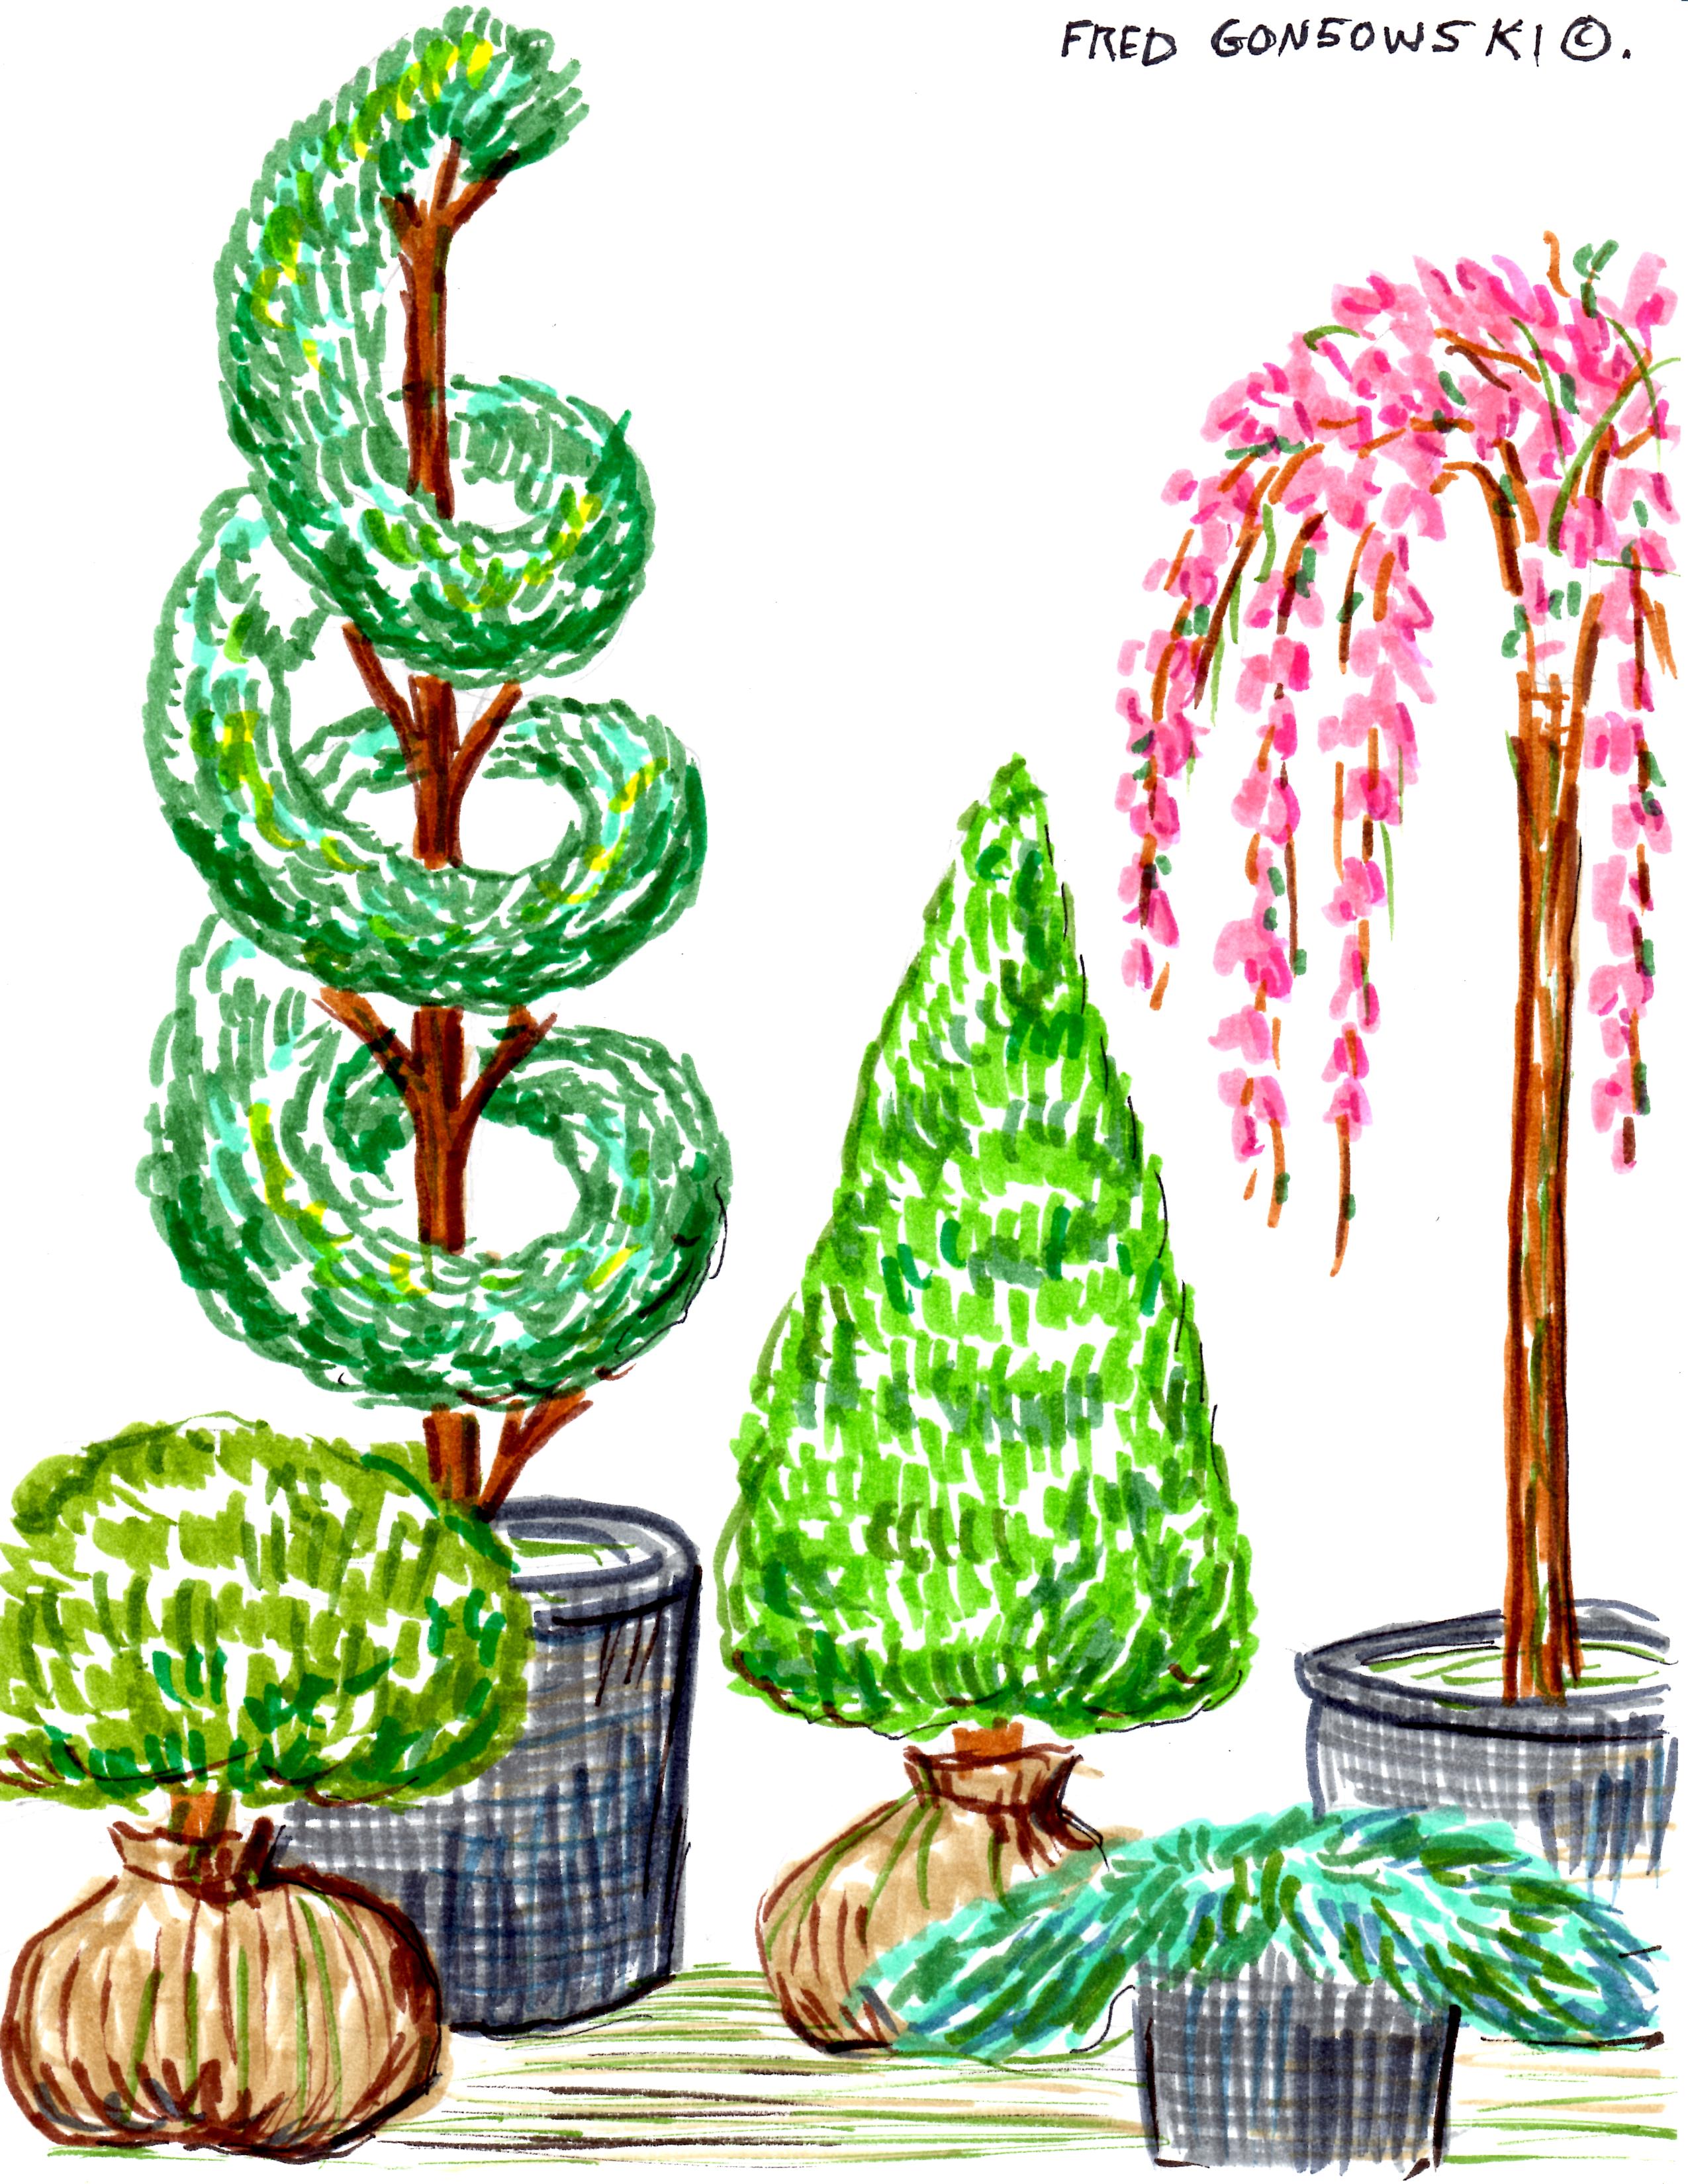
There are many shapes of bushes and trees, but in the world of foundation plants I feel there are only six classical shapes that are most often used.  (now look at illustration 1). They are #1 columnar, #2 pyramidal, #3 sphere / round, #4 spreading, #5 upright (which is a shorter version of columnar), and #6 mound. The six shapes can be seen on bushes and trees that when mature can be one foot tall to over 10 feet high, depending on the variety, their natural growth habits, and if you shear them or not.
Mass versus Specimen Planting is an important issue to address in all parts of gardening.
Specimen Plants are singular plants that have a special, desirable, or unique characteristic like extreme size, unusual color, interesting foliage texture, or odd shape (possibly a topiary) that you want to have few of, and see as focal points in a garden or part of your foundation planting.
Mass Plantings is the planting of 2, 3, 5, or 7 etc of the same plant so you see a large amount of the same thing, and the mass planting gives you a place for your eye to rest before looking at other plants in that area of your foundation garden.
Now look at illustrations 2A and 2B which show how the same amount of plants can go from being too busy to just right.
Illustration 2A represents 3 columnar / upright yews with 2 spreading yews planted between them. Notice how your eyes make many up and down movements as they look across 2A. It is like looking at many different specimen plants. In Illustration 2B the same elements have been repositioned so you now have the two small spreading yews on the ends and the three upright / columnar yews grouped together in the center. Notice how the movement in 2B is much calmer than the movement produced by the arrangement in 2A.
Plant Texture..
When picking plants for your foundation garden you want to have plants with different length needles, different sized and shaped leaves, and possibly foliage colors for the best results. You don’t want to put (let’s say) two pyramidal yews, with three columnar / upright yews, and have two spreading yews somewhere between them. Even if you make a great arrangement of yew items, you would have too much of the same yew texture. 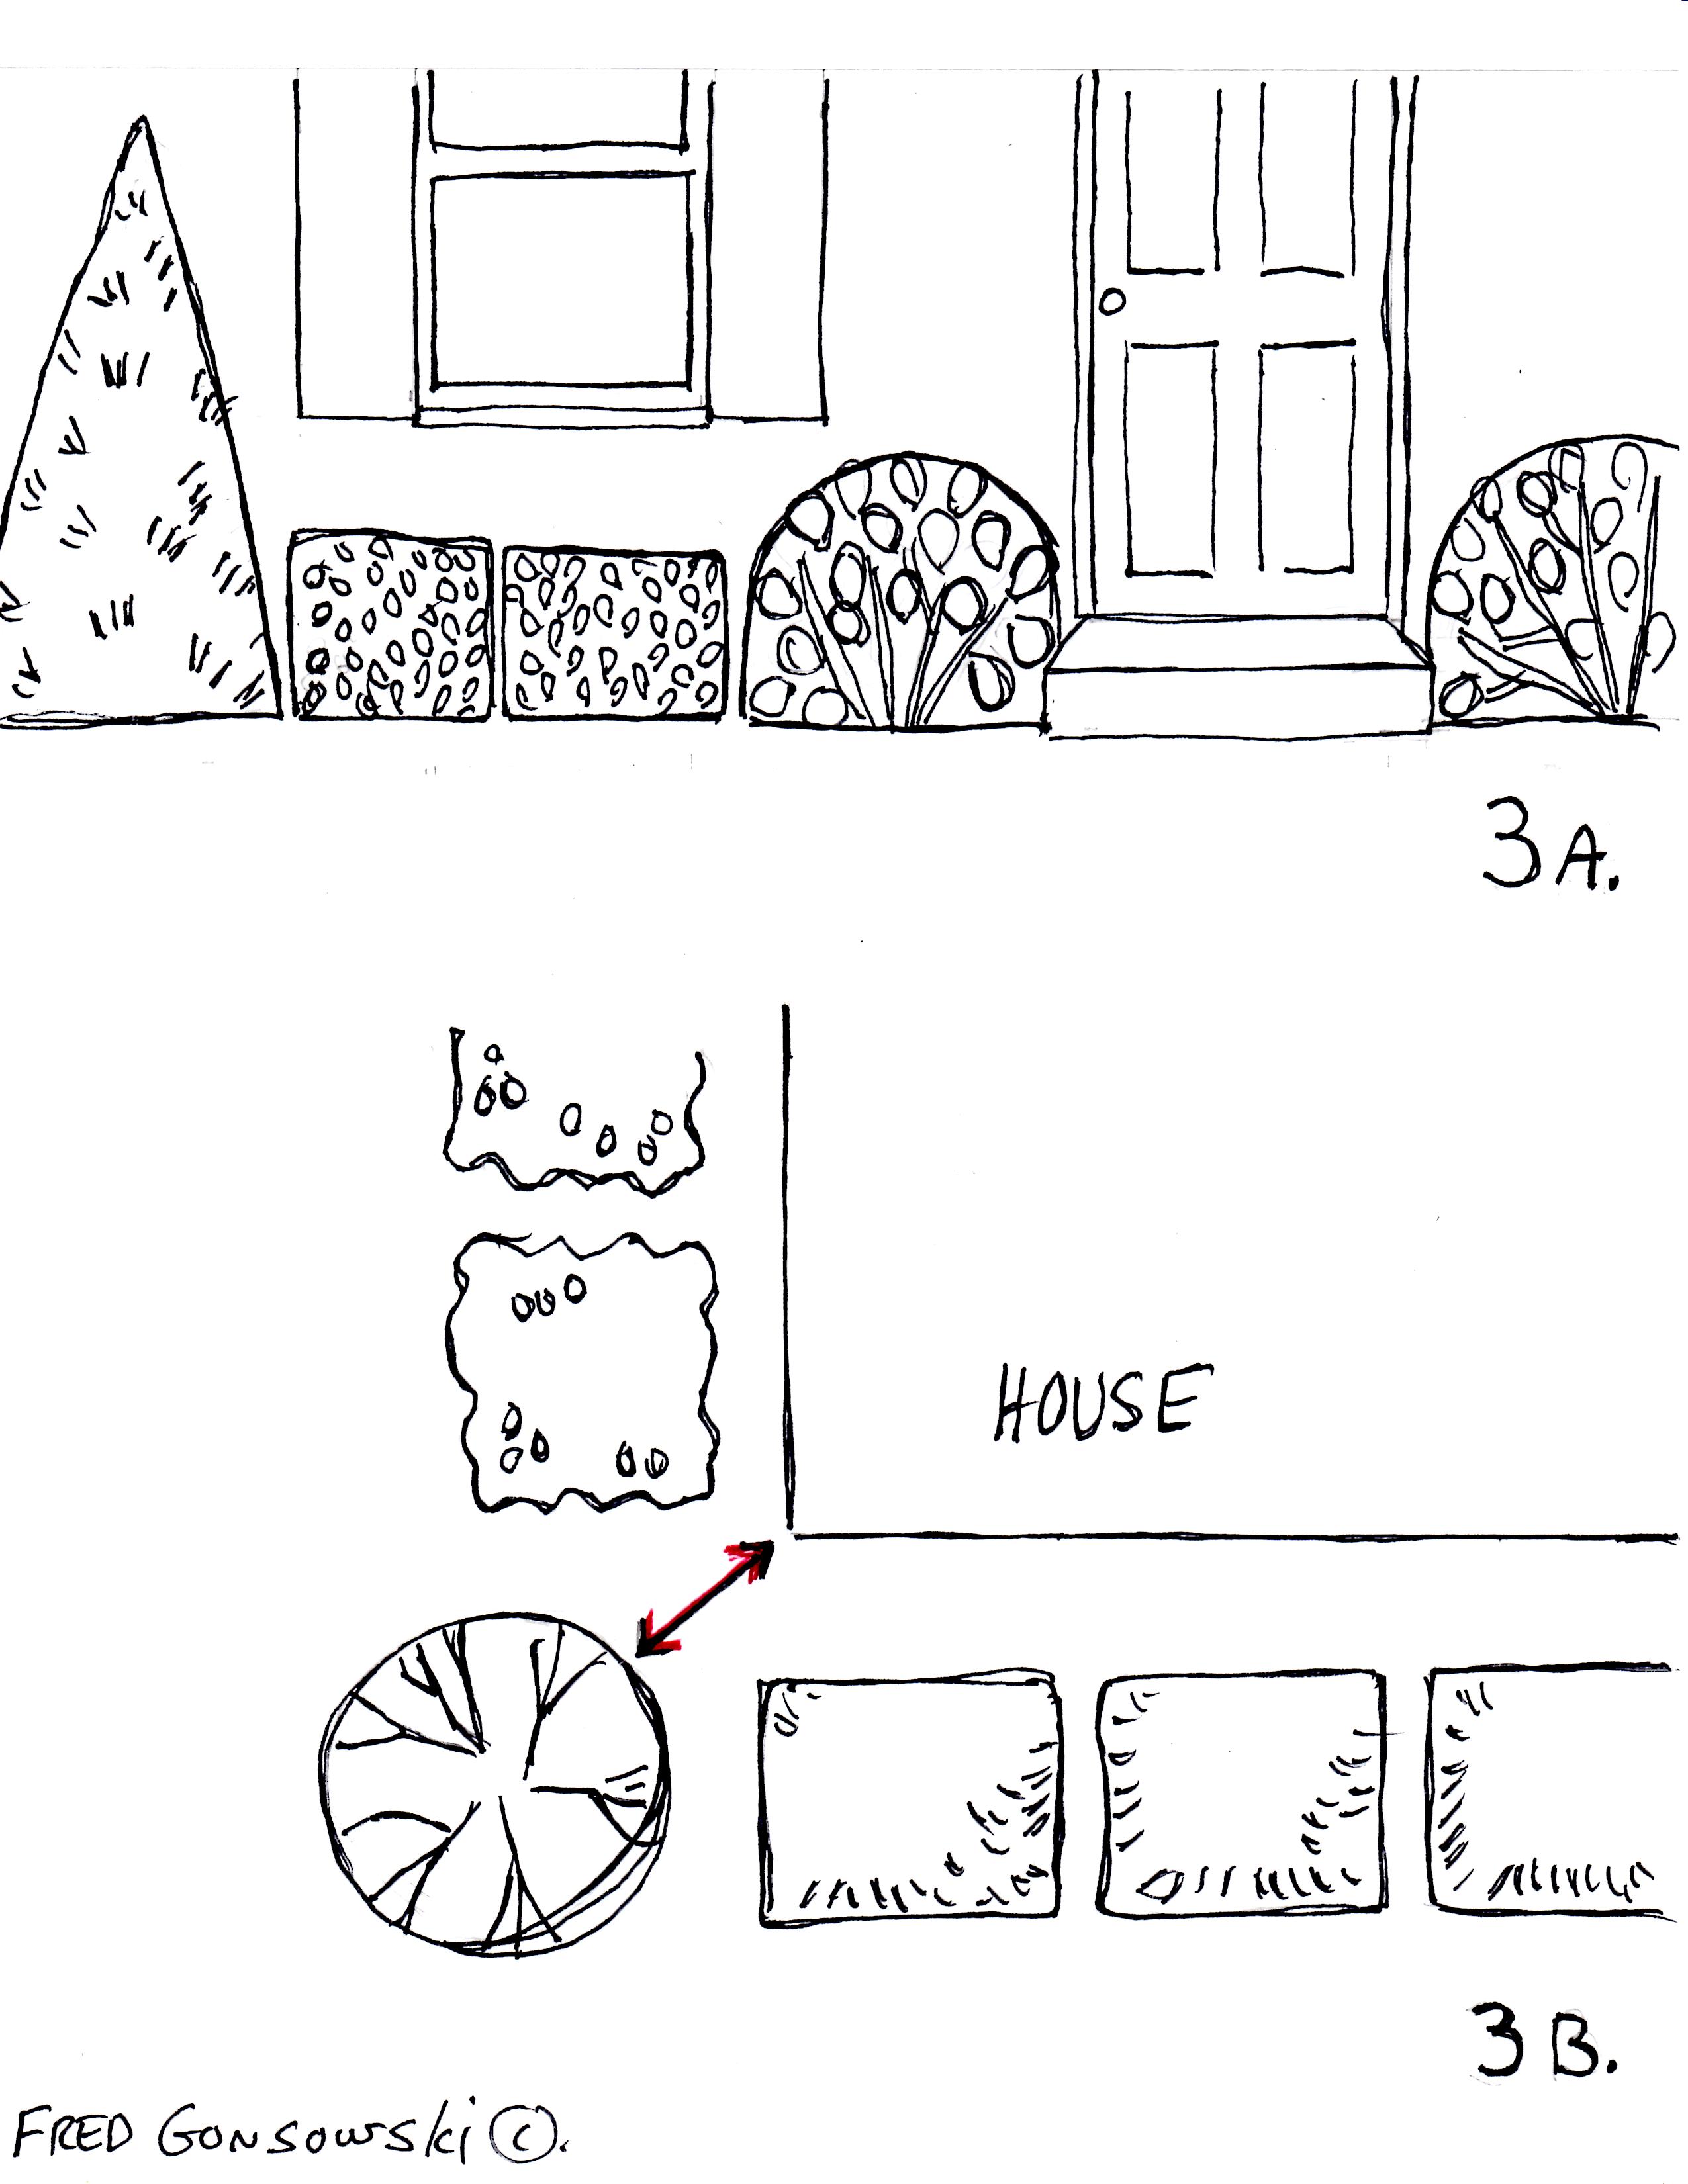
Illustration 3A show a row of foundation plants making a simple arrangement, that if extended would flank and mirror itself on both sides of a front porch. In illustration 3A the pyramidal shaped plant on the left is made with yew that has short and flat dark evergreen needle. Next to that, working toward the porch, and used on both sides of the porch, are boxwood with their small and shiny dark evergreen leaves. Finally closest to the porch on both sides you have a pair of hydrangea which looses their large leaves in Winter, just showing their many branches. This arrangement is made up of foundation plants that are pyramidal, spreading / upright (depending on trimming), and mound forming.
Finally Illustration 3A shows some design concepts that are important to laying out foundation plants. First of all the arrangement is made up of different shaped foundation plants. Secondly: the plants have different sizes of needle and leaves. Third: the planting shows repetition of plant materials. Fourth: and very important, the arrangement is high on the ends, lower at the middle and not low or too high closest to the porch. The full arrangement going across the front of this house is making a shape that I am calling a SMILE. When siting foundation plants you don’t want to chop up the facade of your house into many individual pieces, but frame it with plantings that lead your eye across the front (and sometimes sides or back) of your home.
Now look at illustration 3B. 3B shows where to position foundation plants if space allows. Instead of lining up the end foundation plant(s) at the corner(s) of your house, plant it / them out further at the spot where the front and sides (or even back and sides) of your house meet each other. Look at the red arrows on the illustration. By positioning your end (or first) foundation plant that way, you elongate your foundation planting scheme, which suggests length to your house’s facade.
Foliage Color..
When picking foundation plants, foliage colors should can also be addressed. In the gardening world green is the predominant foliage color, but blue-green, chartreuse, burgundy (green-black, plum and red-black) and gray are also found. Colored foliage should be classified as a specimen, as it draws you eye toward it. Colored foliage can highlight architectural features on your house. If you have a slate roof with burgundy or purple colors in it, or burgundy shutters or front door, burgundy specimen foundation plants will help to move the burgundy color along and tie everything together.
Putting the Right Foundation Plant in the Right place..
When siting foundation plants you want to place them so they enhance your home’s facade, not overpower it. You don’t want the plants to be more of a focal point than your house’s facade, unless your house is ugly and you want to divert interest away from it. 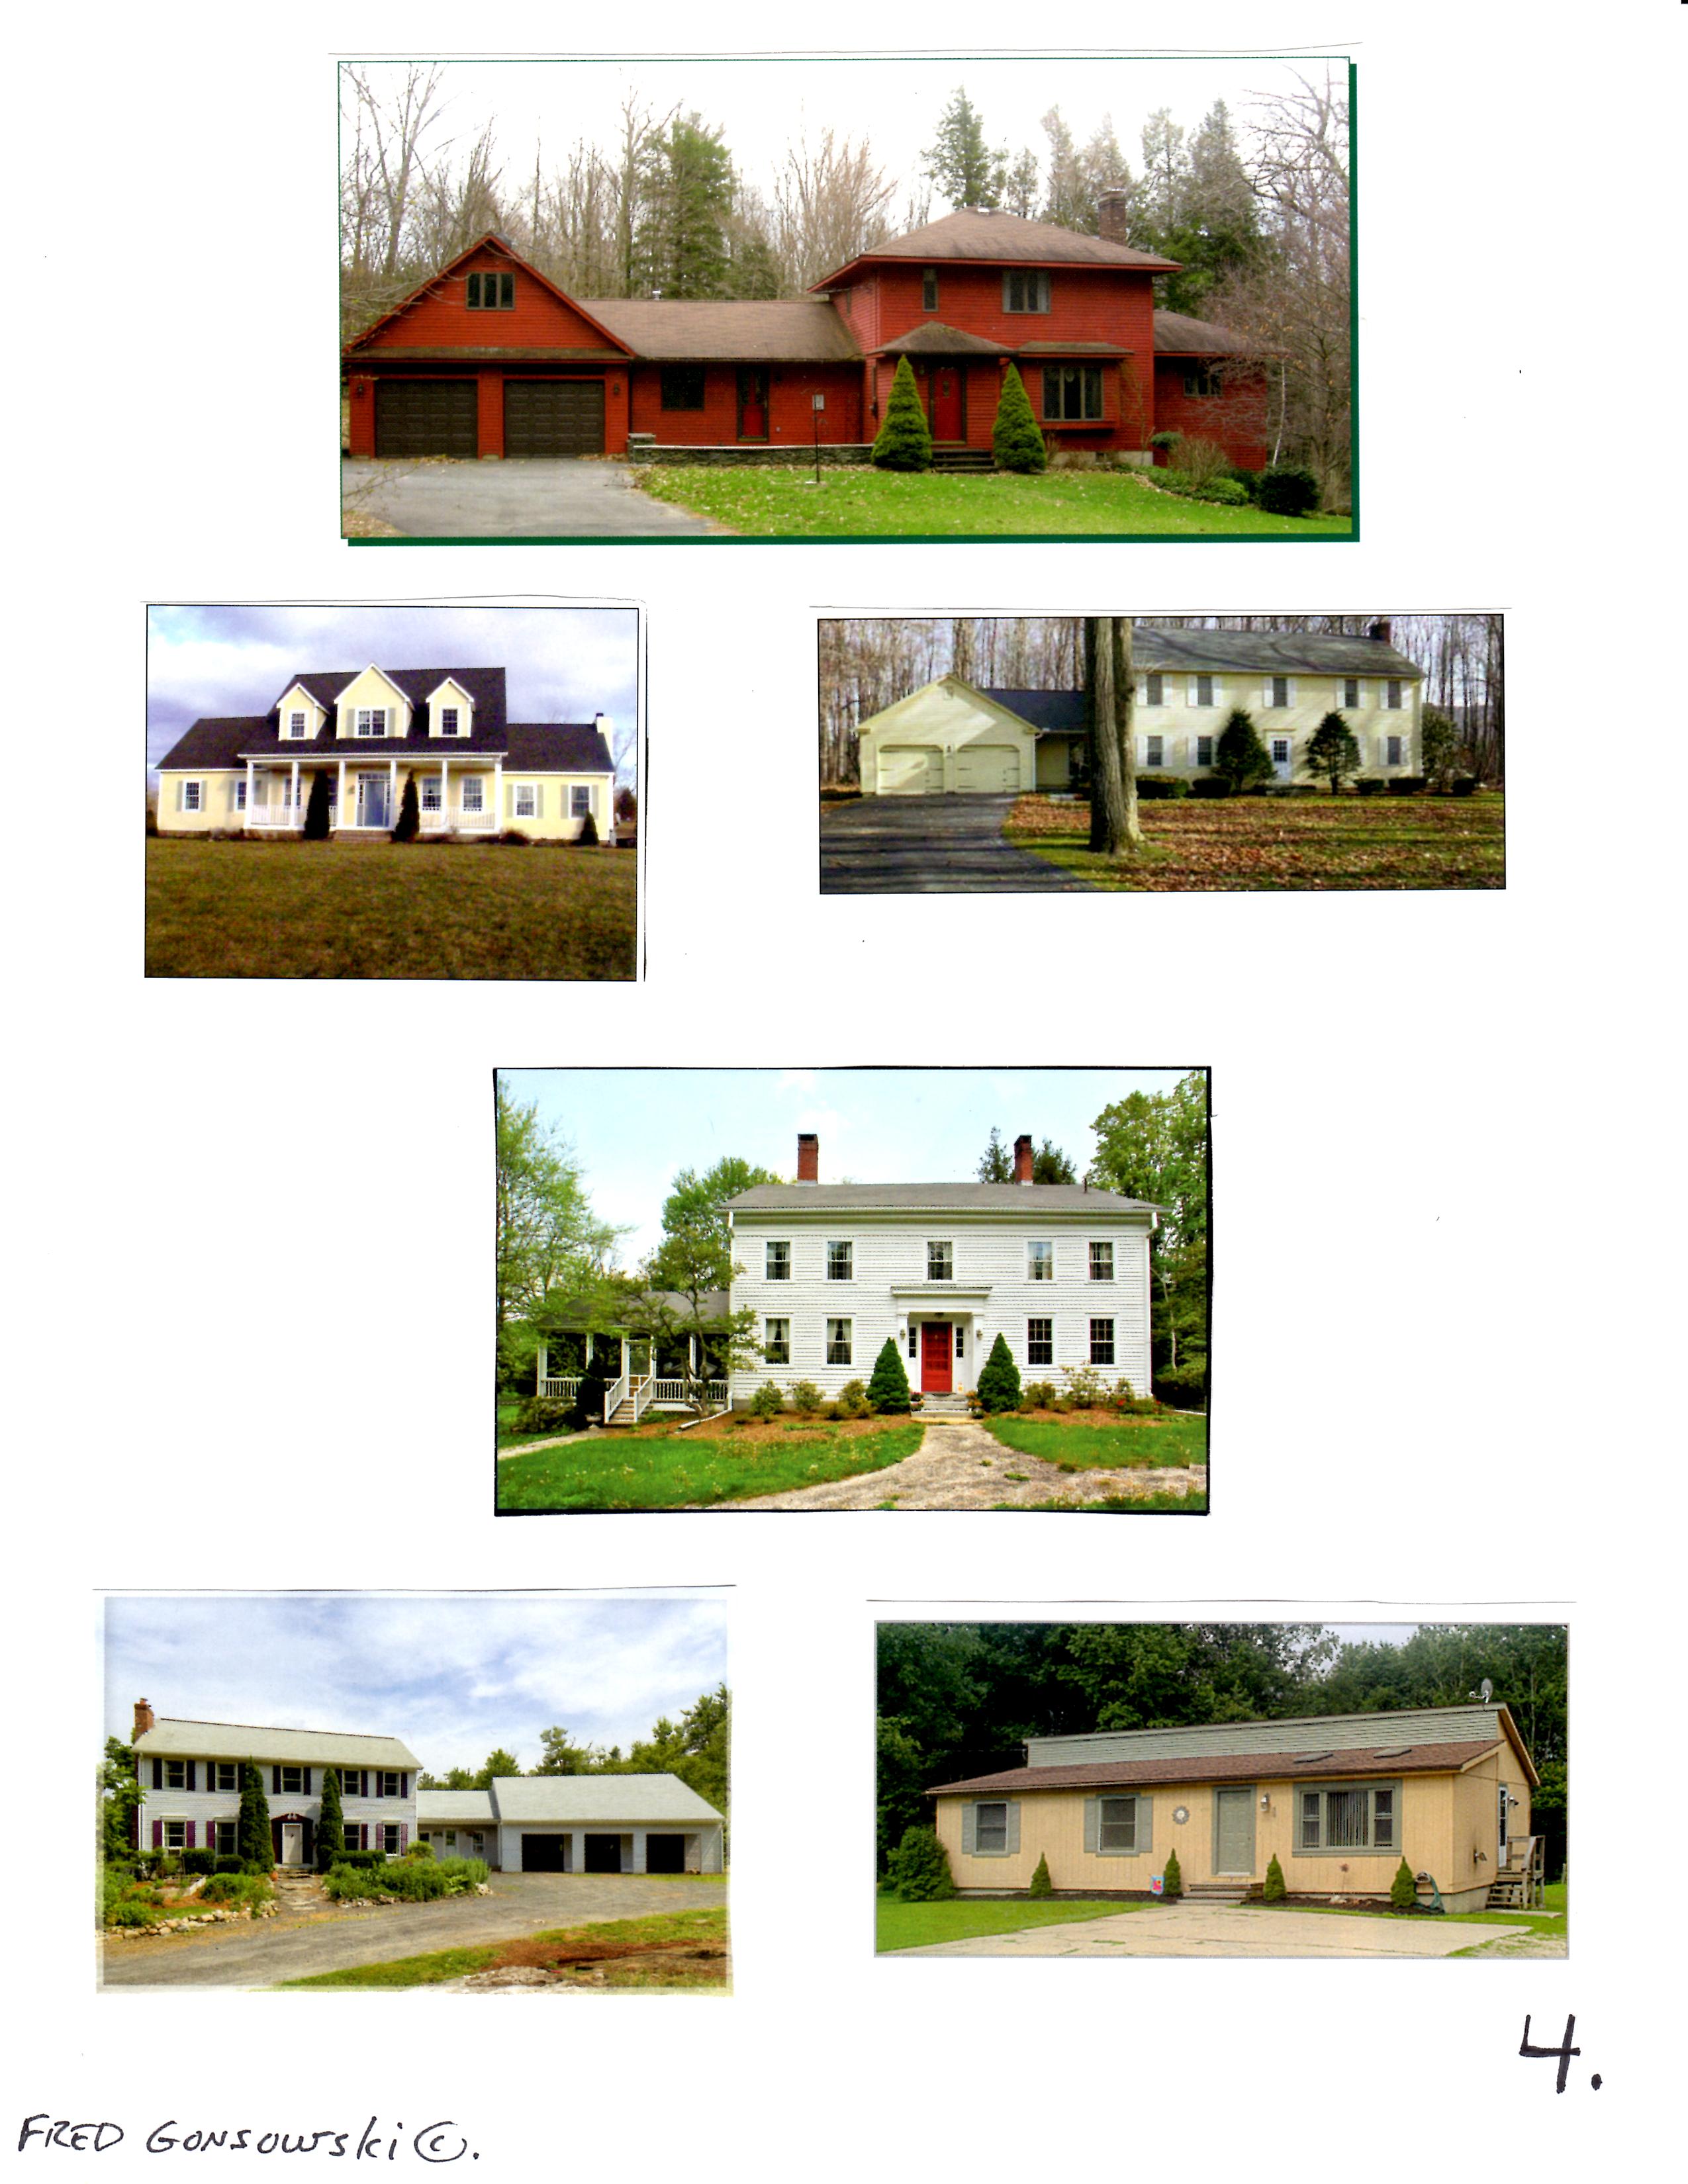
Now lets look at photos / illustration 4. Illustration 4 shows six examples of the wrong way of siting foundation plants. Remember earlier in this post, when I said you don’t want to chop up the front of your house into pieces with foundation plants? Each of the front facades of these houses are chopped up into pieces by the columnar / pyramidal shaped plantings place in front of them. These photos show the right plants in the wrong locations. By just moving the foundation plant to the ends of the main facades of each house, the evergreens would have beautifully framing the houses. 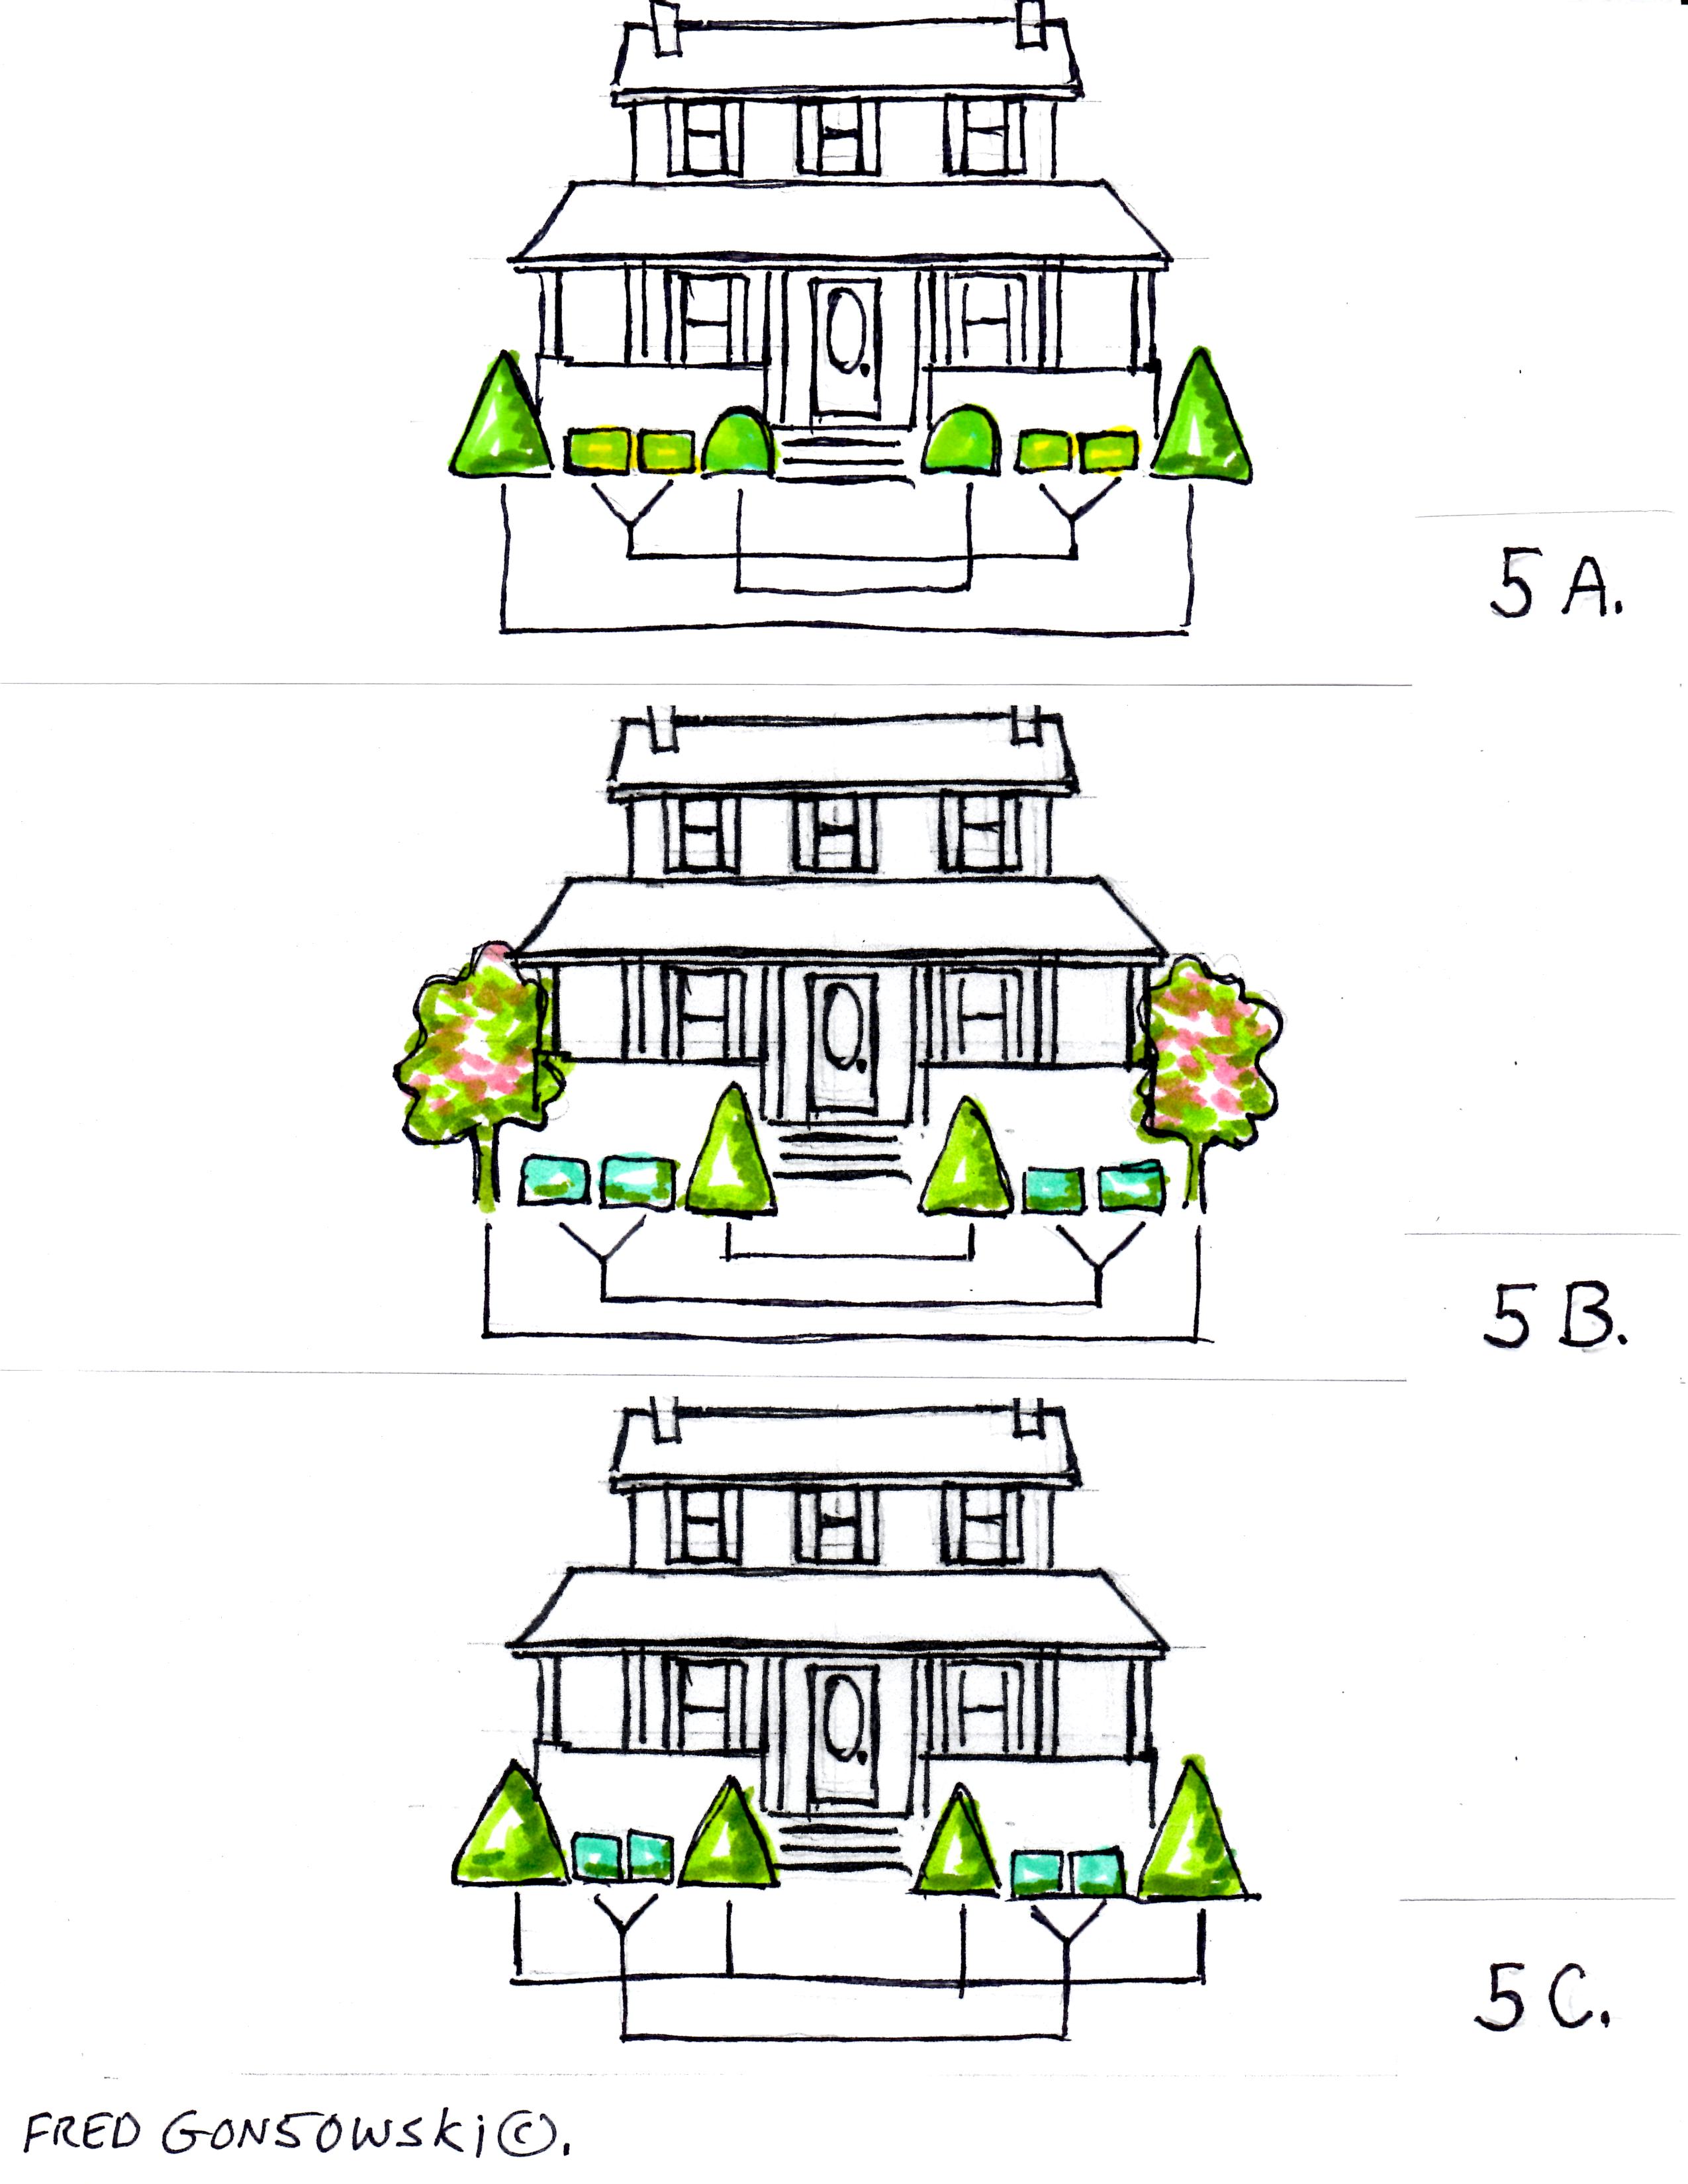
Illustration 5A (and many of the following illustrations) shows the smile I talked about earlier (higher on the ends, and somewhat lower toward the middle). The lines and arrows that go across the bottoms of the illustrations were put there to help you to see how the same plants were used for shape and repetition of variety of plant. Illustration 5A shows pyramidal, with spreading and mounding (just like I showed in illustration 3A).
Now in Illustration 5B we take the same house and shows how two dwarf trees (that when mature will only grow up to the eves of the porch) are positioned at the ends of the porch. Their taller growth habit makes the high ends of the smile. Two pyramidal yews were placed on either side of the porch, but because the yews are not that tall and you have the height of the trees that frame the ends of the house, the yews don’t seem to cut the movement that runs across the front of the house. Your eyes seem to sweep across the front of the house easily without being stopped by the yew.
Illustration 5C shows four pyramidal yews (the same size) planted in front of the house. I like this planting the least. The pyramidal yews seem to cut up and segment the house’s facade; they also seem to become the focal point of the illustration, verses the front facade of the building. As with illustration 5B, if taller pyramidal plantings were placed at the ends of the house, the two pyramidal yew planting along the porch would be just fine. 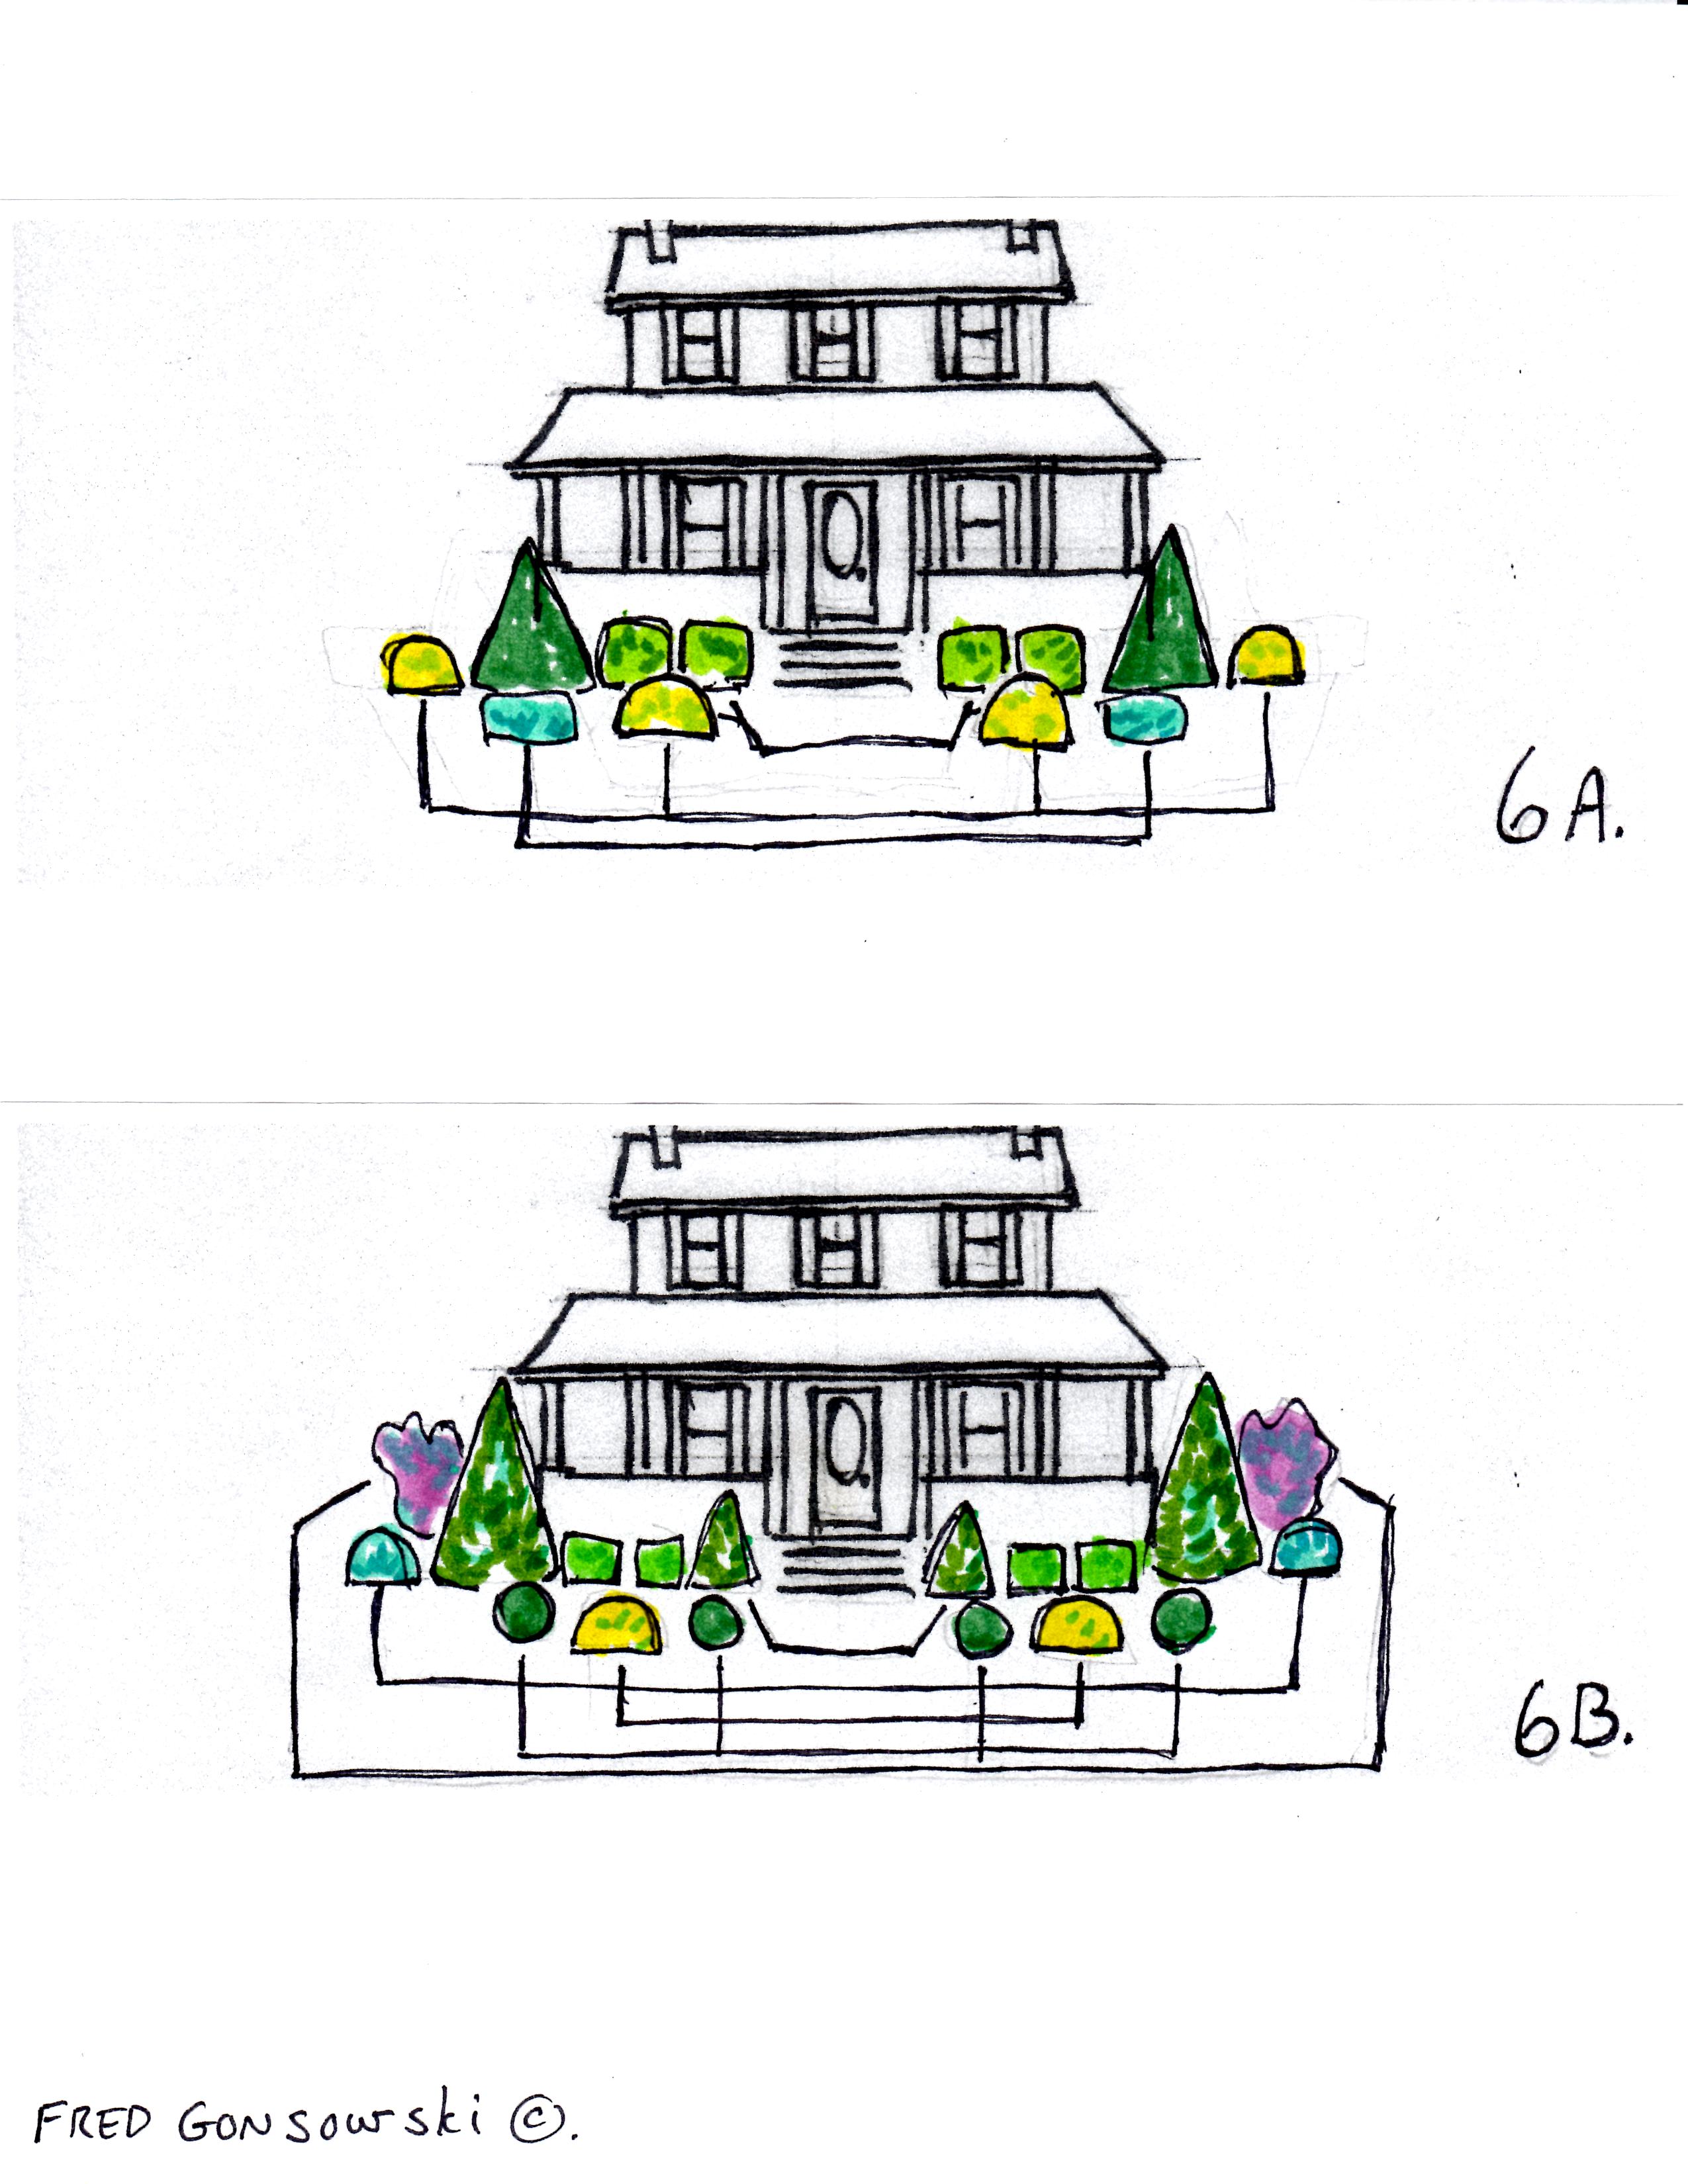
Illustrations 6A and 6B takes the planting patterns a little further. In illustrations 5A-5C I showed you some ideas for planting a single row of plants across the front of the house. In illustrations 6A and 6B a second row of smaller bushes is put in front of the foundation plants planted closest to the facade of the house. Notice, by following the lines across the bottoms of the illustrations, how the same plants were repetitively planted for diverse shapes, and possibly as specimens, across the front of the house.
It’s easy to plant foundation plants in front of a house with a symmetrically balanced facade, but many houses are not shaped that way. The next illustrations show ways of planting foundation plants in front of houses that have asymmetric facades or many roof lines coming together. 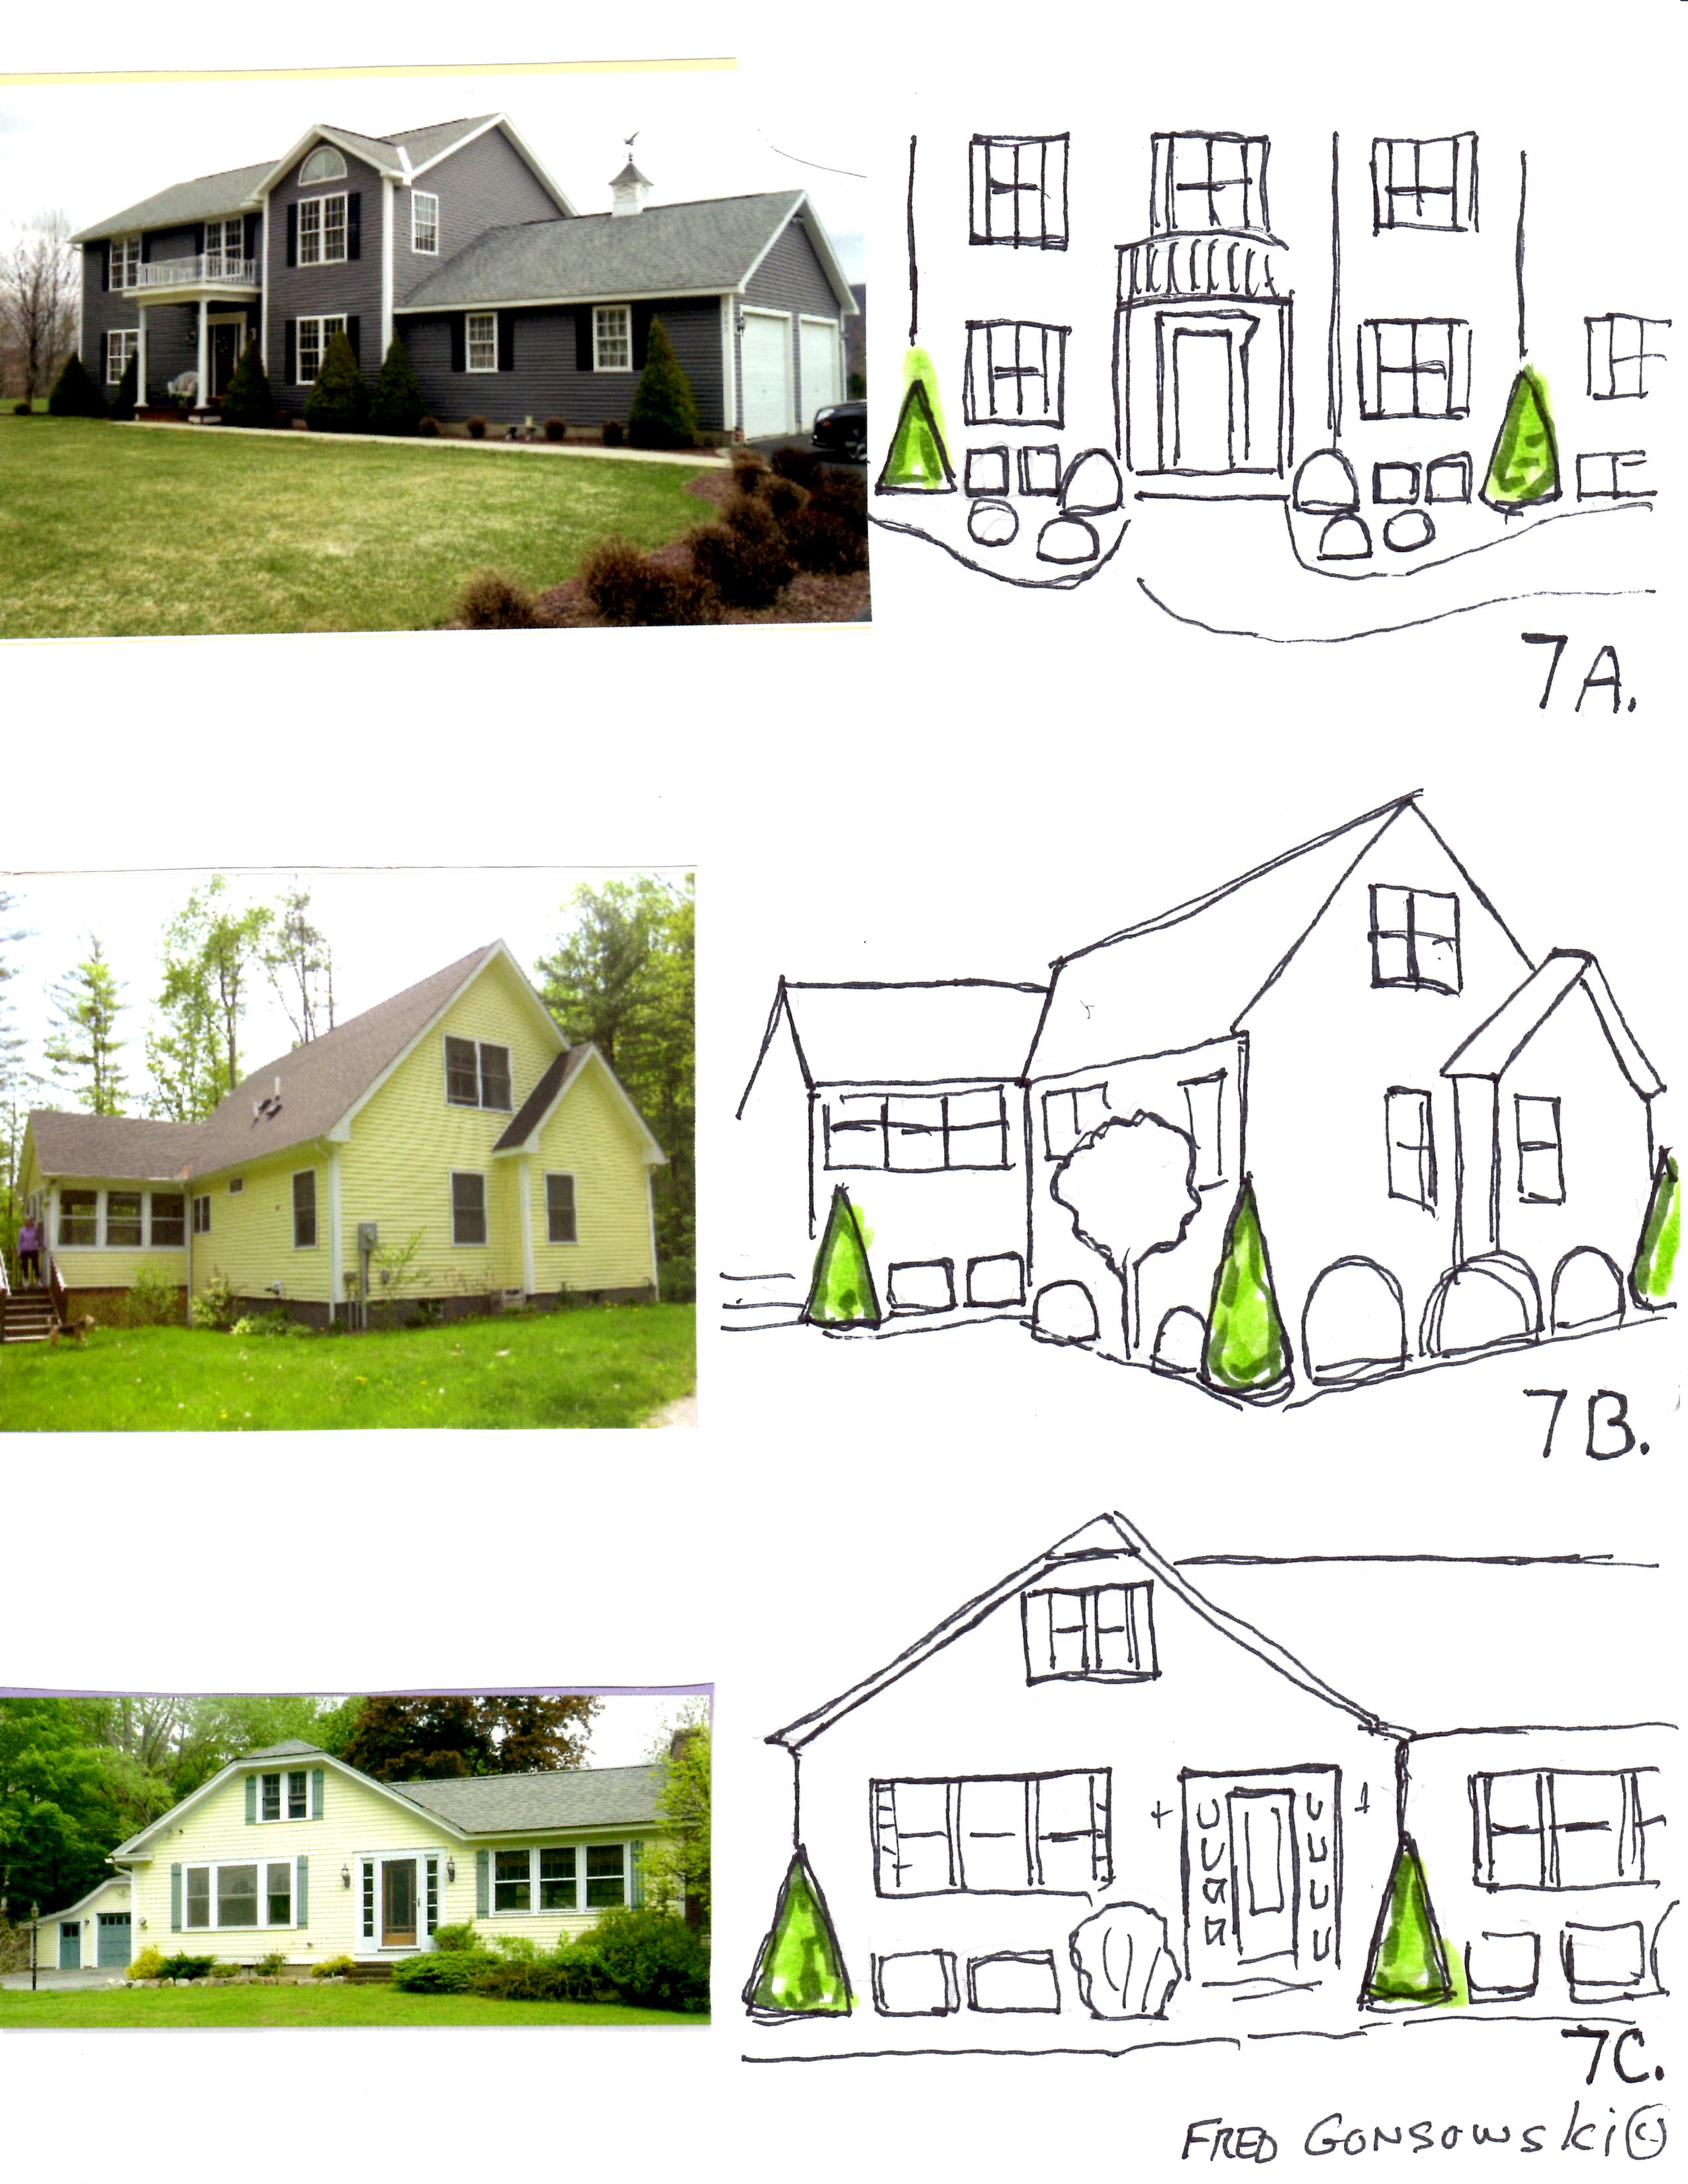
Illustration 7A shows a house with gabled roof lines coming off the house in different directions and at different heights. With a house like that try to look to see if you can find some symmetry in it. Looking at the photo of the house, notice how to the left of the front door are two windows. Next look at how two windows are also to the right of the front door. In illustration 7A, I took the spaces that are both to the left and right of the two sets of windows (as seen in the illustration) and started planting my smile there with taller / higher type plantings. By punctuating the facade of the house there with the taller plantings, the porch, entryway and two sets of windows are framed, but the house is not chopped up into pieces.
Illustration 7B shows a house with two gabled roof lines on the front facade. Here again, I looked to see where the symmetry was, and it is where the ends of the eves line up with each other on both sides of the front of the house. At that point I added the taller plantings to frame the house and added another planting, using the same plant type, close to the side steps on the left to work the same plant materials and shapes around the building. Notice on the left side wall leading from the front facade to the side entry porch how a dwarf tree was planted to fill in the empty space where you have no window(s) on that part of the house.
Illustration 7C shows a house with two different directed roof lines. In this one, looking at the illustration, I used the main gable end, positioned on the front facade of this house, and looked to see where it symmetrically ended and planted my taller framing plants there. 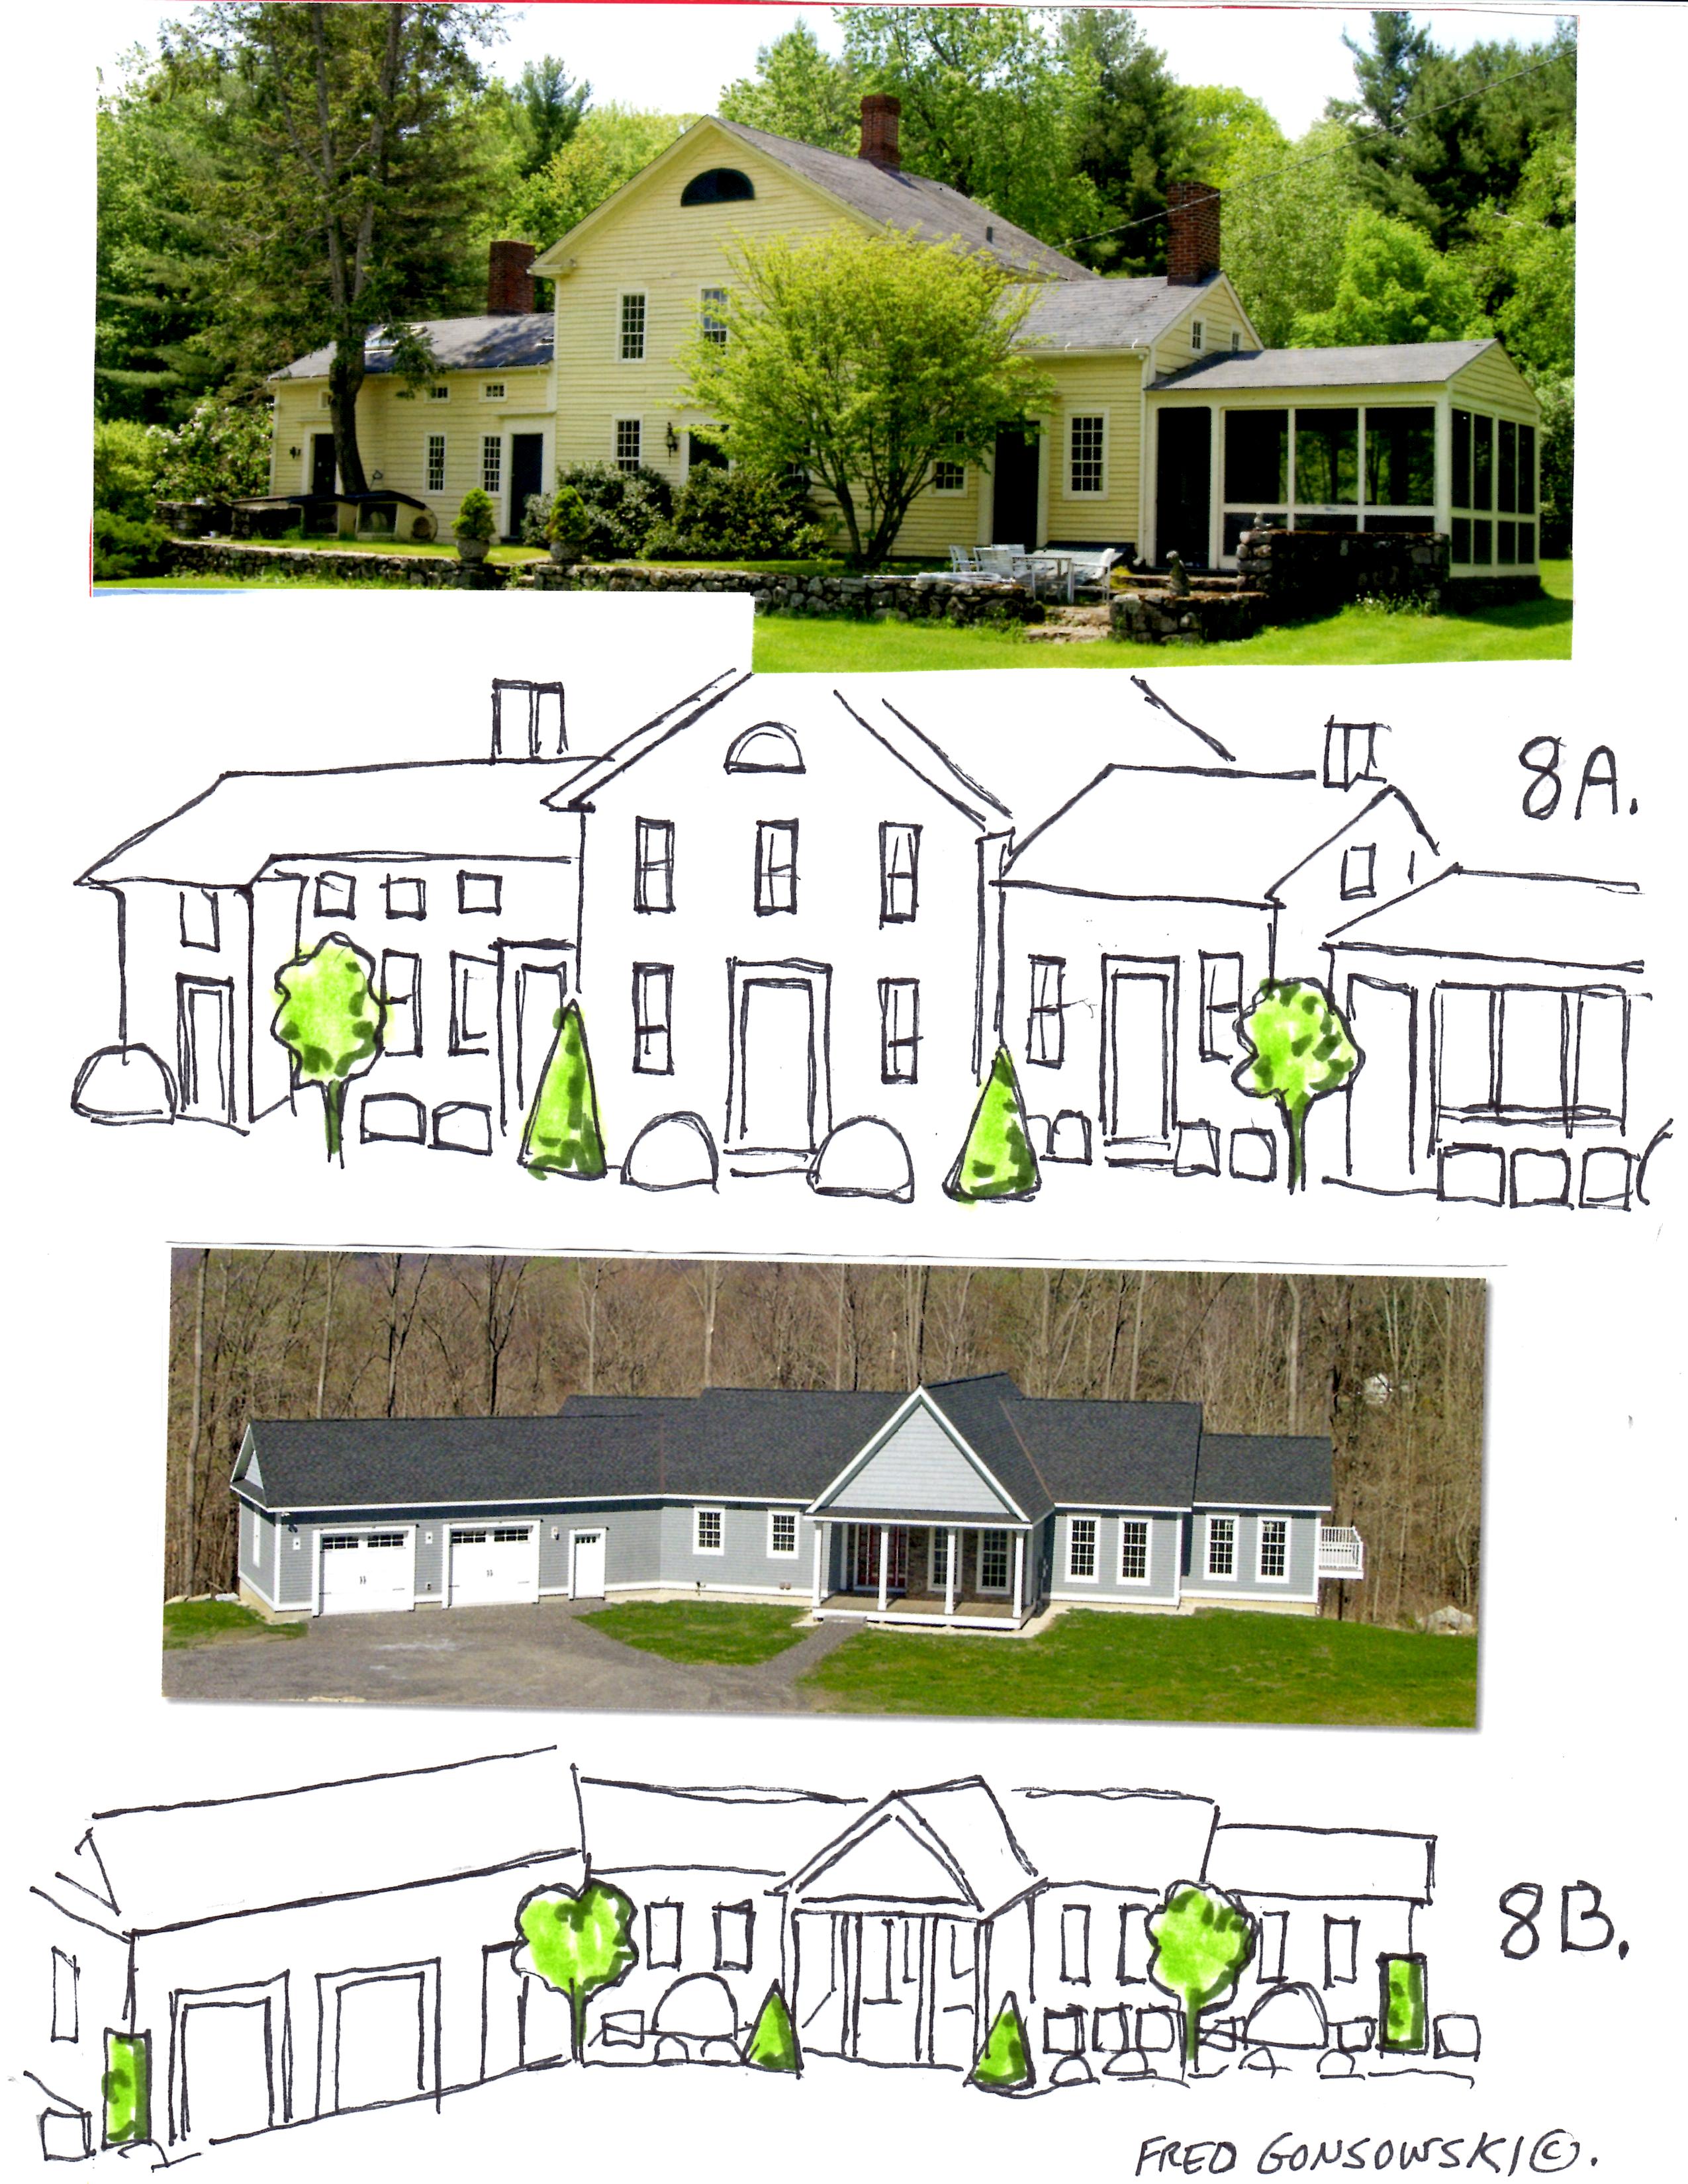
Illustration 8A shows a house with many different roof lines coming off of a house with a two and a half story center. The natural place to punctuate the facade with taller shaped plants is at the ends of each place where the roof lines change, as I have shown in the illustration. Also notice how in my illustration how mound and spreading or upright shaped plants are also repetitively placed across the front of this house.
Illustrations 8B shows a house with one long sweeping roof line. Looking at this house, I looked for the symmetry of the front of the house, and it was created by the two sets of windows that are both to the left and right of the covered front porch. At that point I thought two dwarf trees should be placed to frame and soften the front of the house; they also are the tall elements creating the smile. The tree used on the left also has a way of filling in the large expanse of empty wall that looks to be between the main house and garage area. Columnar plantings were used at the far ends of the house and pyramidal plantings frame the ends of the covered porch. Also notice the repetitive use of mound shaped and spreading / upright shaped plantings. 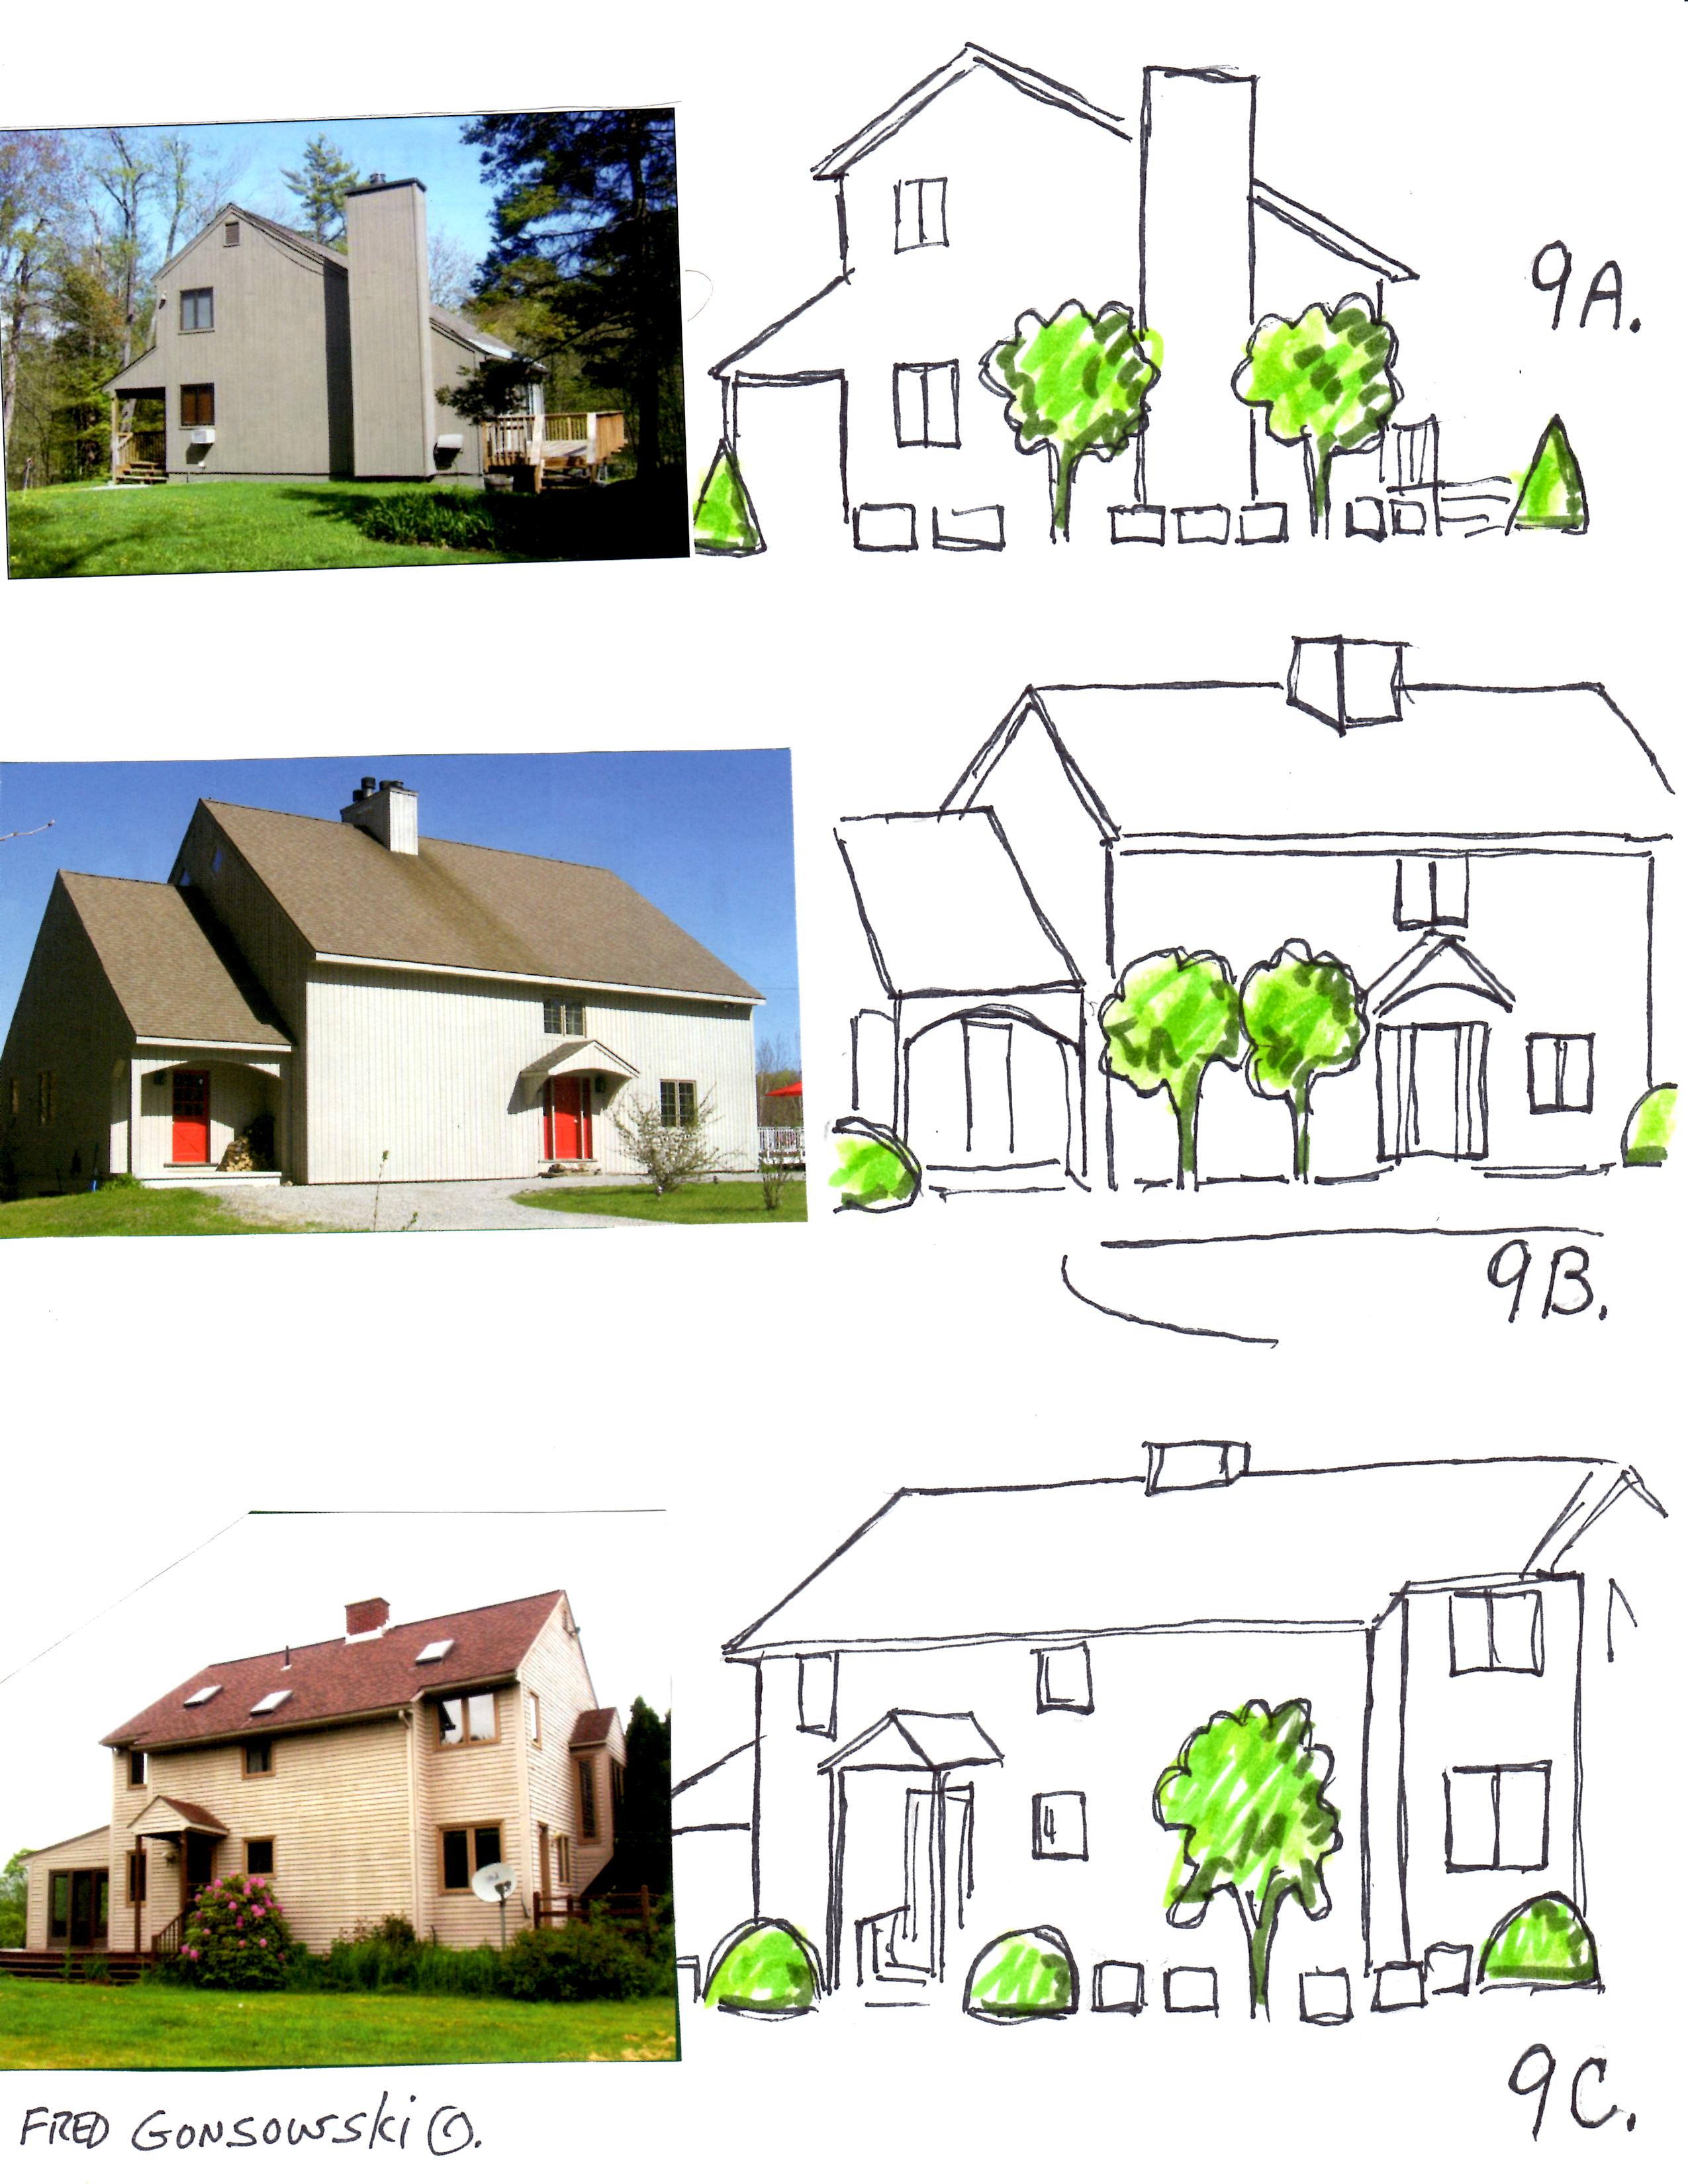
Illustrations 9A-9C show how plantings of dwarf trees with growth habits that are not too tall or too wide can help fill in blank walls around a house.
Illustration 9A Shows how two matched trees are planted along the side of a house as a facade softening agent. Two shorter pyramidal bushes and a repetitive planting of many of the same kind of spreading bushes tie everything together and finish off the look.
Illustration 9B shows how two dwarf trees are planted to the left of a house’s entrance that has a window to its right. Besides filling in the large expanse of empty wall space, you are, with the volume of the trees, “making” / counterbalancing the front door and window with plant materials (two trees). Notice how two mounding bushes are added to the ends of the house for symmetry.
Illustration 9C Shows how one dwarf tree is placed to the right of the front porch with entry door. In this case, like the house in 9B, the tree is counterbalancing the front porch. The tree is about the same size as the width and height of the front porch.
When thinking about planting trees close to a house, the best place to find them is at better garden centers in your area; big box national hardware stores with garden centers might have some, but your choices will be limited. Tell the people at the garden center what you are thinking about doing and have them show you the dwarf trees that they think would work best in your climate. Know up front how much space you have to work with. You don’t want to plant a tree that grows 10′ to 15′ wide in a place where you only have 8′ or 10 feet of space for the plant to grow in. Also know which side of your house the plant will be eventually sited. You don’t want to plant a dwarf tree that needs full sun (6 plus hours of direct sunlight daily) on the north side of your house which gets no direct sun. Take some pictures of the side of the house you are going to plant the tree on showing the full width of that side of the house and the height of the roof line. By doing that the garden center will be able to isolate the right tree to fit your spot.
When planting trees by your house don’t plant them in the direct area where your sewer, septic or water pipes come into your house.
Drive around upscale new developments in your area, and look at how the professionals have sited foundation plants. Even the professionals don’t always get it completely right, but you will see a lot of the concepts I’ve covered in this post. Even if you live in a tiny cottage, still go and look at how the higher priced homes have been planted. You might not be able to do a full display like they have, but you might be able to isolate part of a grand design and adapt it to your own foundation garden planting scheme.
Another thing I want you do is to take a picture of your house, blow it up, and then print out a few copies of it. With a marker or pen, using the concepts I’ve covered in this post, start drawing the shapes of the six classic foundation plants on your house’s picture until you come up with a planting scheme that you like. When I started making the drawings for this post, I drew out a few different planting options until I ended up with what I thought I would be presenting to you.
Another thing I want you to do is to measure the exact length and width of the space where your foundation plants will be sited. When going shopping for bushes, look carefully at the tags to see how wide and tall a bush or tree will be at maturity. Knowing how wide each plant will be at maturity, space them out so in five or ten years, when they have matured, they will have formed nice shapes and are not all growing too close together. Too often people look at a small plant in a container and think they need more planting product than they really have to buy. A smallish plant put in the ground today, in three to five years might double or even triple its size.
So there you have it, some ideas that I hope inspired you on planting foundation plants. I’ve written some other posts that I feel will also be of help, they are listed below.
Companion Posts…
Distance Foundation Plant from your House when Planting 5-3-2012,
Putting Foundation Plants across the front of your House 10-21-2013,
Some ideas about Planting Trees by your House for Curb Appeal 4-26-2012,
Applying Fertilizer / Weed Control on the Lawn 4-27-2011,
Got Grass Growing out onto your Sidewalk or Driveway?… Edge it! 8-26-2012,
Why Rake Leaves, Grind them with the Mower 10-15-2010,
Picking the Right Paint or Siding Color(s) for your Home 10-19-2011,
Choosing the Right color Roof for your Home 10-7-2011,
Picking a Color for your Front Door 1-17-2012,
Siting a Garden Shen on your Property 6-9-2012,
Looking at Evergreens in the Garden 1-31-2012,
Evergreens are Winter interest in my Garden 1-24-2012,
It’s Easy to Grow Pussywillows 2-15-2012,
Dividing Miscanthus Grass, not easy, BUT you can do it 12-12-2011
Raspberries…Planting and Pruning 2-9-2012,
Growing a Topiary from an Upright Yew 6-15-2011,
Looking at Evergreen in the Garden 1-31-2012


Nice! Simple to understand. Thank you!
You’re Welcome ;-}
Hi Fred,
Just read your article on foundation planting and your examples are amazing. I’m not sure I “get it” for my own home though as its asymmetrical. Do you do custom designs?
Thanks,
Lynn
Hi there Lynn, I don’t do custom land scale designs, I just try to inspire people with my blog articles.
I need to read this with a fine-toothed comb. So much to digest and hopefully apply. My house has so many micro-climates it’s hard to get it all straight. Fortunately, the plantings are old and have “good-bones”.
Hi Fred. You have no idea how many of my friends and I read your blog. It’s the most informative, and exemplary garden blog around. It’s so filled with great information which you back up with those GORGEOUS GORGEOUS ILLUSTRATIONS.
I wanted to know if I could have permission to make a copy of some of your color illustrations to frame for my personal use in my home. They rivet me every time I see a new one. You have such a beautiful hand, so perfect, yet simplistic if that makes sense. It’s just enough. Not overdone. Like landscaping. Just enough. Not overdone where you lose any sense of symmetry and design. Where your eye doesn’t know where to go but not because you want to look at everything, but because you can’t make sense of what the intention was.
You have beautiful garden drawings and a fantastic storytelling talent.
Boy do I wish I could hire you 🙂
But alas, I’m thrilled to just be able to use your art work.
Please let me know.
Thanks.
Karen
Hi there Karen,
if my drawings are reprinted for your own personal use, and not printed and resold anywhere, I say do it. My suggestions is to, if you can, print them to a size where you can put them in a pre-made mat, like an 8×10, 9×12 or 11×14 inches, outside dimension of mat, so if you want to hang them up, you can put them in an inexpensive frame. I’ve always wondered if people had printed off and hang up my quickly magic marker and colored pencil pictures, and use them for other things. Putting things up on the internet, my things seem to go out far and wide, last year people in 162 countries looked at my pictures and articles.
Thanks for your comment ;-}
I have just stumbled upon your posts I have spent all evening reading many many of them. All are so informative and interesting. I have bookmarked you and will be back. Thank you!
Hi there Beth, thanks for your comment, come back soon and tell a friend or two that I’m here ;-}
This is the most helpful article I’ve ever read about foundation planting. So glad I found it! Thanks for providing all this great info!
Hi there Francesca, Thank You for your quick note. Soo many people read the articles, but it is that rare one person here and one person there who comments ;-}
Fred,
This is by far the best article I have seen on planting. I was happy to see that I already do some of what you suggest, so that made me feel I am on the right track. You have a great way of explaining things and I really learned a lot!
Hi there P.W. Thanks a MILLION for your comment. It is a rare person who ever types a note to me saying something has worked or inspired them. For like forty thousand articles read, I get about five comments. People must be just too busy with life’s issues, or are just too afraid to write a line or two. Read the two other articles about planting foundation plants that would come under Companion Posts, they will also get you thinking about the topic. Have a wonderful Summer ;-}
Thanks, Fred! I am inspired by your garden to work more on my own! I am looking forward to going back and reading all of your earlier entries, so expect more comments! 🙂 Enjoy your summer too, among the beautiful setting you have created, or in someone else’s vision that you visit!
You are amazing!! I have been moving shrubs and perennials in my foundation planting for 4 yrs. now and could never seem to get it right. I may actually be able to move the wheel barrow out of the front yard now. THANK YOU!!!!
Hi there Debbie, you can still leave the wheel barrow in front of your house, just paint it a pretty color and use it as a planter ;-}
Fred, I love your blog just the way it is. You don’t need to do anything different than what you already do. You don’t need pop or bling. Your drawing are art and I know you spend a lot of time preparing your posts. You are a wealth of knowledge that does not need bells and whistles to be successful. In fact, I love your blog because it is a nice quiet read. Please don’t change a thing! 🙂
Hi there P.W. I’m not going to change my blog a bit. If you were looking at the comment from that “Spam Person” don’t pay one bit of attention to it. When my blog started having more than one thousand page views / articles read a day, the daily spam rose to sometimes almost two hundred tries, and a certain amount of the spam gets through to the posted comments. WordPress controls a large amount of it, but spammers are getting more devious with their ways of trying to attack websites. Daily I have to look at the comment area on my dashboard, and delete them so they don’t litter my website. I’ve been past busy with projects, and soon hope to be able to have time to write new things that will hopefully inspire my readers. Thanks for your comment, it is most appreciated ;-}
Spammers should just take up gardening if they have so much free time on their hands, Fred lol!
P.W With all the websites deleting spam constantly, I wonder why the spammers even want to put the effort into writing it. Some spammers write short things, while others write things that are paragraphs. The most common comment from spammers are “I just found your site and bookmarked it, or I found your site and told a friend”. Companies like Disney Cruises, Michael Kors and Louis Vettone are constant spammers, as well as sites that sell male anatomy enlargement products. Spam also comes in foreign languages and some spammers even take parts of a person’s website “title of post or person’s name” and add it to their pitch. Spam is just one of those things that a website has to contend with, though sometimes it is fun/funny to read.
Thank you. This is the most helpful site I have found in two years of trying to plan something.
That’s because Fred is the best!! 🙂
This is enormously helpful. I now feel confident that I can make a success of replacing the large shrubs in front of my porch. Your illustrations are beautiful and really bring the information alive. The photos of real houses to back up your points (good and bad) is the perfect finishing touch. Thank you for working so hard to share your expertise.
Well! I love this! However, what in the world are you supposed to do when your brick foundation has many windows in it? and how do you manage around that without blocking everything when there is limited space? stick a boxwood in here and there?… and make sure the rest are small plants? Unlike block foundations , I happen to think our brick is nice looking (1880’s victorian) (with a rounded porch… ) thanks for this excellent article!!!!! very nicely done =)
Hi there Jessica, I would say plant some (a pair) evergreens flanking the front porch, and just at the edges of the house, leaving the windows completely exposed. Take a front on photo of your house and print it off a few times. Take a marker, crayon, pencil, ow whatever and try drawing in spots of green to represent foundation plants, and try to do a repetitive pattern that works across the front-sides of your house. After that try to find real plants that represent what you’ve drawn. Also think about grown hugging evergreens for in front of the windows, or just having mulch. You could also have matched puts/urns in places instead of having foundation plants. Place a square paver on the ground first as a base, then place the planter on it. You could plant some kind of flowers in it, or just use foliage. Good luck with your project.
Ahhh! I absolutely love this Blog. You’re very talented. Thank you for sharing all of your ideas along with photos and explanations to help the reader conceptualize and visualize them…I’ve been searching the web for years looking for landscaping ideas/explanations that may help me plan a layout for foundation plants for the front of my boxy 1970s ranch style split-entry home. Believe it or not, there’s limited info anywhere on how to landscape a split entry to soften its appearance and make them more appealing. Although It doesnt show a concept specifically, your blog is the best, most informative one yet! Now overwhelmed but excited about all the possibilities, I’m hoping to seek your advice. 🙂 how would you landscape a boxy 1970s split entry home? I live in a zone 5 area and the area closest to my house gets exposed to the morning sun only. I could send you a photo of my home if you would like?
So glad to have found this website, after exhaustive searches I haven’t seen anything else like it. I need some help please, Fred. Per the previous poster, aimee, I also have a 1970 “Hi-Ranch” that has the typical overhang eyesore which cuts the front of the house in half horizontally. I have a portico with columns at the entryway, with a 2 foot wide strip of river rocks along each side of the entryway platform. The river rocks cover drainage pipes that were planted there because of excessive amounts of rainwater falling from a high pitched roof above, so I can’t remove them or plant anything in the rocks. I would love to do the “Smile” design but can’t because the drainage rocks have to stay, plus there are windows alongside the rocks. I’m in Zone 7a, about 20 miles northwest of NYC, and there are a ton of these cookie-cutter type houses around here with unpleasant landscapes. Aimee’s right, there isn’t much expertise online (or at the nursery centers) on how to make this type of house more appealing so whatever you advise would be greatly appreciated. Thank you in advance and thank you for this website!!
Hi there Margaret, soo sorry to have taken this long to reply, but life has put many things in my path, and the blog, at this point in time, is on the end of my list of things that have to be addressed.
Margaret could you place a large square “patio stone paver” on each side of the entrance of your entrance on top of the river rocks? On top of those stone pavers you could place a pair of large decorative planter and have them as focal points by your front door. If something like that could works find planters in metal or some kind of four-season/frost-proof material so they make it through a cold winter. Not seeing your house, I’m only guessing at what might work. Sorry to say, but my blog articles are just meant to inspire readers, I can’t do their homework for them. Best of luck with your project :-}
That’s a wonderful idea, thanks so much for taking the time to reply!
Thank you so much for sharing your expertise with me! My husband and I bought an older home on some acreage and are finally getting around to doing some landscaping work. I was feeling very overwhelmed with trying to choose things to plant and how to lay them out the right way, and your article provided lots of thinking points and a place to start. I’m sure I will be referring back to your advice many times in the coming weeks!
Hi there Amanda, thanks for your comment. I say you got it!, as my premise in writing this blog is to give people some direction and get them thinking. Best of luck with your project. Soon I hope to be writing many more articles to inspire my readers. Happy Summer to you.
This is really a great article. I don’t think any of the popular garden magazines that I read to figure out how to do landscaping ever had such an excellent article. Thank you very much for sharing such valuable information. Few questions. Can we follow the same rules when doing landscaping to the back of the house? I’m just thinking how do I implement the smile pattern to the side of the house(with AC units) and to the back of the house with a patio with some accent plants like(weeping cherry)? Trying to keep the flow from the front of the house to the side to the back of the house. Also any suggestions on what plants really go well ( boxwood, azalea) etc.?
Hi there KK, I would say that you don’t have to plant the smile on the sides of your house or back, if it does not work. I would say that you should change up the different kinds of planting materials from the front to the sides and back. If you use, for example, many upright yews in the front (their growth habit is to grow narrower than spreading yews, and they can be trimmed to stay short of height), then to keep the sides looking cohesive with the front, use just a few upright yews, (to keep the plant textures moving from the front to the side), but introduce a larger amount of something else, so it does not look like too much of the same thing, as you look from the front to the sides. Do the same with the back. Look at illustrations 7B which shows repetitive planting on the side of the house, and 9B which shows how a solid wall space could be addressed. I don’t like to suggest plants, as I don’t know where you live (what zone) and I wrote the post from a design perspective, versus a landscape one to get the reader thinking about what could possibly work in their area. Good luck with your project ;-}
How generous you are to share these techniques. Some are intuitive, but in 1990 I paid $200/hour and didn’t learn anything. Ready to redo big time.
Hi there Mary, glad to be of help. This website is all about inspiring and getting people thinking and I know you will do just fine with a few fundamental instructions. Have fun and hope 2016 is your best gardening year ever!
Hi Fred. I LOVE, LOVE, LOVE your illustrations & posts. They’ve been so helpful as I tackle my own landscaping and attempt to help others with theirs. May I use a few of the illustrations in a slide deck I’m putting together, please? Be assured I’ll credit you in large-sized font.
Hi there Michele, use what you want illustration wise, but as you said credit this website Fred Gonsowski Garden Home.com It’s snowing here today in up-state New York, so anything that is garden related looks to be soo comforting, as it heralds things to hopefully come soon.
This was incredibly helpful!!! Your illustrations are beautiful and your descriptions so helpful. Just bought a house with dead or overgrown landscaping and desperately needed some guidance. I have a cape cod style home with a front porch that wraps around the right side but not the left. When looking at my front door I have less width in my front left flower bed than the right. Unsure how to make the two front flowerbeds look cohesive. What would you recommend?
Hi there Amy, just keep the plant material on both sides of the front door the same. It really doesn’t matter if there is less on one side and more space on the other, just having similar plant material ties things together. All of gardening is really about repetitive planting so the eye keeps moving from one place to the other, versus planting just one thing ( like a specimen plant) and having the eye land on it and stay there. If you have a moment read my posts…When designing a perennial garden, it’s ALL about the Shapes of Leaves, ….How to Plant (Design) a garden, Mass versus Specimen Planting and Colored Foliage adds the WOW Factor to a Garden, those three posts will get you thinking about shapes of foliage and color of plants. Also look at Looking at Evergreens in the Garden, that post will think about textures and growth habits of evergreens. Amy glad you liked my post and hope my extra posts are inspiration, Happy Spring to you.
Well you have done it again. I am now redoing the foundation plants around my home and was surfing for ideas and was directed to this article. You are the man!
Hi there A.B., the man, wow ;-}
Hi Fred! This is awesome and I can’t thank you enough for this information. Really easy to understand and great pictures. I have a question for you regarding figure 7C and would love to see the rest of the drawing if possible. Would you plant the same taller framing plants at the far right of the house? Thanks in advance and again awesome blog.
So far I’ve read both of your articles on foundation planting, and your articles gave me the confidence and inspiration to be able to work on my own front yard landscape. See my neighbor directly across the street from me owns his own landscaping company, so his yard is beautifully landscaped and maintained by his workers. We brought this house 5 yrs ago, and everything inside and outside the house hasn’t been maintained since the home was built over 25 yrs ago. The last 5 years, we have totally updated the inside, and now I’m researching the outside. I didn’t even know what foundation planting meant until I read your first article. I was at Lowe’s yest, looking at the various tags, saw foundation, screening, and a few other various descriptions that I jotted down on my notepad to research further to get a better understanding of what are these, where do I plant them, and the variety of diff kinds for my zone. I will also listen to your advice and go to a local nursery for my trees, instead of Lowe’s. I have been very intimated whenever I would walk out my front door and look at the landscaping of my yard, esp with the professional landscaper living directly across the Rd from me. But your articles have given me great confidence to now know what I need to do to make my yard just as beautiful as my neighbor. Thank u so much for your attention to detail, examples, and diagrams…I’ve never comment on these articles, but u def helped me out so much this morning. Can’t wait to show your article to my husband!!
Hi Fred,
These are the best designing principles ever – thank you so much!
I was wondering if you would be interested to take a project of selecting plants and planting locations for my house front.
Thank you again
Hi there Vlad, I give, hopefully inspirational advice, I’m not taking on projects. My blog is read by people around the world. Each country, climate zone, etc is different, and plants are not the same everywhere, so I would not know where to begin. Read the companion posts that I’ve also included with this article, there might be some extra information, there that will help you. Happy Gardening, Stay Safe, and best of luck;-}
Hi, I’ve came across your blog and have gotten so many wonderful tips and advice! I’m getting ready to start our landscaping on our new home and I feel like I’ve just over thought every idea I’ve had as far as design/silhouette that I need. Do you, by chance, offer services where I could send you a photo of my house and you could tell me your opinion on the best design. Thank you so much, thank you even more for your time and gracing me with your knowledge!
Just like one of your other articles, this is exactly the infoi was looking for! The text and illustrations are very helpful. Thank you!
Hi there Chass, glad to be of assistance.
I just found this article and it’s so helpful!!! What about homes that have garages in the front? We have a ranch style home with a 3 car garage taking up the entire left side of the house and a turret and recessed porch taking up the right side. I’m stumped about how to plant!