


Two views of one of the Gallery Walls in my cellar.
The idea of assembling many different kinds of artworks on one wall, or even on all four walls in a room has been around forever. We all have seen photos of the great houses of Europe with walls soo covered with things, that hardly, if any wall color or covering is even seen between what was hung up.
Recently after going through my mother’s cellar and looking through things at my own place, I decided to hang my own gallery wall, or should I say gallery walls, in one of the rooms down in my basement.
Between all of the things stored at my mother’s place and mine, I found a large collection of samples of different kinds and styles of artworks that I had made over the years; some going all the way back to the 1970’s. Those pieces, now hung up, are a visual history showing different periods of my creativity. The instillation of the gallery walls went pretty quickly, after I figured out how to hang things; here are the steps I took
Step 1 Mapping out Your Arrangement
Lay out your artworks along the wall where you will be creating the gallery. Start by placing your largest pieces first. Try to have one large piece in the middle / center of your wall and place other large pieces at the beginning and ends of your gallery wall. You don’t want all the large pieces just in the middle or clumped together at either of the ends; but scattered along your wall. If you can, have something large in the first 1/3 of your gallery space, something large in the second 1/3 (center) and something large at the third 1/3 point.
When grouping artworks (paintings, prints, photos or posters) together, try to place things together that share a similar color story. If you have a large piece with orange on it, for example, try to put some other thing next to, or below it that also has orange as part of its color scheme.
When making groupings of art pieces always put large pieces over small ones, and dark, bright or bold things above artworks that are soft, light or pale of color. Small pieces, or thing in soft, light or pale tones will act as pedestals holding larger pieces up in space. If you reverse the pattern with large, dark, bold or bright on the bottom, and small, light or pale on top, your arrangement will be bottom heavy and the eye will be pulled downwards toward the bottom of your arrangements. Also consider the subject matter of your artworks when hanging multiple pieces one above the other. An artwork showing a mountain range would most likely be placed (above) toward the top, whereas a babbling brook, being more ground related, would be placed under it.
Directed Action is another thing that should be considered when grouping many images together. I wrote a post titled Making an Interesting Arrangement of Pictures; it covers right directed action, center directed action and left directed action. Knowing the principles presented in that post are a must when hanging pictures in a room, hanging patterned (pictorial) dishes and creating tablescapes.
Step 2 Locating the Top Line of your Gallery Wall
In interior decorating it is all about natural lines that are in a room and how they direct your eye across space. To read a full post on that topic look at Hanging Pictures Around a Room, which I wrote.
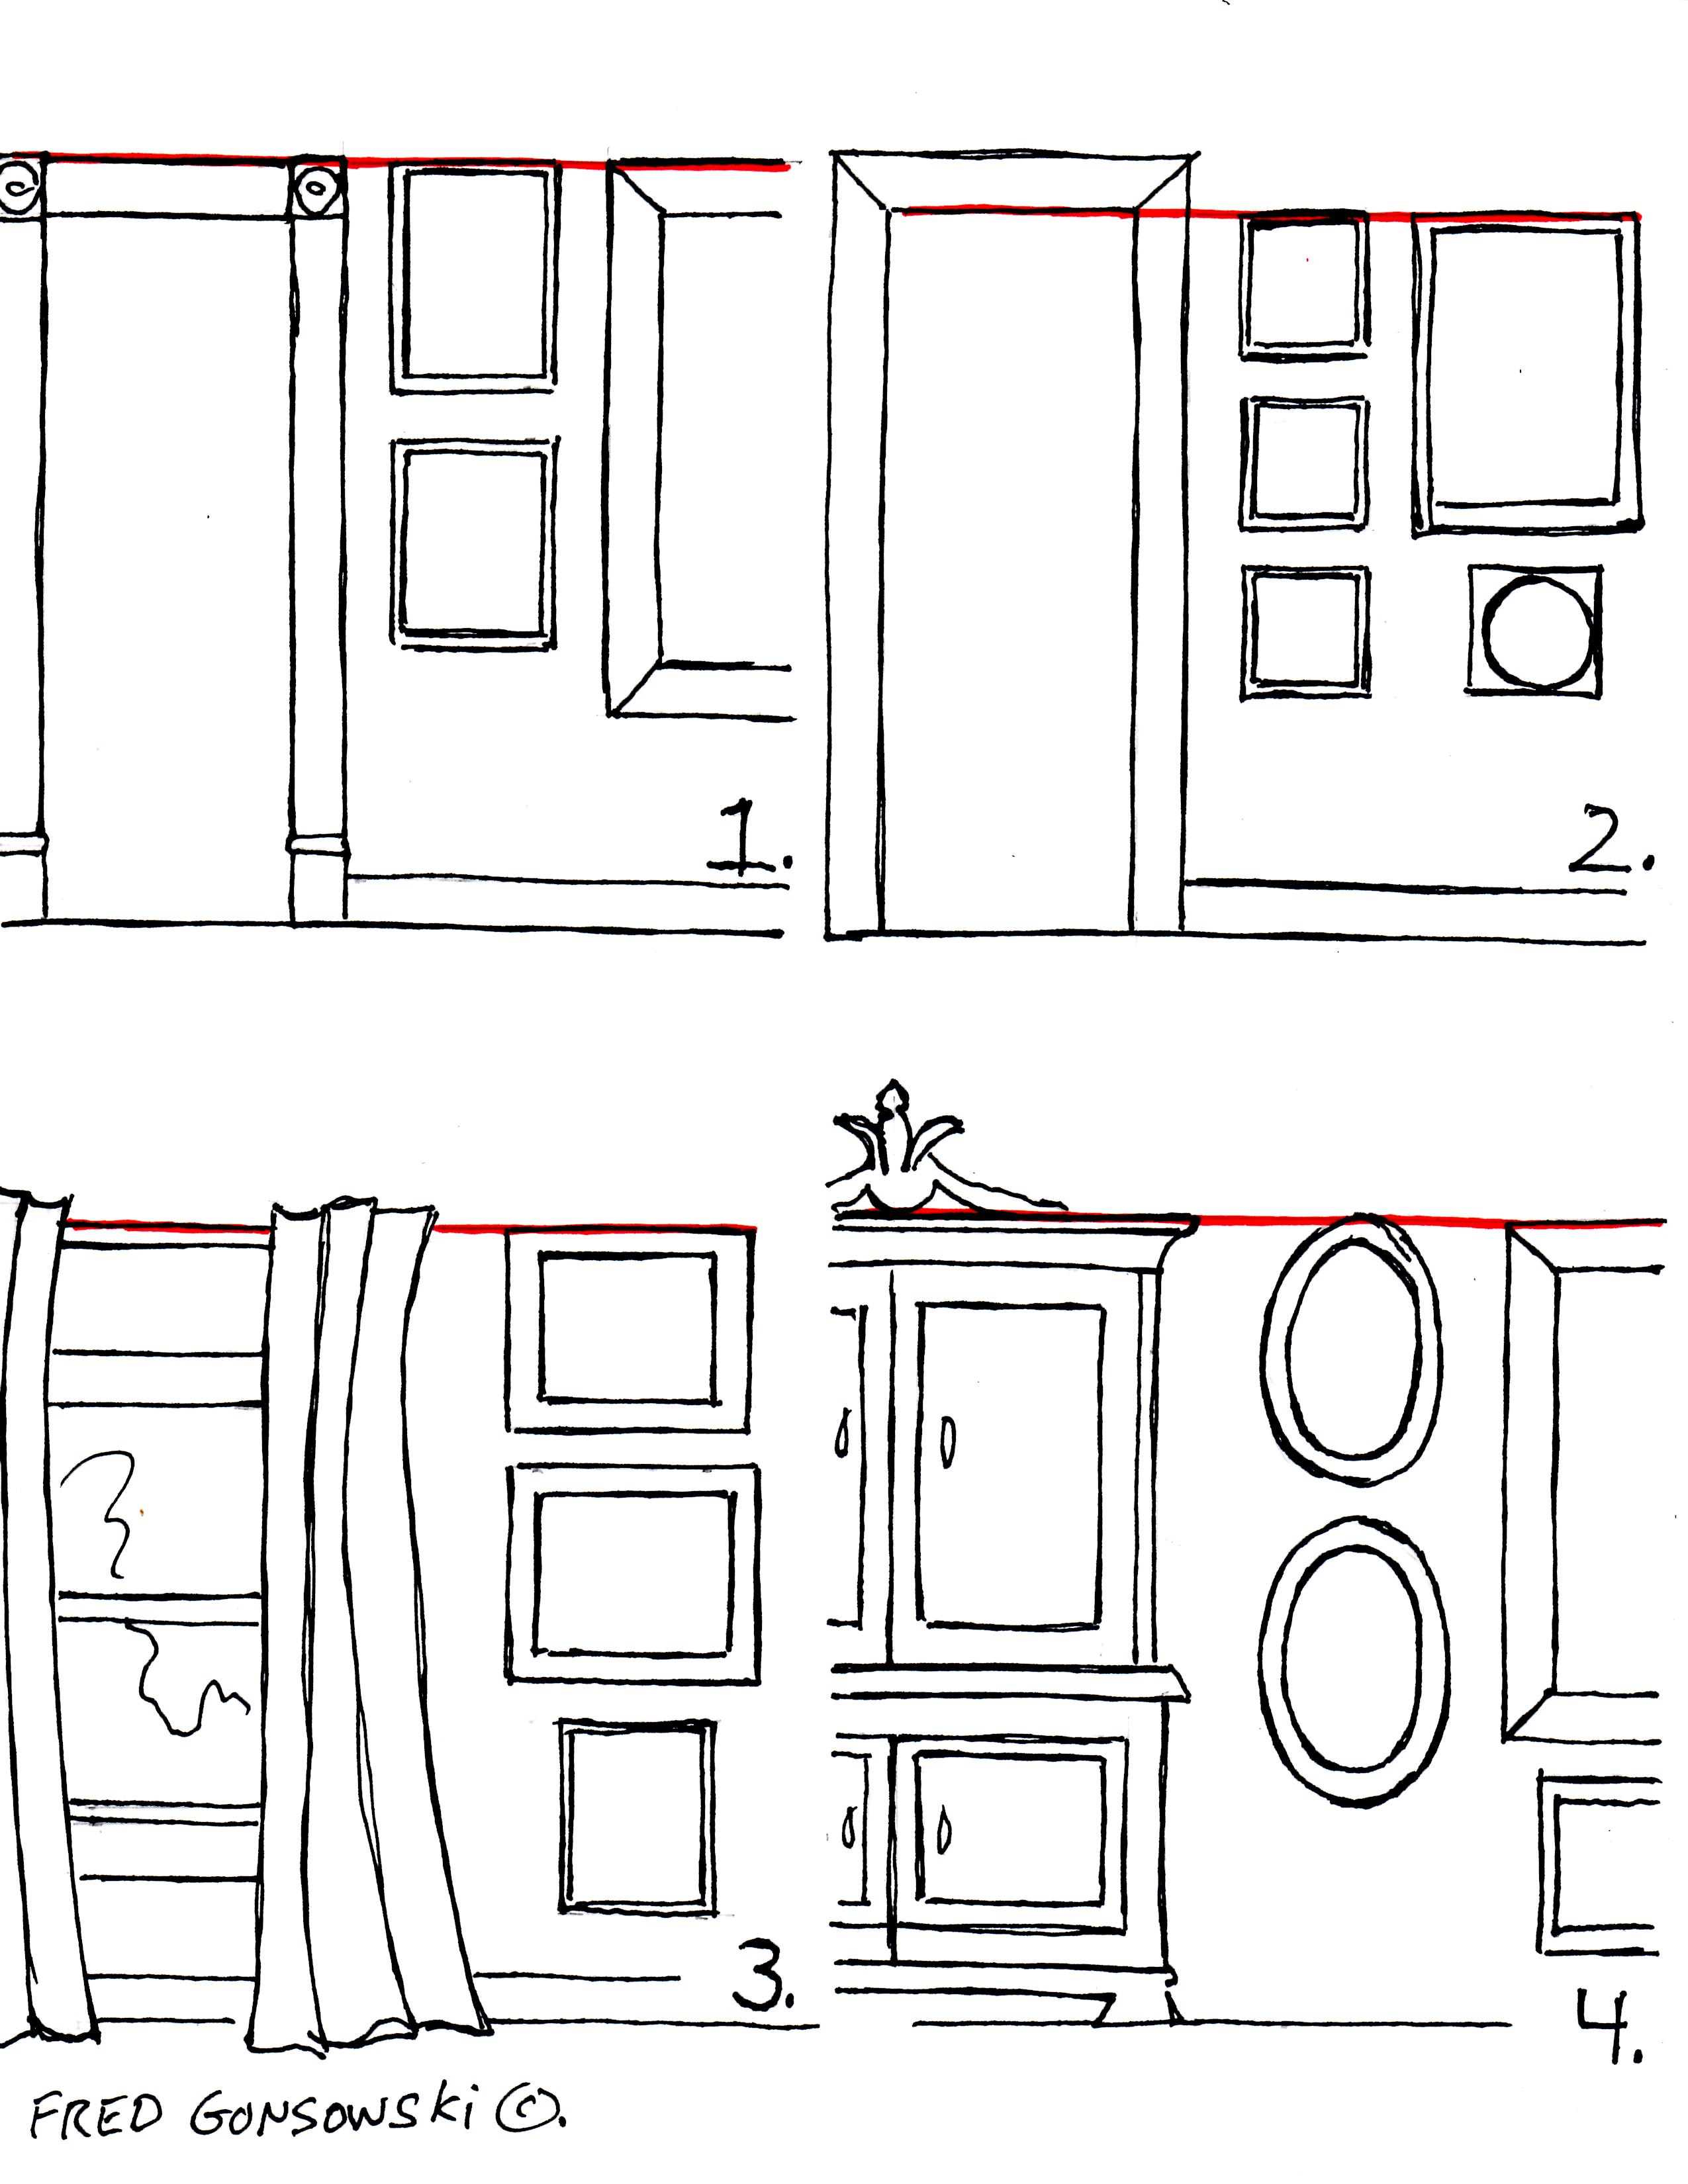
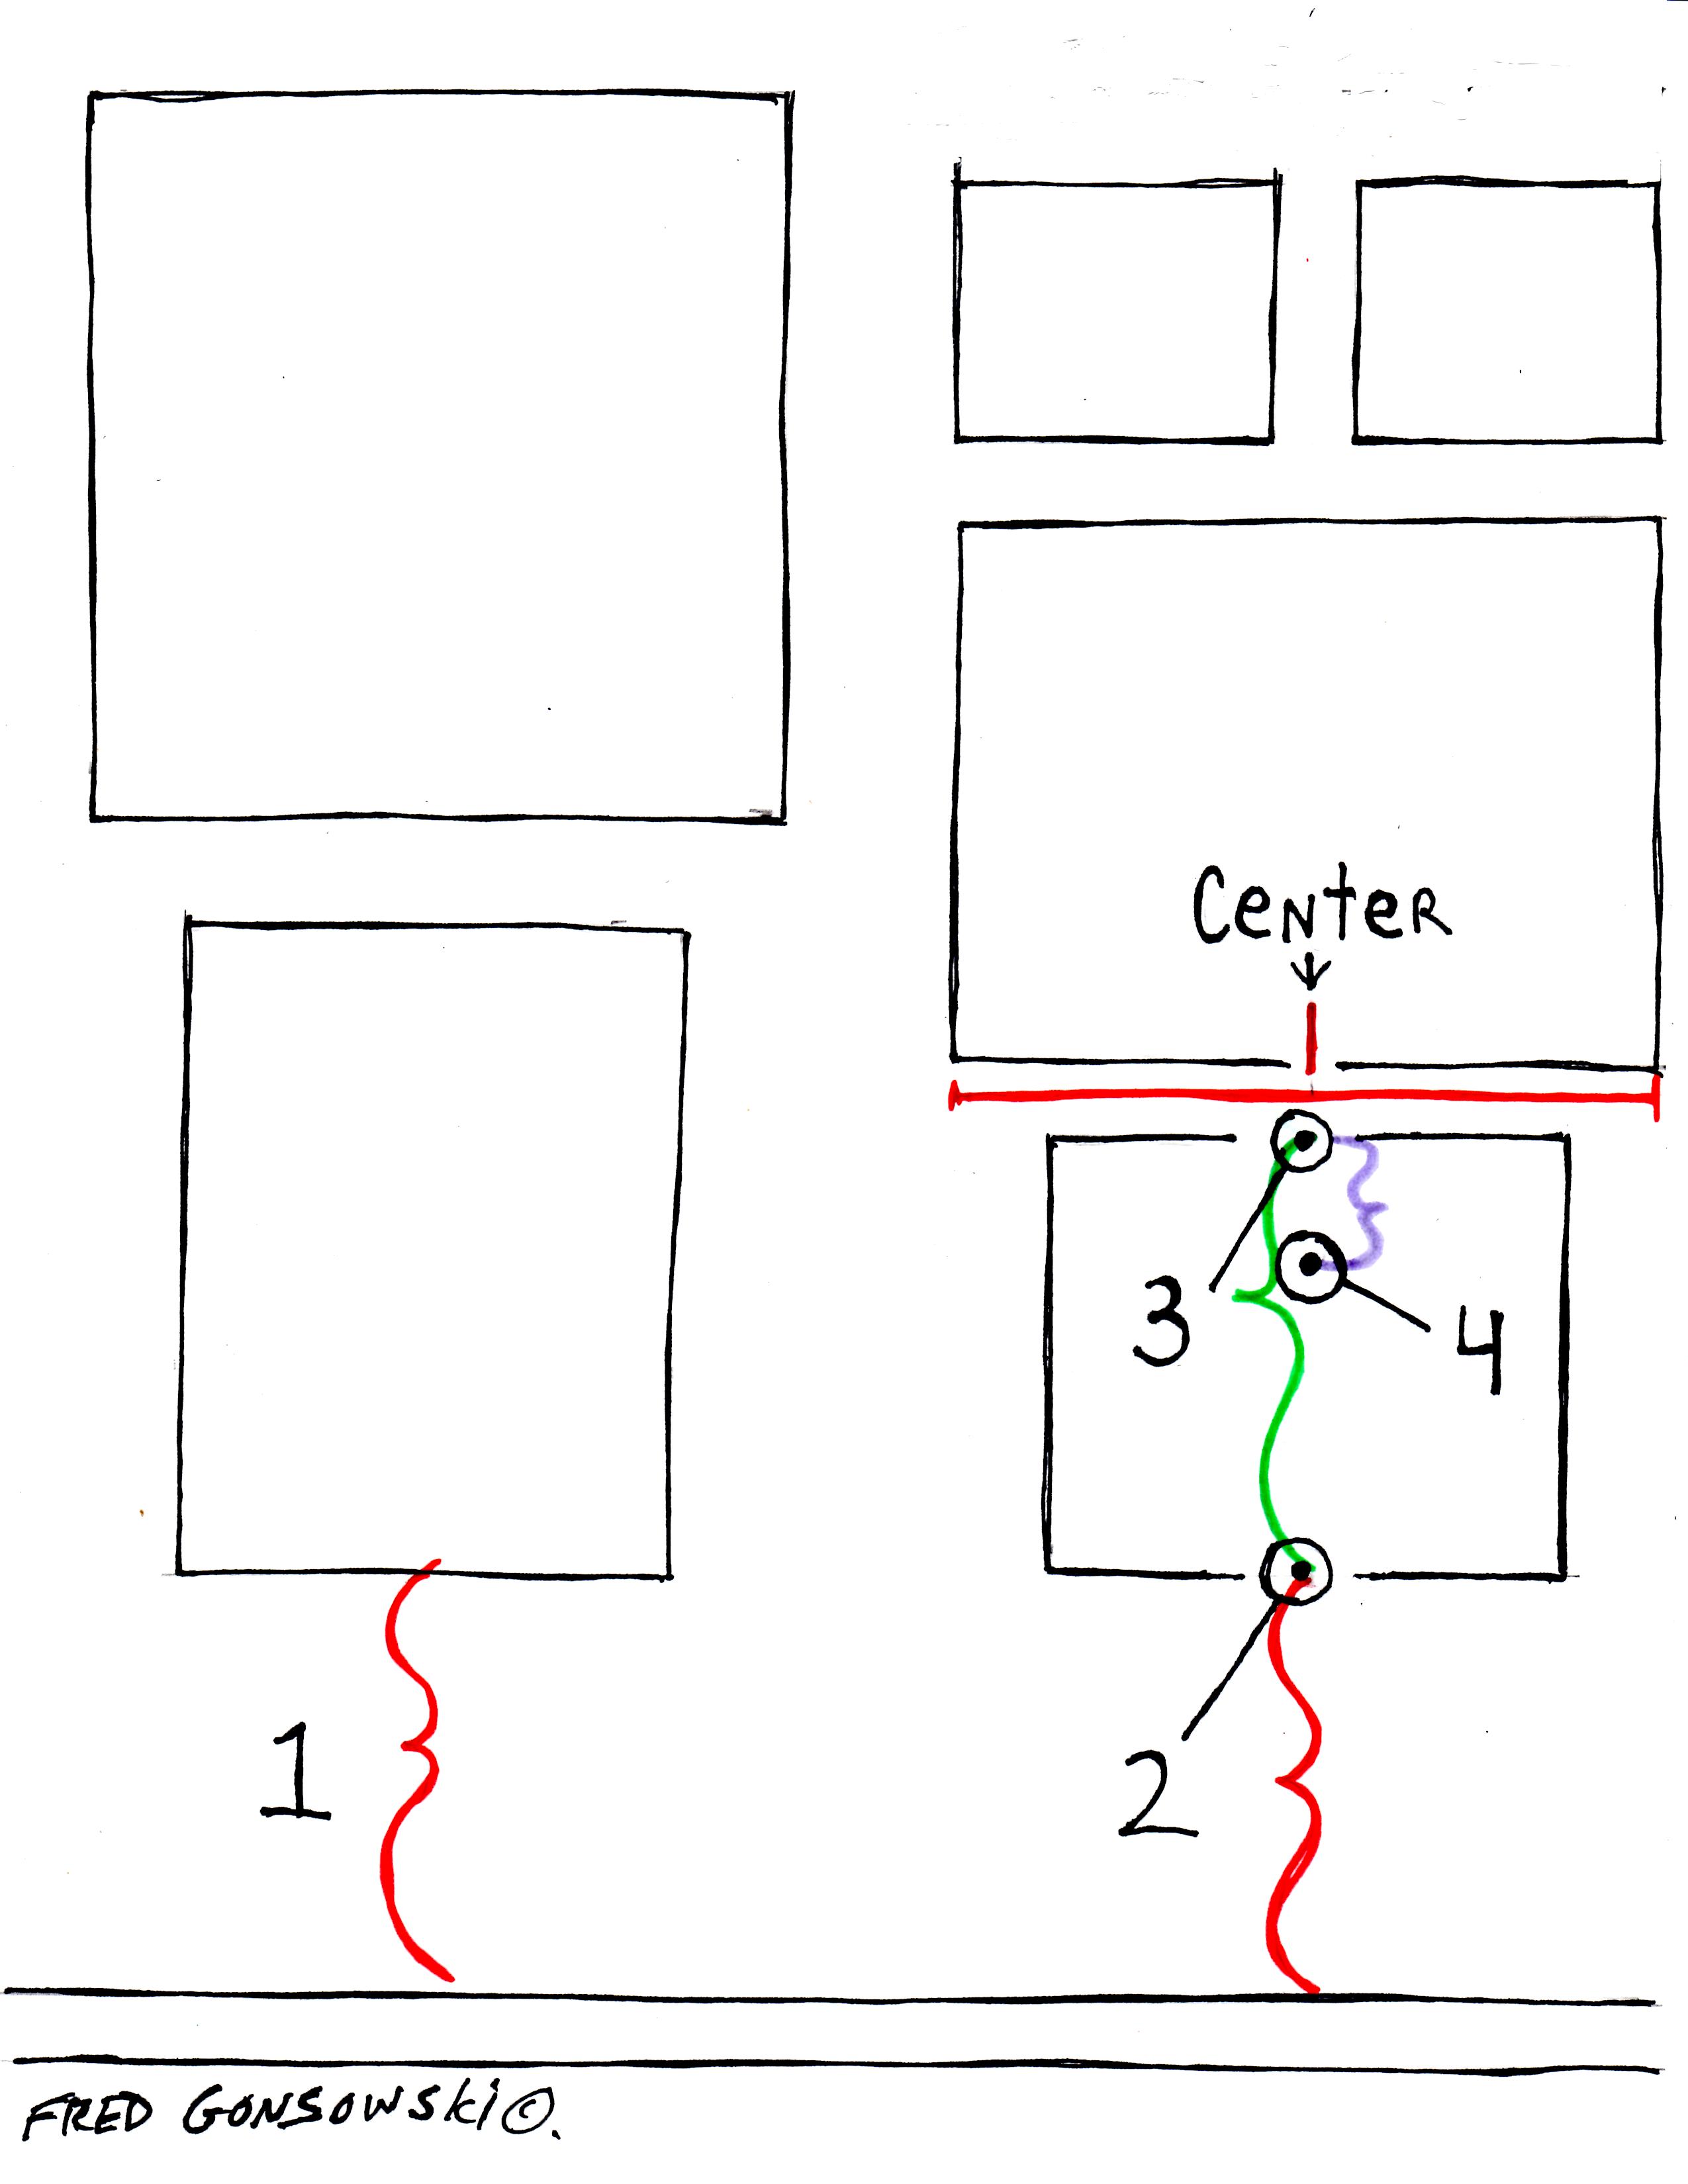
Natural lines produced by different elements in an interior.
When figuring out what natural lines you will follow in a room, for your gallery wall, you have a few places to choose from. You could choose the natural lines created by the top edge of the molding that goes around a door or archway, as seen in illustration 1 shown by the red line. The inside edge of the molding that goes around an archway or frames a door, as seen in illustration number 2 is a second choice. The top edge of the curtains or drapery rod that is hung above a window, as shown by the red line in illustration 3 or the outside or inside edge of the molding that frames a windows; it is the same as the molding around a door or arch way (illustrations 1 and 2). You could also use the natural lines produced by the top edge of a large piece of furniture that dominates a room (entertainment center, large bookcase, etc) see illustration 4. A final choice is to pick a spot on the wall just under the ceiling or crown molding if the room has any.
In my basement, which has windows at almost ceiling height, I decided to come down 2 1/4 inches from the ceiling, which was the point of the inside top edge of the cellar windows. Being that the windows are higher up on the wall than any of the molding that surrounds the room’s openings or doorways, I picked that point because it would give me more space to hang art objects, and in the end, after all was hung, the eye would look at the top edge of the mass grouping and think that was the top of the room. My basement room, being just shy of 7 1/2 feet high, needs things hung high as possible so they suggest vertical tension (height in the cellar space).
Creating a successful gallery wall depends on lining up the pieces in one way or another.
Hanging a gallery wall is not just about randomly mounting a lot of things on a wall. To me, a gallery wall only works if things line up with each other in some way.
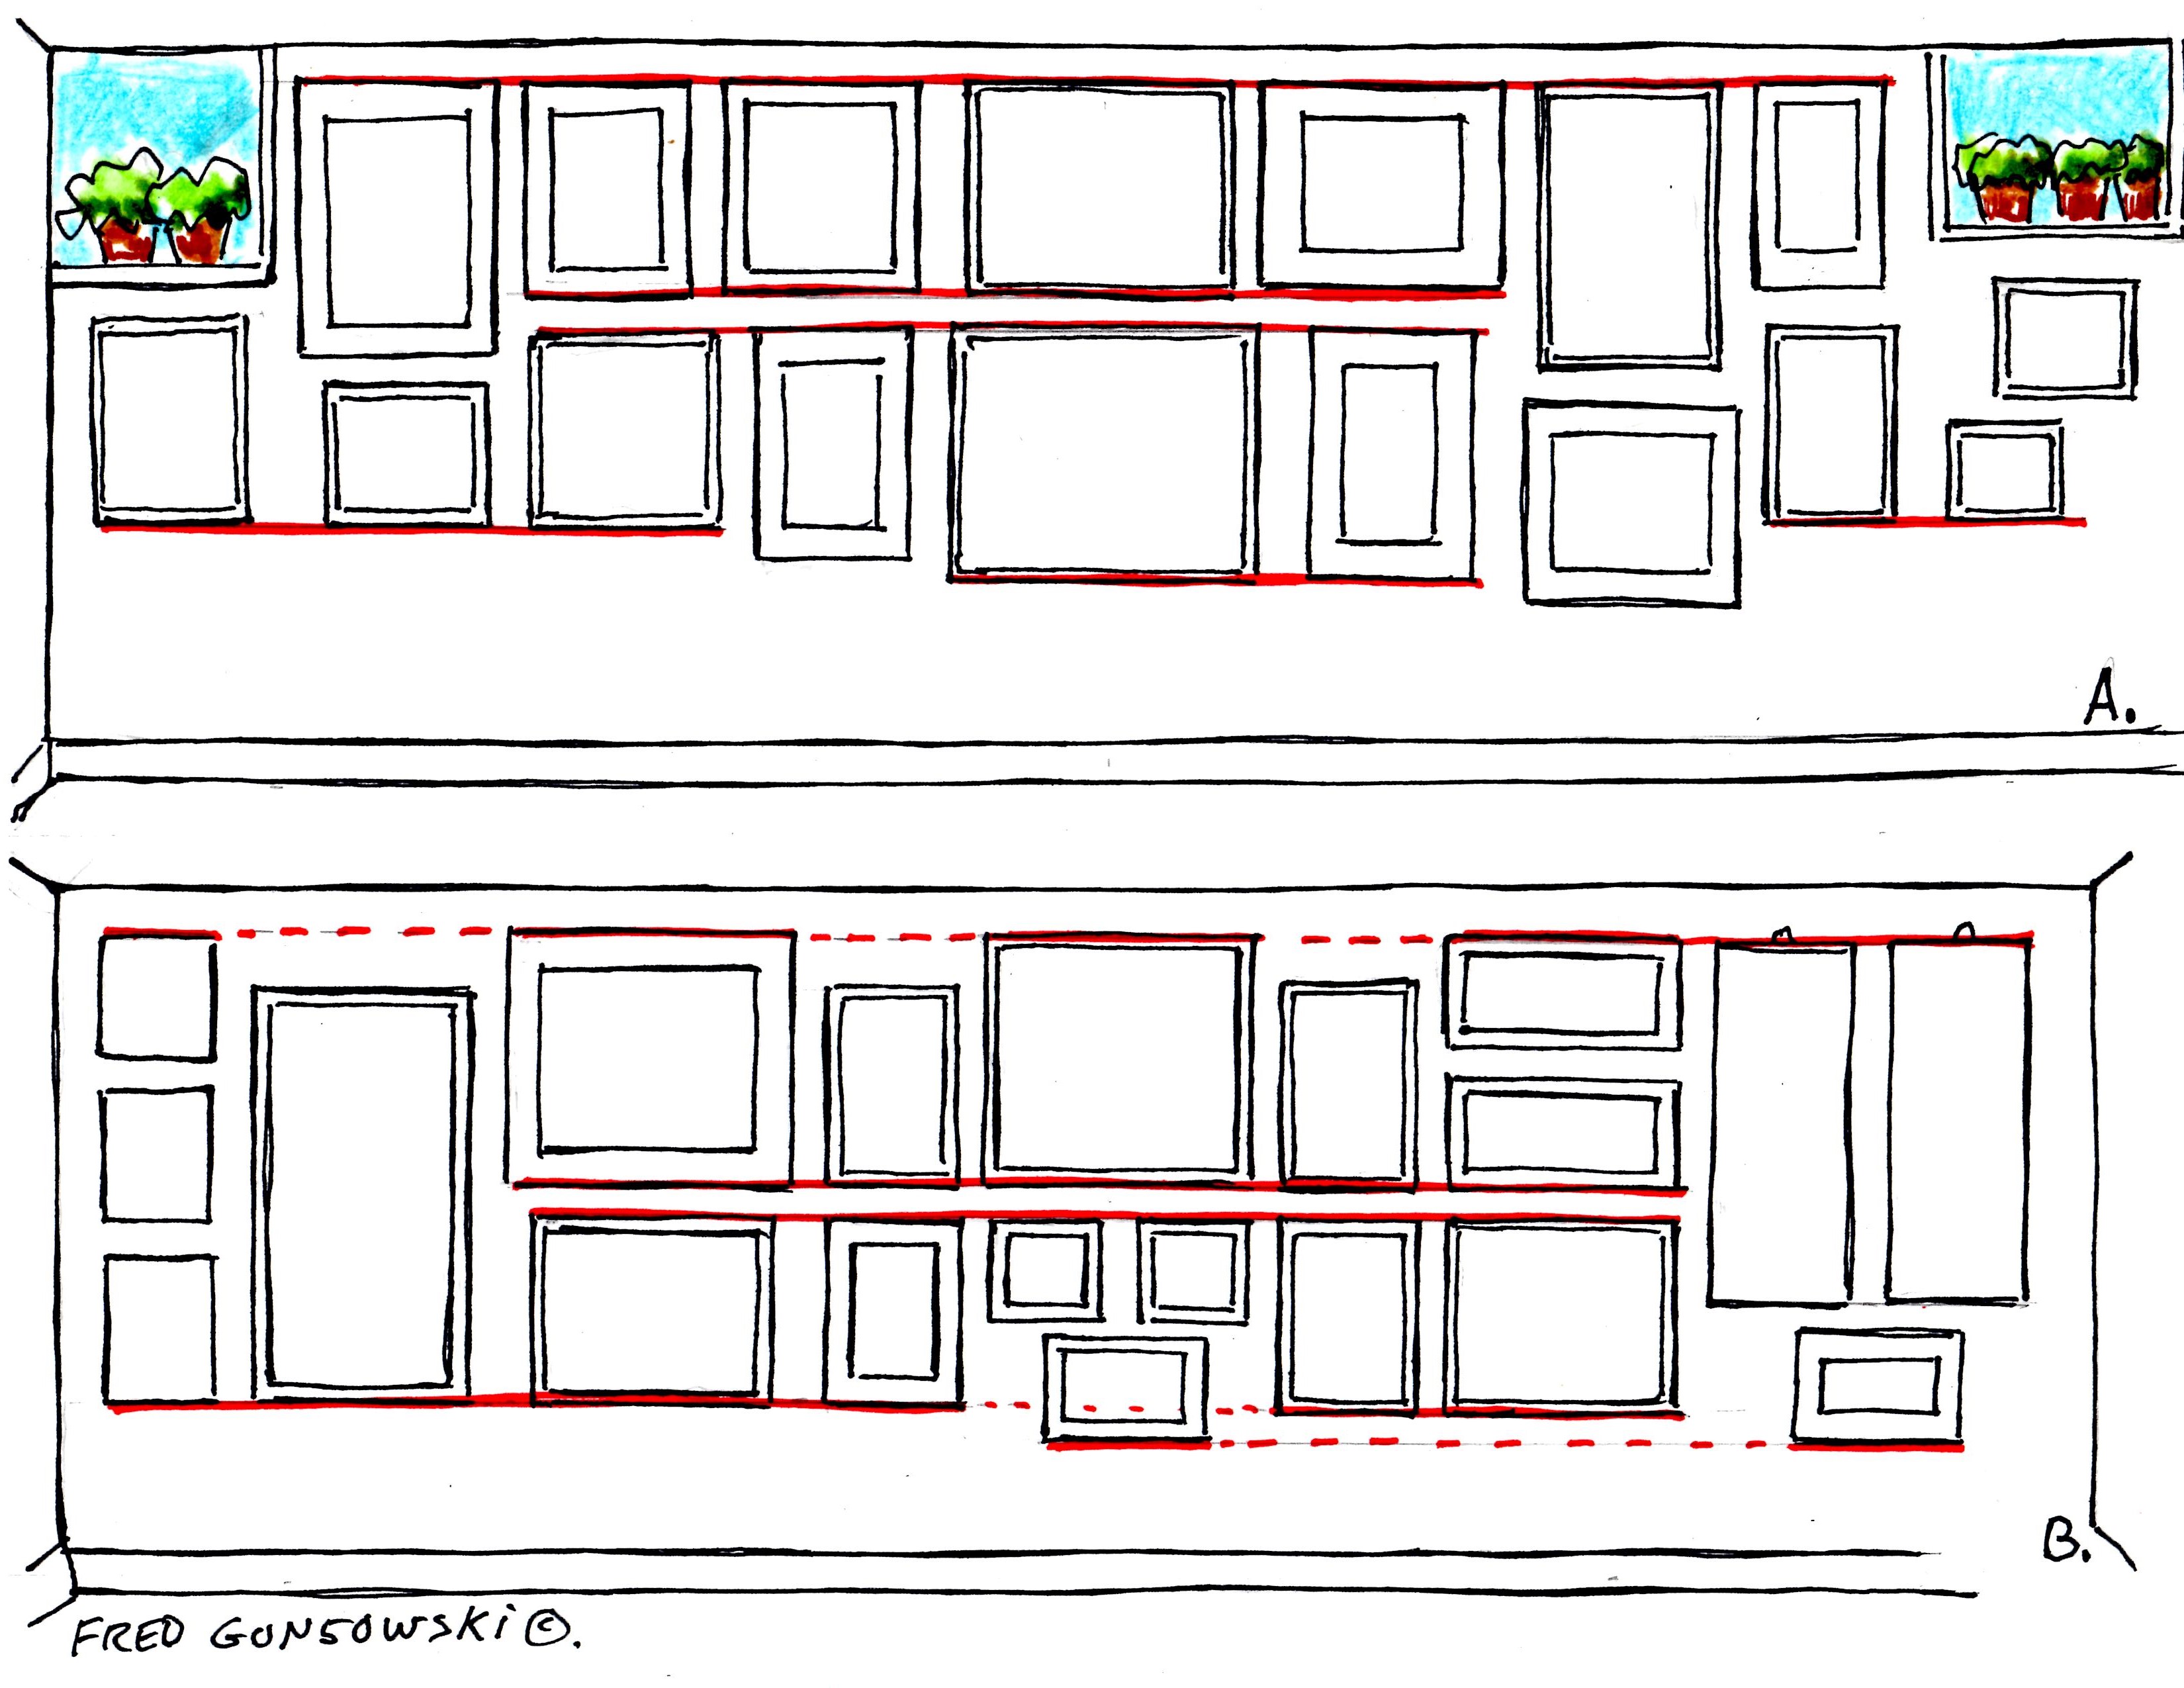
Now look at the above two illustrations. The top drawing, illustration A, is a breakdown of the exact placement of the paintings and posters hanging on the long wall in my cellar. The cover photo for this post is what the illustration looks like in true life. Looking at the two top corners, you will see the basement windows where I over-winter plants. Looking across the top of the space, the red line shows how all of the top edges of the pieces line up with each other as they work across the wall.
Next look at the framed piece below the window on the left. That piece was centered directly below the window above it. The most important thing about that piece is that its bottom edge started the lining up of the two other pieces that were hung to its right. You can easily see it by following the red line below those three pieces.
Next look at how the double row of red lines goes horizontally through the center of the wall grouping. Those lines show the bottom and top edges of the pieces in that area. I was kind of lucky with the hanging of my art pieces, because I made a lot of things in only so many sizes.
Finally, look at the window on the right, and the small piece hung under it. To tie that small piece to the two pieces to its left, I hung another small piece below it off-center, but lined up its bottom edge with the piece to its left. The red line shows that action. The stair-stepping of the pieces on the right and the window, direct you to the stairs that go up from the cellar to the garage.
Illustration B shows a controlled, but more random arrangement of art pieces; it does not have the straight top line that illustration A has. If you look across the top of the wall grouping, you can see that some, but not all of the pieces line up with each other by looking at the solid and dotted red lines that run across the top of the wall display. The real controlled part of this grouping of pieces is seen in the center of the wall, shown by the double row of horizontal red lines. The top red line shows the bottom edges of all the pieces in the upper area, and the bottom red line shows the tops of all the pieces in the center-bottom of the wall grouping. Across the bottom, you will see how other pieces line up with each other as you look at the solid and dotted red lines.
When creating your gallery wall, you will have to decide if you will be covering a full wall or part of a wall (the center). If you are going to cover a full wall, you could start at the wall’s middle, and after hanging the first center pieces, work to the right and left, alternating sides as you progress to the ends of the wall. You could also do as I did and start in one of the corners (I choose the left side) and keep hanging things until you worked across the wall to its other side.
If you decide to start working in a corner, you will have to decide how much wall space to leave exposed between the corner of the room and the vertical side edge of the first artwork(s) you will be hanging. I chose 4 1/4 inches of exposed wall space.
I have come up with three strategies for hanging different aspects of the gallery wall. The first one should/can be used if you are starting your gallery in the corner of a room, at the top of the wall. The number of inches chosen from the corner of the room to the first art work should be the same amount of inches of space that you have between each and every other art piece, that you hang on the top row (closest to the ceiling) of your gallery wall. Having the same amount of space between pieces will provide visual consistency. You don’t have to have the consistency of spacing between artworks hung below the pieces that form the top of your gallery. Pieces hung under the top ones should only be centered, in most cases, or the vertical side edges of the lower framed artworks should line up with the vertical side edges of the pieces hung above them. For my gallery wall, as shown on the cover photos for this post, I came down 2 1/4 inches from the ceiling and all of the pieces are spaced 4 1/4 inches apart.
Picture hanging Strategy One.
Strategy One ..Hanging your first piece on the gallery wall.
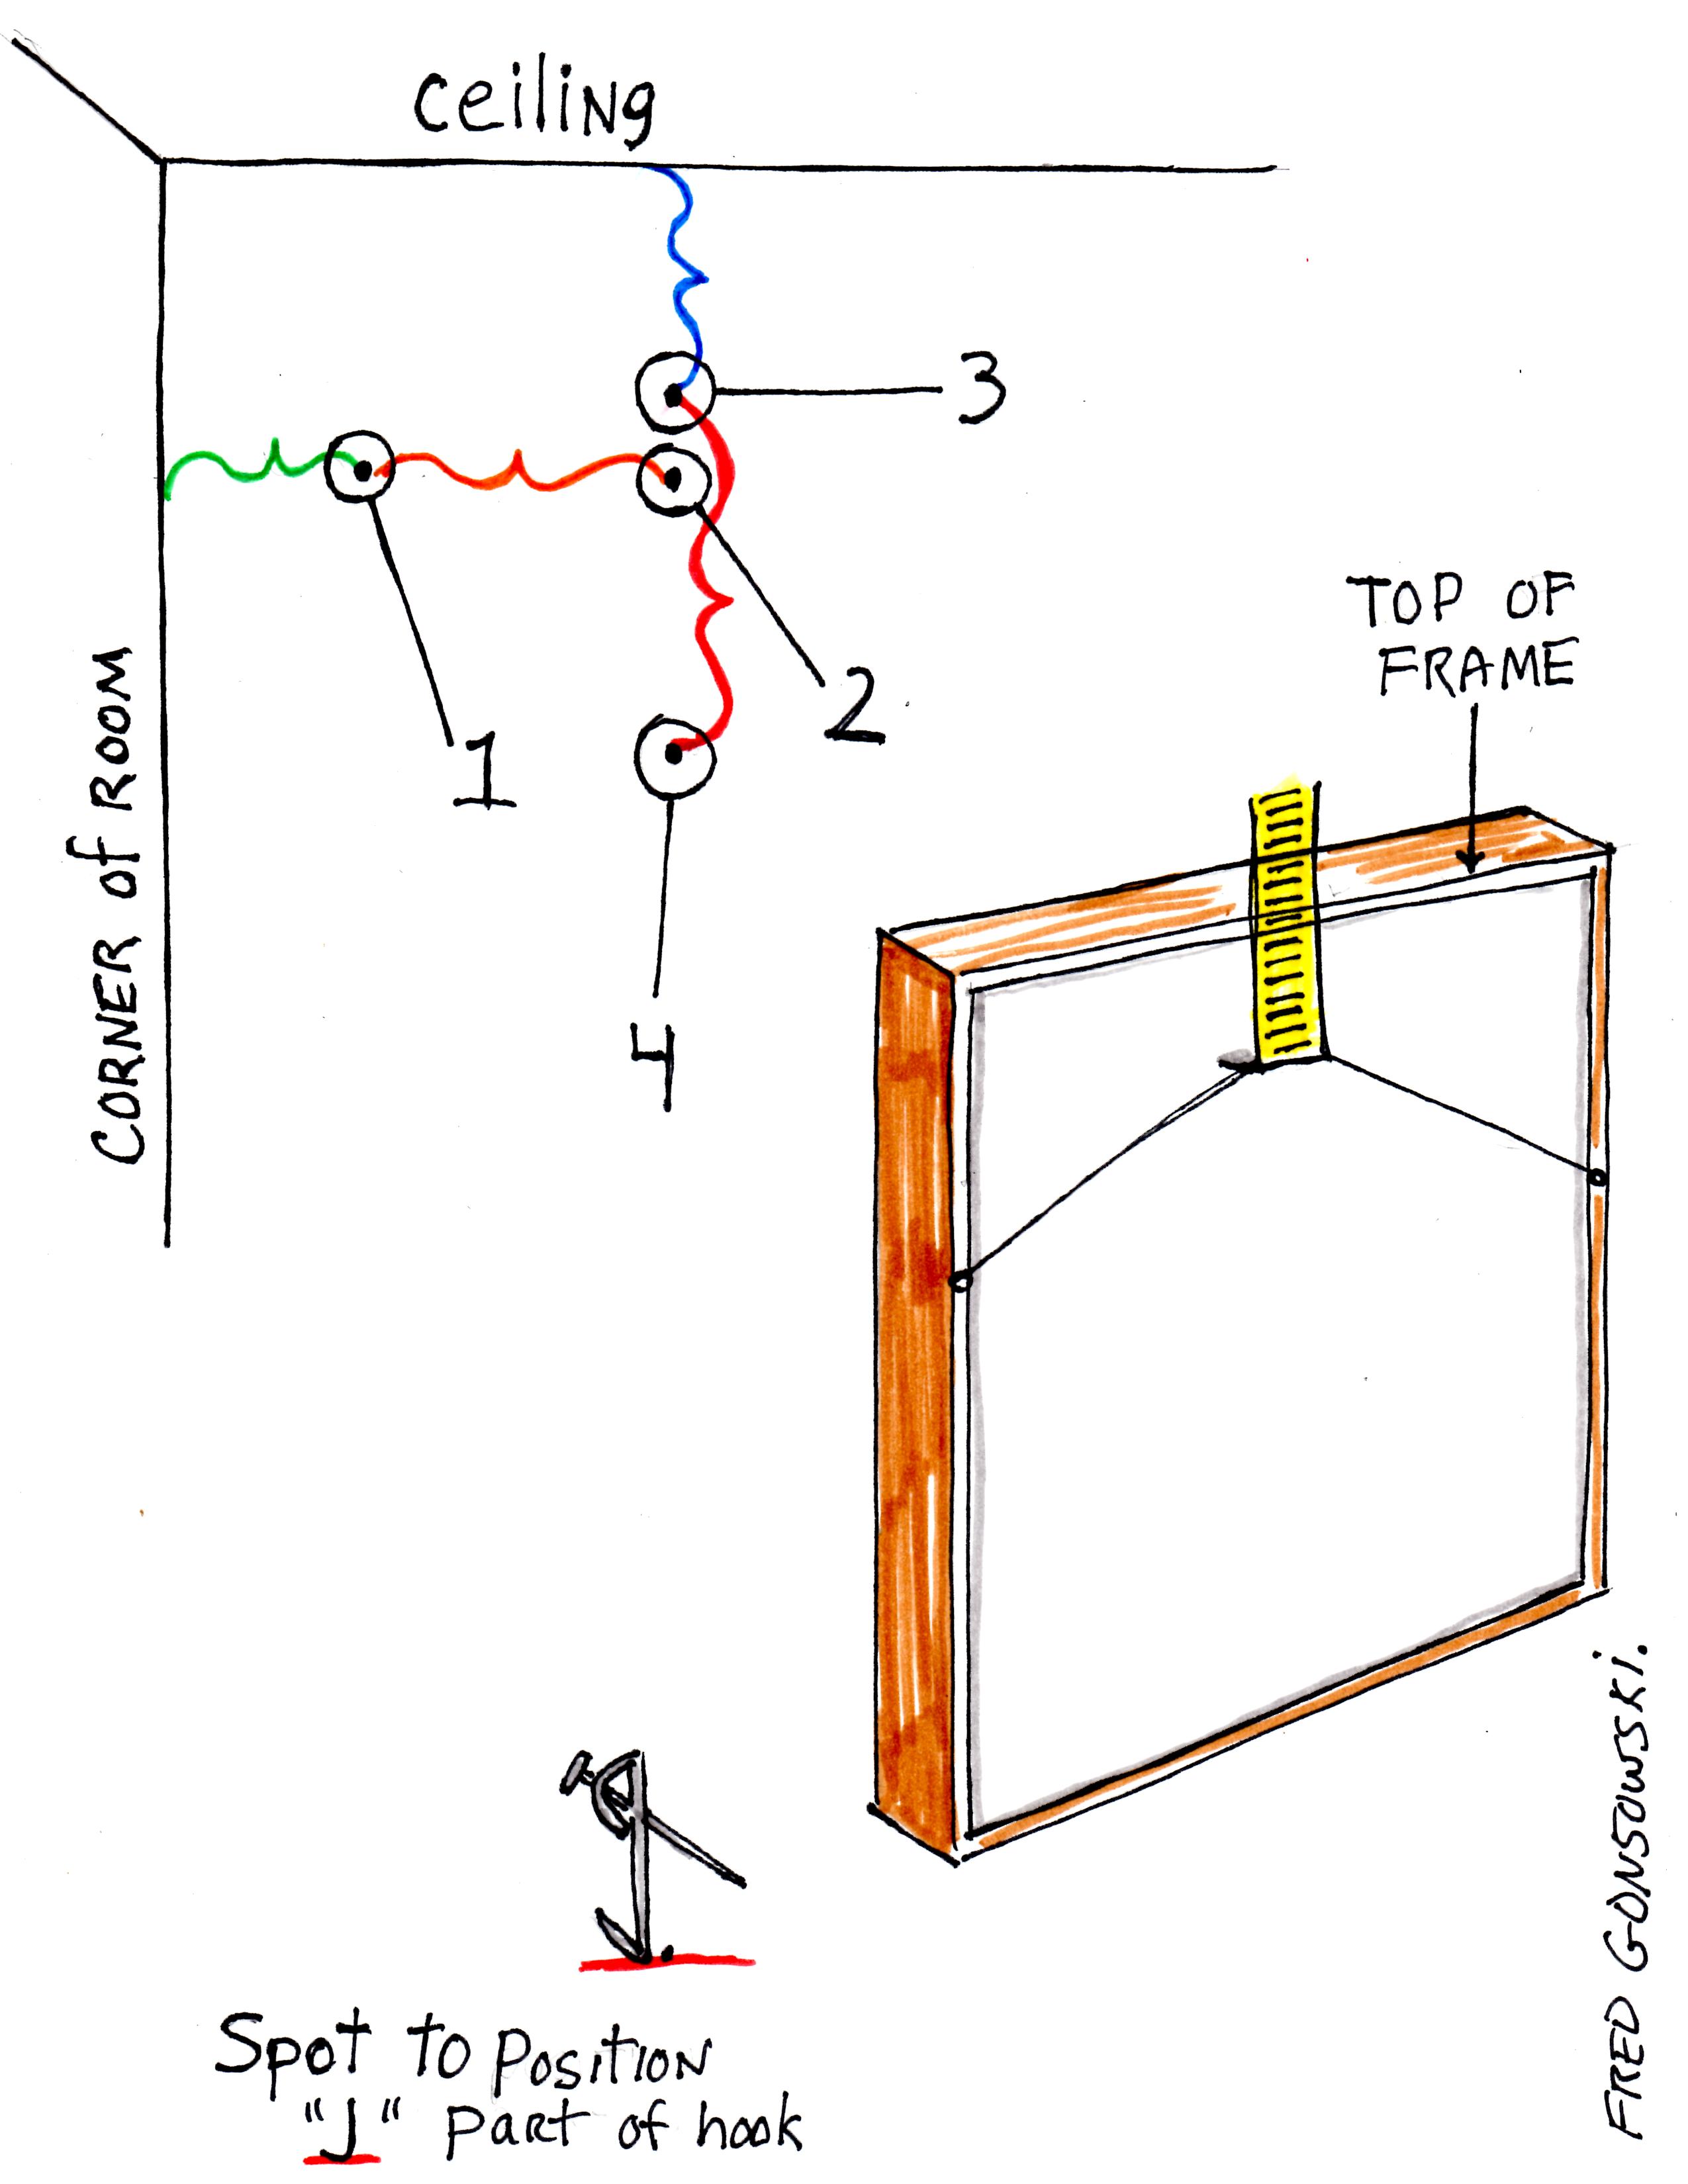
Determine how many inches of space you want between the corner of the room and the vertical side edge of your first framed piece; I choose 4 1/4 inches. The 4 1/4 inches of space is represented by the curved green line, on the above illustration, and ends at the dot numbered 1.
Take a measuring tape and measure that distance from the corner of the room and mark that spot on the wall with a dot made with a pencil. If you don’t want to put a dot on your painted wall or wallpaper, first put a piece of blue painters tape on the wall surface and then draw your dot on it. After finishing the hanging process, you can easily pull off the tape and there will be no marks. Mark your wall close to where the top of your framed piece will be hung.
Next take your framed piece and measure its width, then divide that number in half. If your frame is 24 1/4 inches wide, half of that is 12 1/8 inches. From the dot numbered 1, on the illustration, measure over 12 1/8 inches which is half of the width of the framed piece and make another dot (that distance is shown by the orange line), that dot is numbered 2 on the illustration.
After that you have to decide how many inches down from the top of your ceiling, or below your crown molding that you want the top edge of your gallery wall, or the top edge of the frame of the first art piece to be hung; I chose 2 1/4 inches. Knowing where on the wall that the center of your artwork will be hung, by doing steps #1 and #2, at the top of the room eyeball that location, and measure down from that point toward what is the center of your frame; that measurement is represented by the curved blue line that ends up at dot number 3. Take your painter tape and mark that spot.
Next, working on the backside of your framed artwork, as shown on the illustration, pull the end of a tape measure tightly from the center of the picture hanging wire toward the top of the frame and write down that measurement (an example could be 3 1/2 inches).
From the spot on the wall (the dot numbered 3), measure down, for example, 3 1/2 inches (the amount of inches from the top of the pulled wire to the top of the frame) and put a piece of painters tape on the wall and then draw a final dot on it, that measurement is represented by the red line which leads you to dot number 4 on the illustration. If you have measured right, that is the place on your wall where you should position the bottom edge of the “J” part of the picture hanging hook, as seen on the illustration and then hammer the hook to the wall. That spot is not the place you position the top of the picture hanging hook or the place where the nail is hammered into the wall.
After hammering your picture hanging hook to the wall and hanging up your framed piece, step back and see how it looks; then take the blue painters tape off of the wall.
Picture hanging Strategy Two.
Strategy Two …Hanging an artwork below one that is already positioned close to the top of the wall.
If your framed artwork is the same exact width as the piece above it, do steps #1 through #4 shown on Strategy 1. The only difference will be that you will have to decide how much space to have between the bottom edge of the top artwork’s frame, and the top edge of the frame hung under it. To figure that out, hold the framed piece under the one already hung and slowly moving it up or down until you see a spacing that you like. Place a piece of painters tape on the wall and them make a dot. That dot will represent the top of your frame, and all you have to then do is repeat the above hanging measuring instructions.
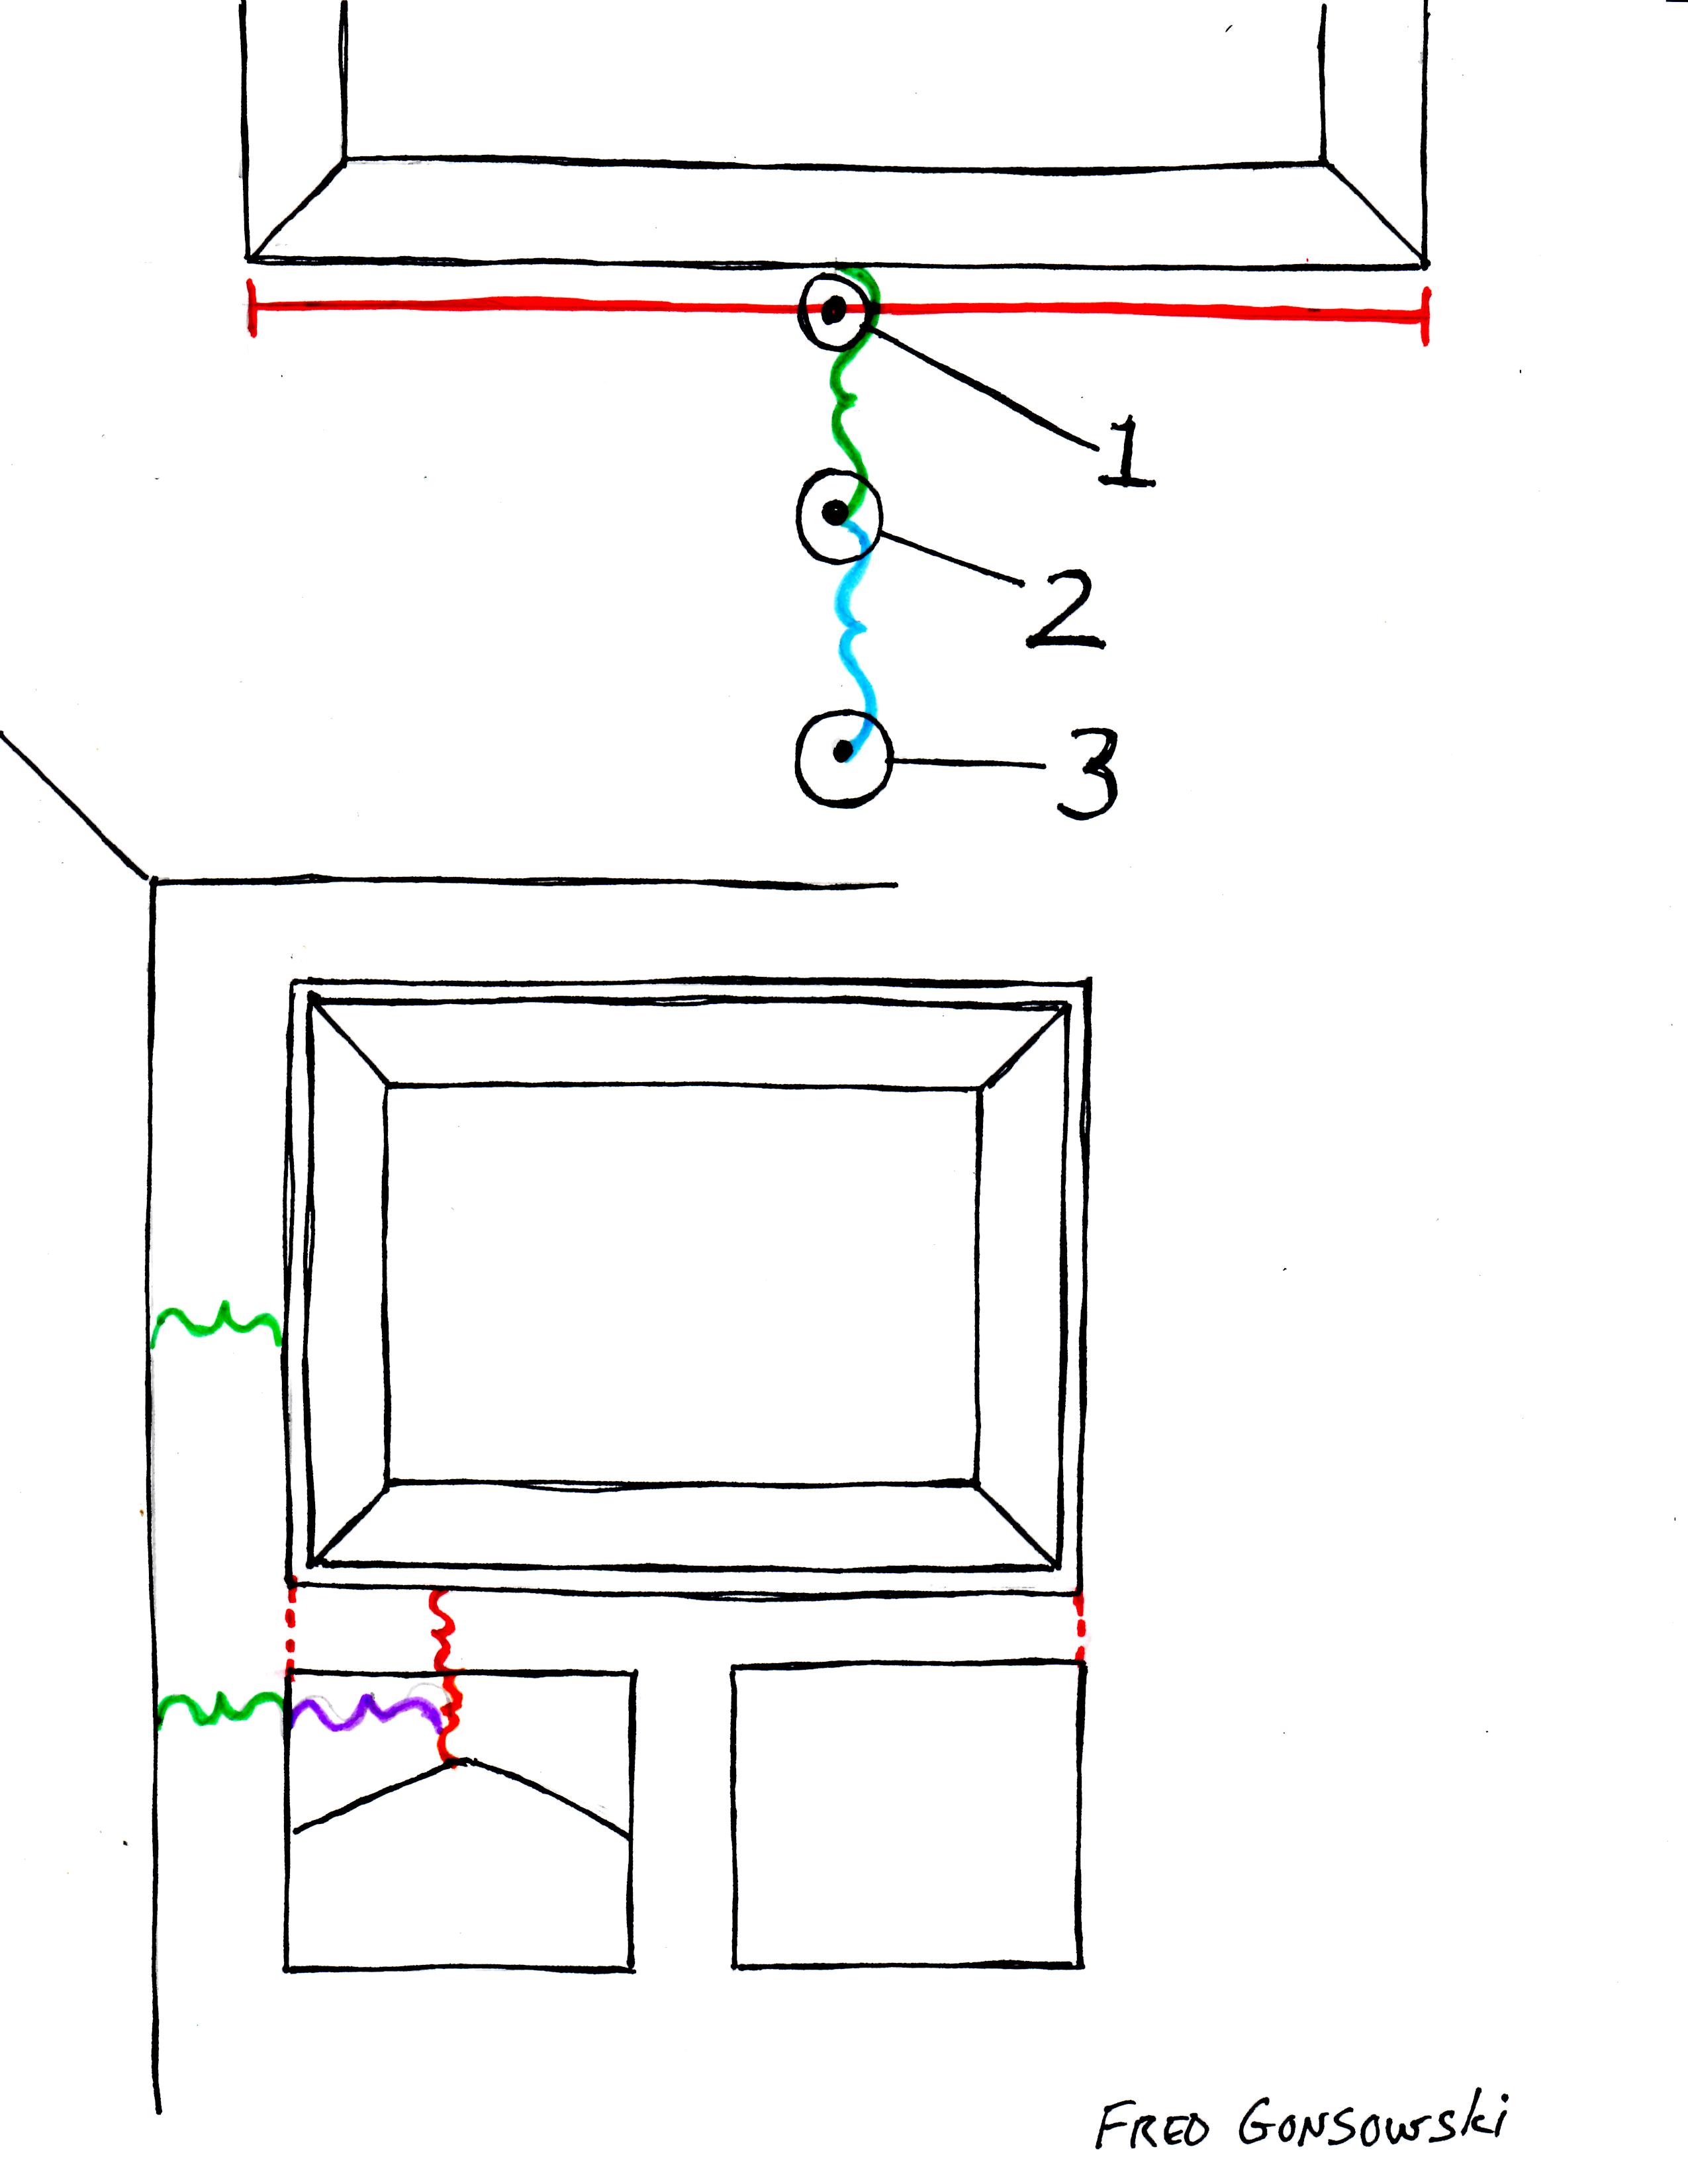
If you have an art object that is narrower or wider than the one hung above it, first measure the width of the already hung piece and divide that number in half to find its center. That measurement is represented by the red line under the frame at the top of the illustration and the dot numbered 1 is the center of that frame. You can put a piece of painters tape on the wall first, then make your dot with a pencil.
Next decide how much space you want between the bottom horizontal edge of the upper frame and the top edge of the lower frame that you will be hanging. That space is seen in green on the illustration and goes from the dot numbered 1 to the dot numbered 2. After that take your framed piece, pull its wire tight and measure to the top of the frame as talked about in Strategy One. From dot 2, measure down those inches (as seen with the curving blue line) to dot numbered 3. Then position your picture hanging hook, as directed in Strategy One, and hammer your hook to the wall.
If you are hanging two or more pieces below a larger piece, as seen on the lower part of the above illustration, line up vertical side edges, if you can. Notice how both the left and right side edges of the smaller pieces line up with the edges of the large piece hung above them. To hang a small pieces like the ones shown on the left…
(1) determine the distance from the corner or the room, or from the edge of the piece hung to its left (green curving line on illustration),
(2) measure the width of the first small framed piece and divide that number in half (purple line on illustration),
(3) figure how much space you want between the bottom edge of the upper frame and the top edge of the frame to be hung below; that distance is shown by the red curving line,
(4) finally, determine the amount of inches from the top of the pulled wire to the top of the frame to be hung (orange line), and follow picture hanging hook instructions presented above.
For the right hanging piece, as seen in the illustration….
(1) take the measurement of the wall space between artworks (seen in green on the illustration) and add that to the width of the large framed piece hung above. Take a measuring tape and measure over from the left corner of the room, or the left most hung art work and put a piece of painters tape on the wall and make a dot designating the two combined measurements; that dot should line up exactly with the right side of the big frame hung above.
(2) take your second piece and measure its width and divide that number in half. From the dot on the wall, that lines up with the right side of the frame, measure back that amount of inches and make a dot, that will be the center point of your right frame.
(3 and 4) determine the amount of inches that the already hanging left piece is hung below the large piece above it, and do your measuring on the back of the frame, and transfer those inches to the wall; all those details I’ve gone over before.
Picture hanging Strategy Three.
Strategy Three … Lining up pieces following the horizontal bottom edges of framed artworks.
A gallery wall, to be interesting looking, should have different sized elements places across its top, middle and bottom. Sometimes there might even be things hung close to the floor. If you are hanging/stacking framed pieces three or even four units high on your wall, you will most-likely have to think about how framed pieces line up with each other across the bottom of your wall space. To line up certain pieces across the bottom of your gallery wall with others, follow the next five steps.
One …Determine which piece(s) on the wall that you want to line up other pieces with. Measure the distance from the floor or top of the baseboard molding to the bottom horizontal edge of that framed piece. Look at number 1 on the illustration.
Two… Find the center of an artwork that you want to hang something under; it is the red line under the framed piece on the right in the illustration.
Three… From the floor/top of the baseboard, measure up the same amount of inches (as #1), this will be the spot that designates where the bottom edge of your framed piece should line up with; that spot is dot number 2 on the illustration.
Four… Measure the height of the framed piece to be hung, and add those inches to #2 (the green curving line) which brings you up to dot number 3, which represents the top edge of your framed artwork.
Five… Knowing the center point of the piece above, and that dot (#3) represents the top of the frame, line those two points up. Take your frame, pull its wire tight, and measure to the top of its frame, as I’ve covered before. Measure down from dot #3 to dot number 4; that will be where you will place your hanging hook.
So there you have it, what I hope are some interesting concepts to think about when hanging a gallery wall(s). I am closing this post with a drawing showing a gallery wall with all kinds of shapes and sizes of art objects. Look at the dotted red lines that go between the pieces and how the edges of unrelated shaped things line up with each other. 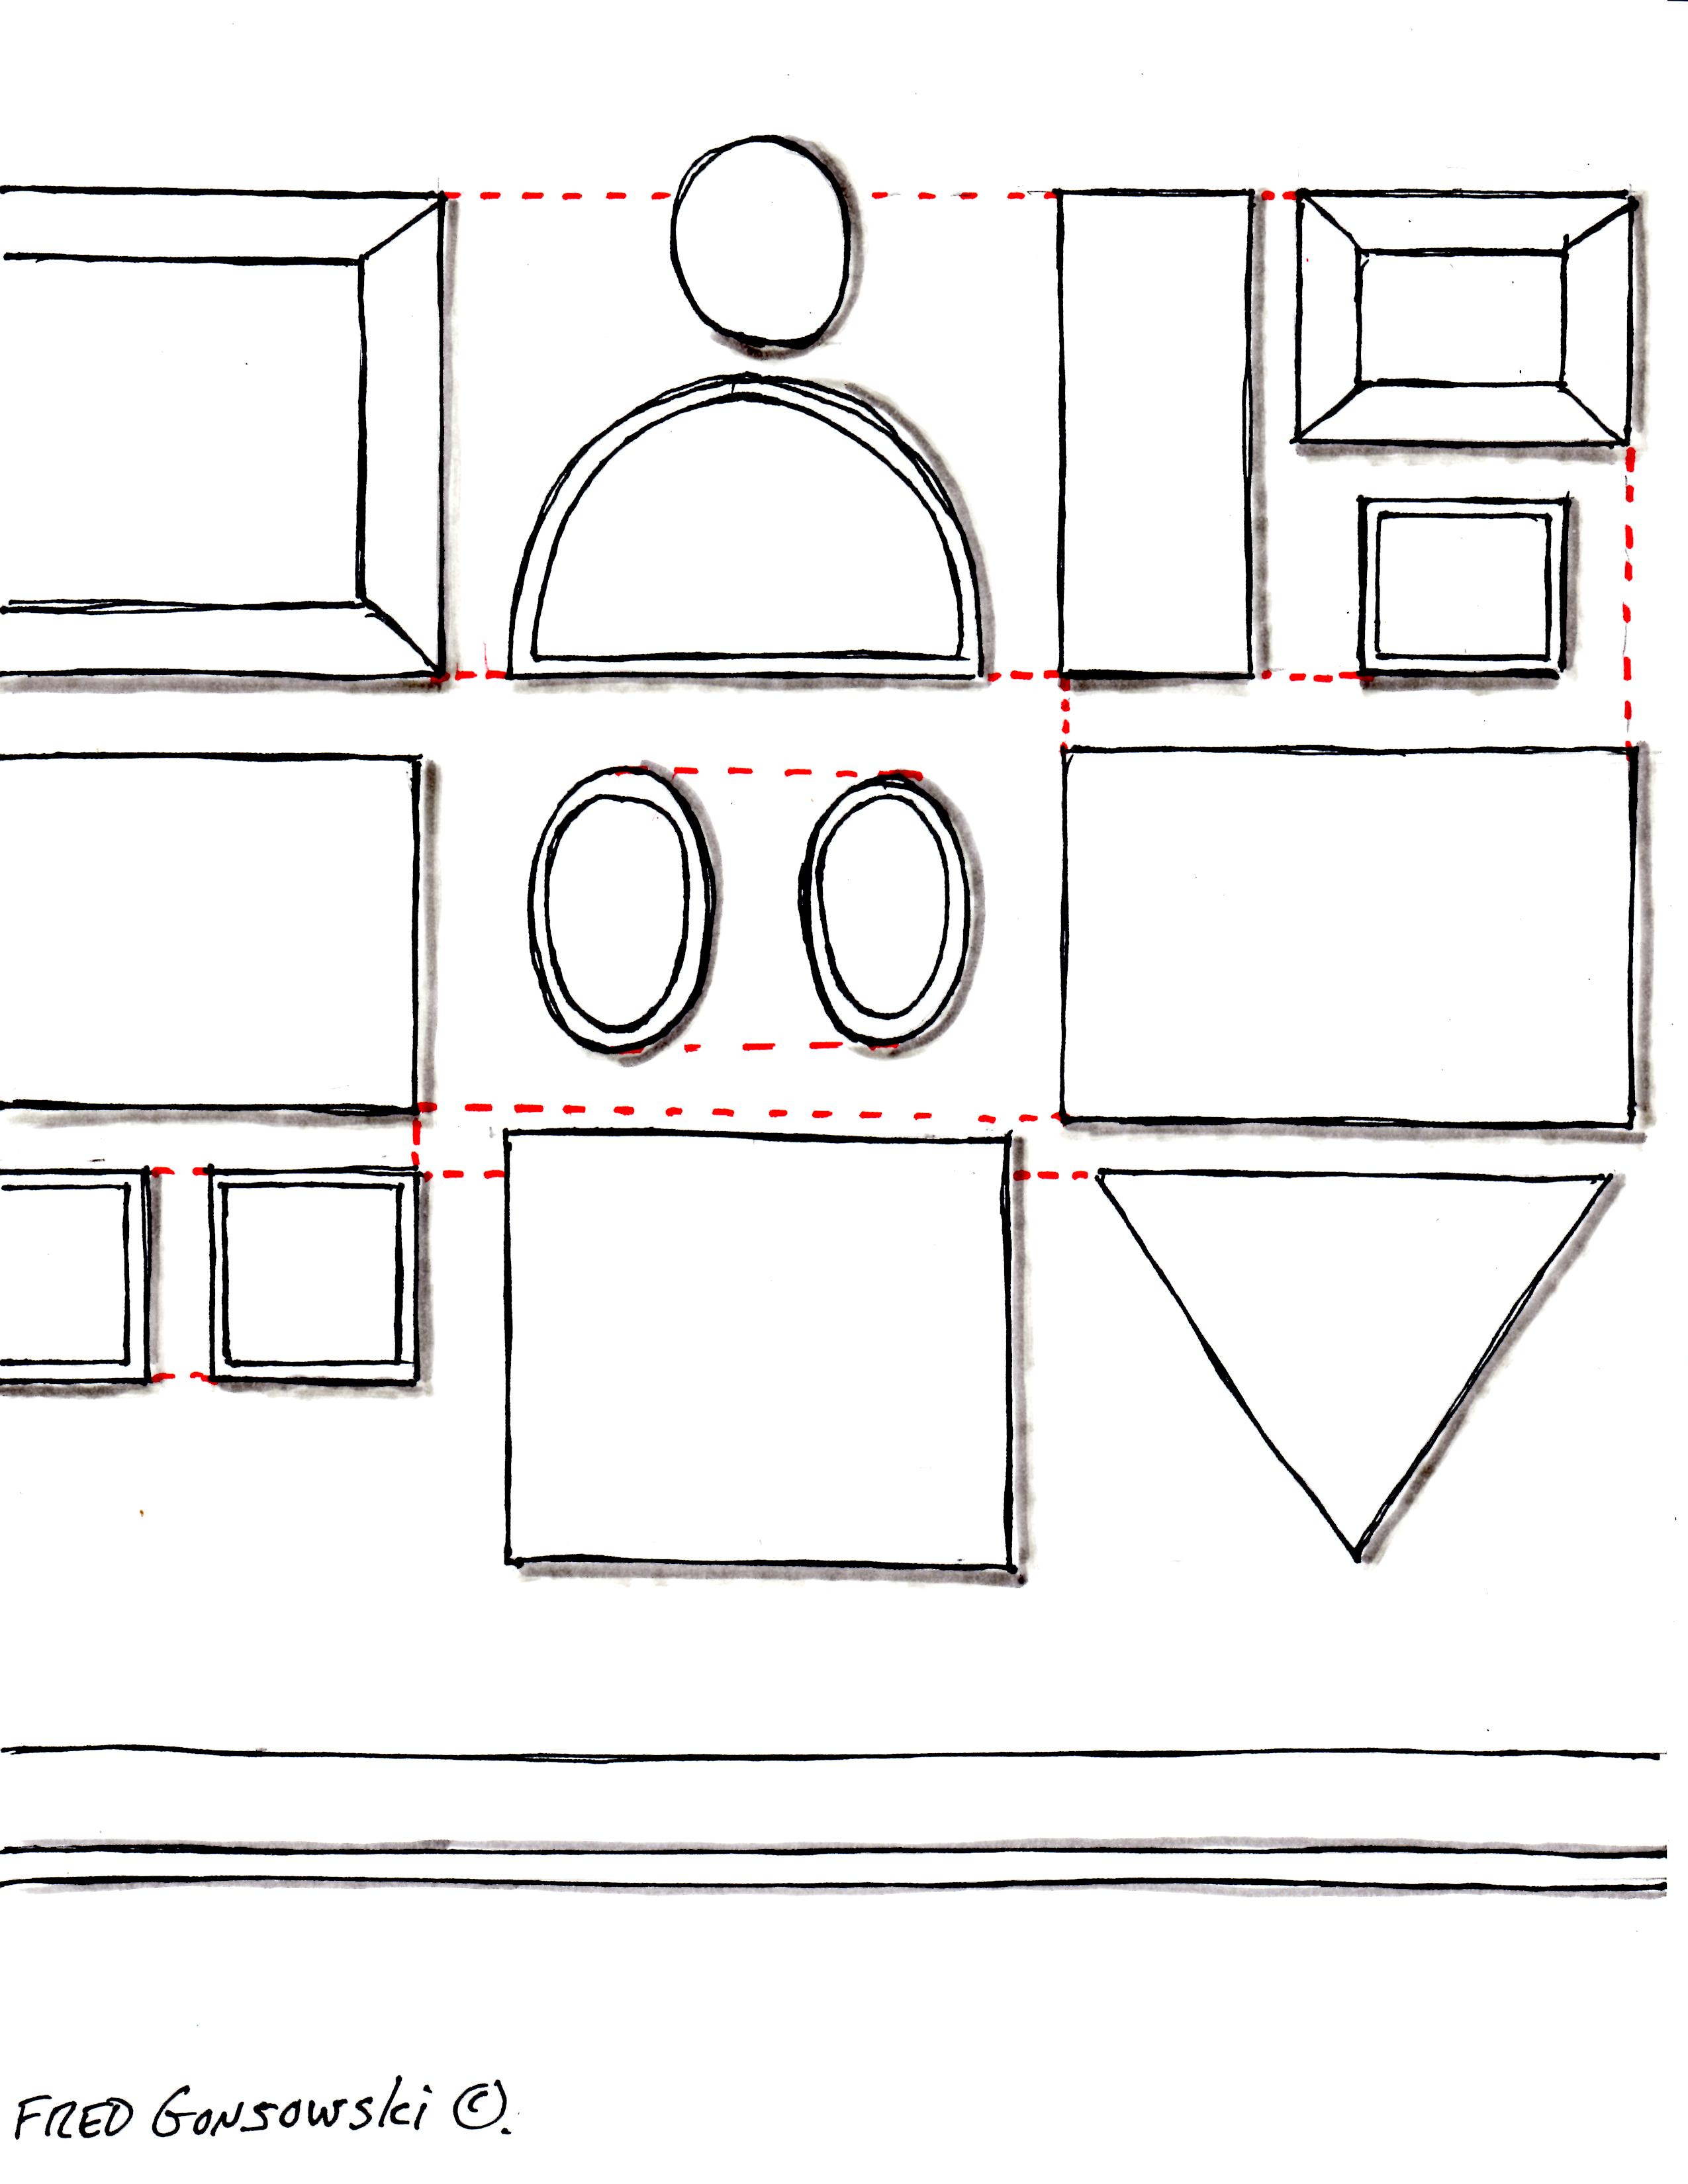
Companion Posts…
Picking and Hanging the Right size Picture or Mirror over your Fireplace 6-23-2011,
It’s Easy to Make a Grouping of Pictures 6-29-2011,
Making an Interesting Arrangement of Pictures 7-8-2011,
Hanging Pictures Around a Room 8-3-2011,
It’s Easy to Hang Pictures up on the Wall 7-17-2011,
Hanging Pictures over a Sofa 9-12-2011,
Hanging a Collection of Plates/Dishes up on the wall 1-19-2013,
A Bridge unites a Tablescape and Wall Decor 6-10-2011,
It’s Easy to Decorate a Room with a Tall / High Ceiling 2-3-2013,
The Right way to Hang Curtains and Drapes 5-3-2011.


Thank you! You have such vast talents and all are beautiful and doable. I am looking for instruction on hanging pictures or something on corner walls. I have the awkward corner fireplace with the opposite corner having a love seat in front. There are entryways on each side of this corner. How would you decorate the walls?
Hi there Trish, look at my posts Picking and Hanging the Right size Picture or Mirror over your fireplace, It’s Easy to make a Grouping of Pictures, It’s Easy to Hang Pictures up on the wall, Hanging Pictures around a room, Hanging Pictures over a Sofa and look at Hanging Pictures on a Staircase, Create a Gallery Wall, that post shows how to work things from one wall to another. Hope one or more of those articles inspire you ;-}