

Hanging a Gallery Wall on a Staircase.
Hanging a visually interesting grouping of pictures, on the wall alongside a staircase, is not just about getting out your hammer, picture hanging hooks, the framed things you want to mount on the wall and randomly going at it. Creating a gallery wall is all about lining up the edges of frames, either vertically and-or horizontally with each other, so you can make a presentation of, sometimes diverse images, that hopefully in the end look good next to each other. This blog post shows how easy it is to create a gallery wall that looks thought out and has some structure to it.
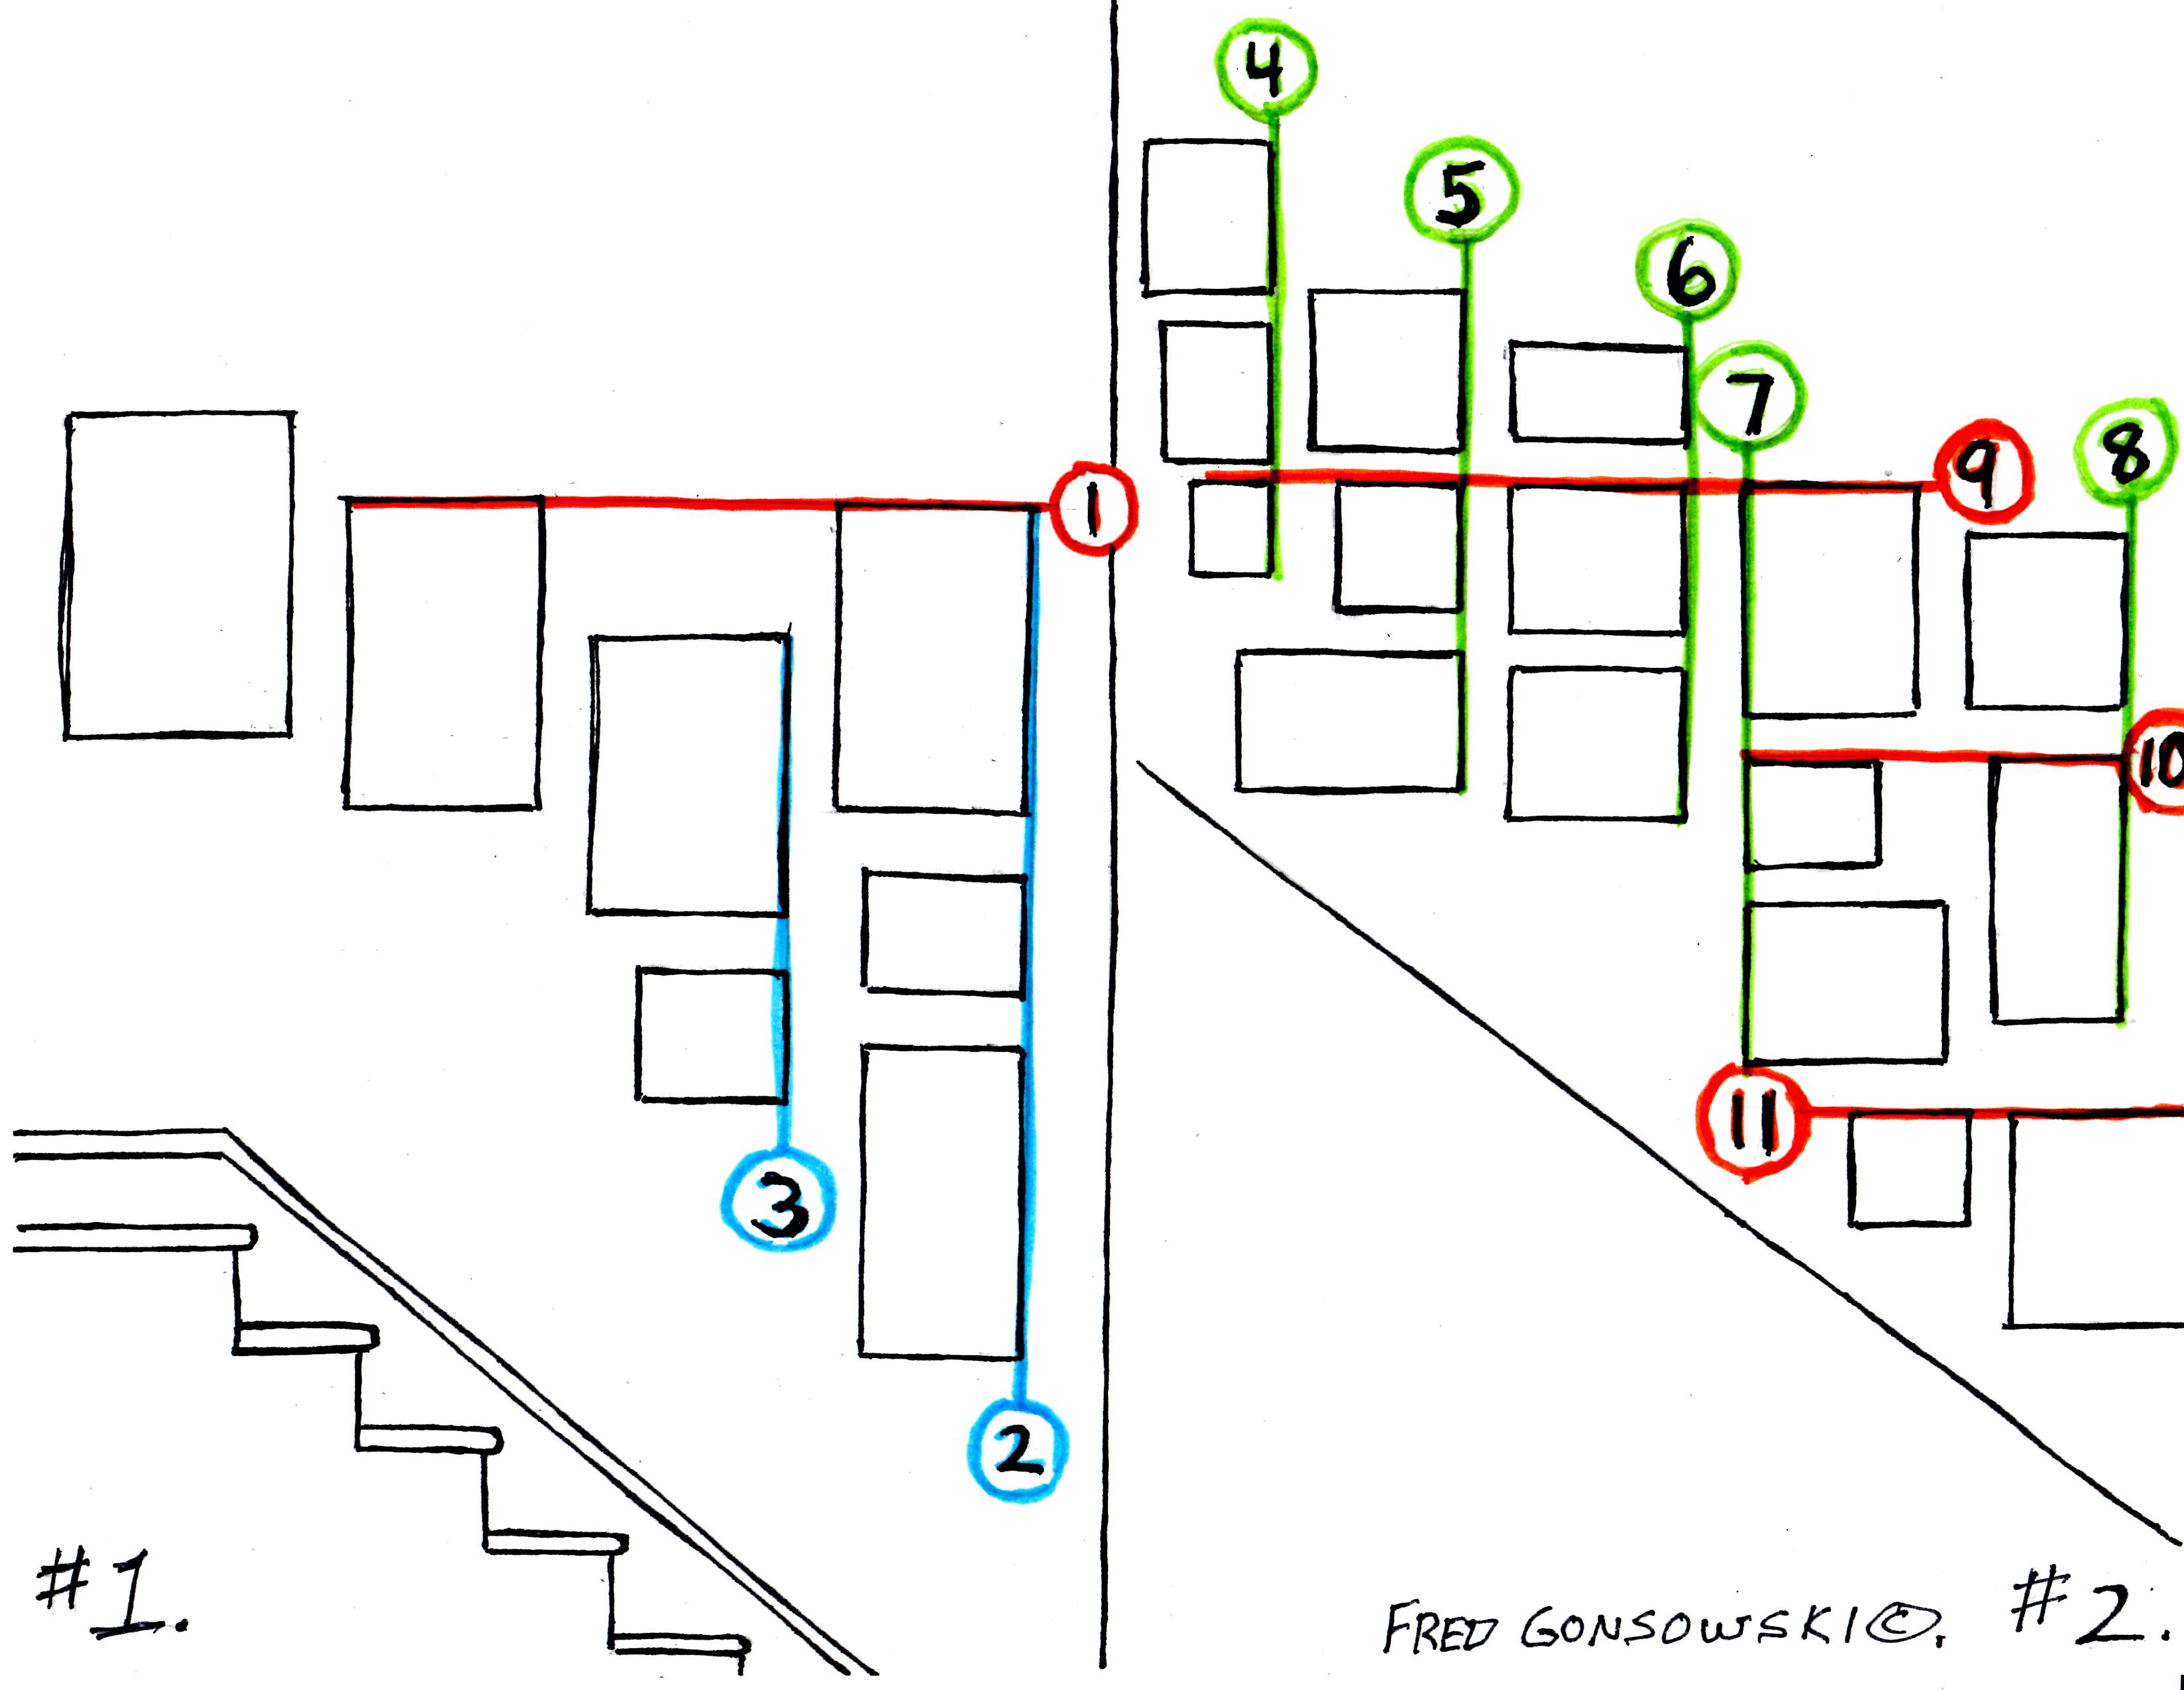 Let’s start by looking at illustration #1 which is everything to the left of the center line on the above graphic. This very simple drawing represent the outlines of framed pictures that are hung up on a wall alongside of a stairway.
When hanging pictures to form a gallery wall it’s all about lining up the edges of frames, either or both, vertically and horizontally to make a display that does not look to random and uncontrolled. What you want to do is have your frames line up with each other across either their tops, sides or bottoms, as much as possible, which create lines that guide the eye around the display in a vertical or horizontal fashion.
Now let’s look at number (1) on the above illustration and the red horizontal line that goes out from it. Notice how that red line, lines up with the top edges of the two pictures in the above drawing. Even thought there is a picture hung lower between them, those two pictures form the top edge of the gallery wall at that part in the grouping because they are hung at the same level and the eye moves from the top of one framed piece to the other in one steady “straight line” movement.
Next look at numbers (2) and (3) which are both connected to the blue vertical lines. Looking at the blue lines you will see that both numbers two and three show how different sized pictures are hung up, one above the other, with the right sides of their frames lining up with each other.
After looking at 1, 2 and 3 in this illustration can you see the horizontal and vertical lines formed by the edges of the different sized frames hung in the grouping? How easy was that!
Knowing that you now got it, let’s look at illustration #2, which is everything to the right of the center line.
First, look at numbers (4 through 8) with their green tails. You will see how all of the different rows of pictures line up vertically with each other on their right sides, with the exception of (7) where each of the frames line up with each other in that row on the left side. When lining up things vertically on your gallery wall, the choice is yours as to which side of the frame you will be lining up, with other pieces in that row.
Now let’s look at numbers (9 through 11) with their red-orange horizontal lines. Notice how the tops of those frames line up with each other as they form that part of the grouping.
A decorating tip… When hanging pictures on your gallery wall, hang larger pieces above smaller pieces. The smaller piece(s) will act as a pedestal(s), holding the larger pieces up in the air. If you place larger pieces mostly at the bottom of your gallery wall display, the larger pieces will make your grouping look bottom heavy, which pulls the eye downward. Also, put things that have big heavy or dark colored frames or dark toned images above things that have lighter more delicate frames and lighter images. Darker imaged and darker framed pieces possess more visual weight than the light and delicate things, and need to be suspended higher on the wall above visually lighter looking pieces which act as their pedestals. Looking at the cover illustration for this post and the first two illustrations and the following two illustrations, notice how larger pieces are hung over smaller pieces, here and there in the arrangements.
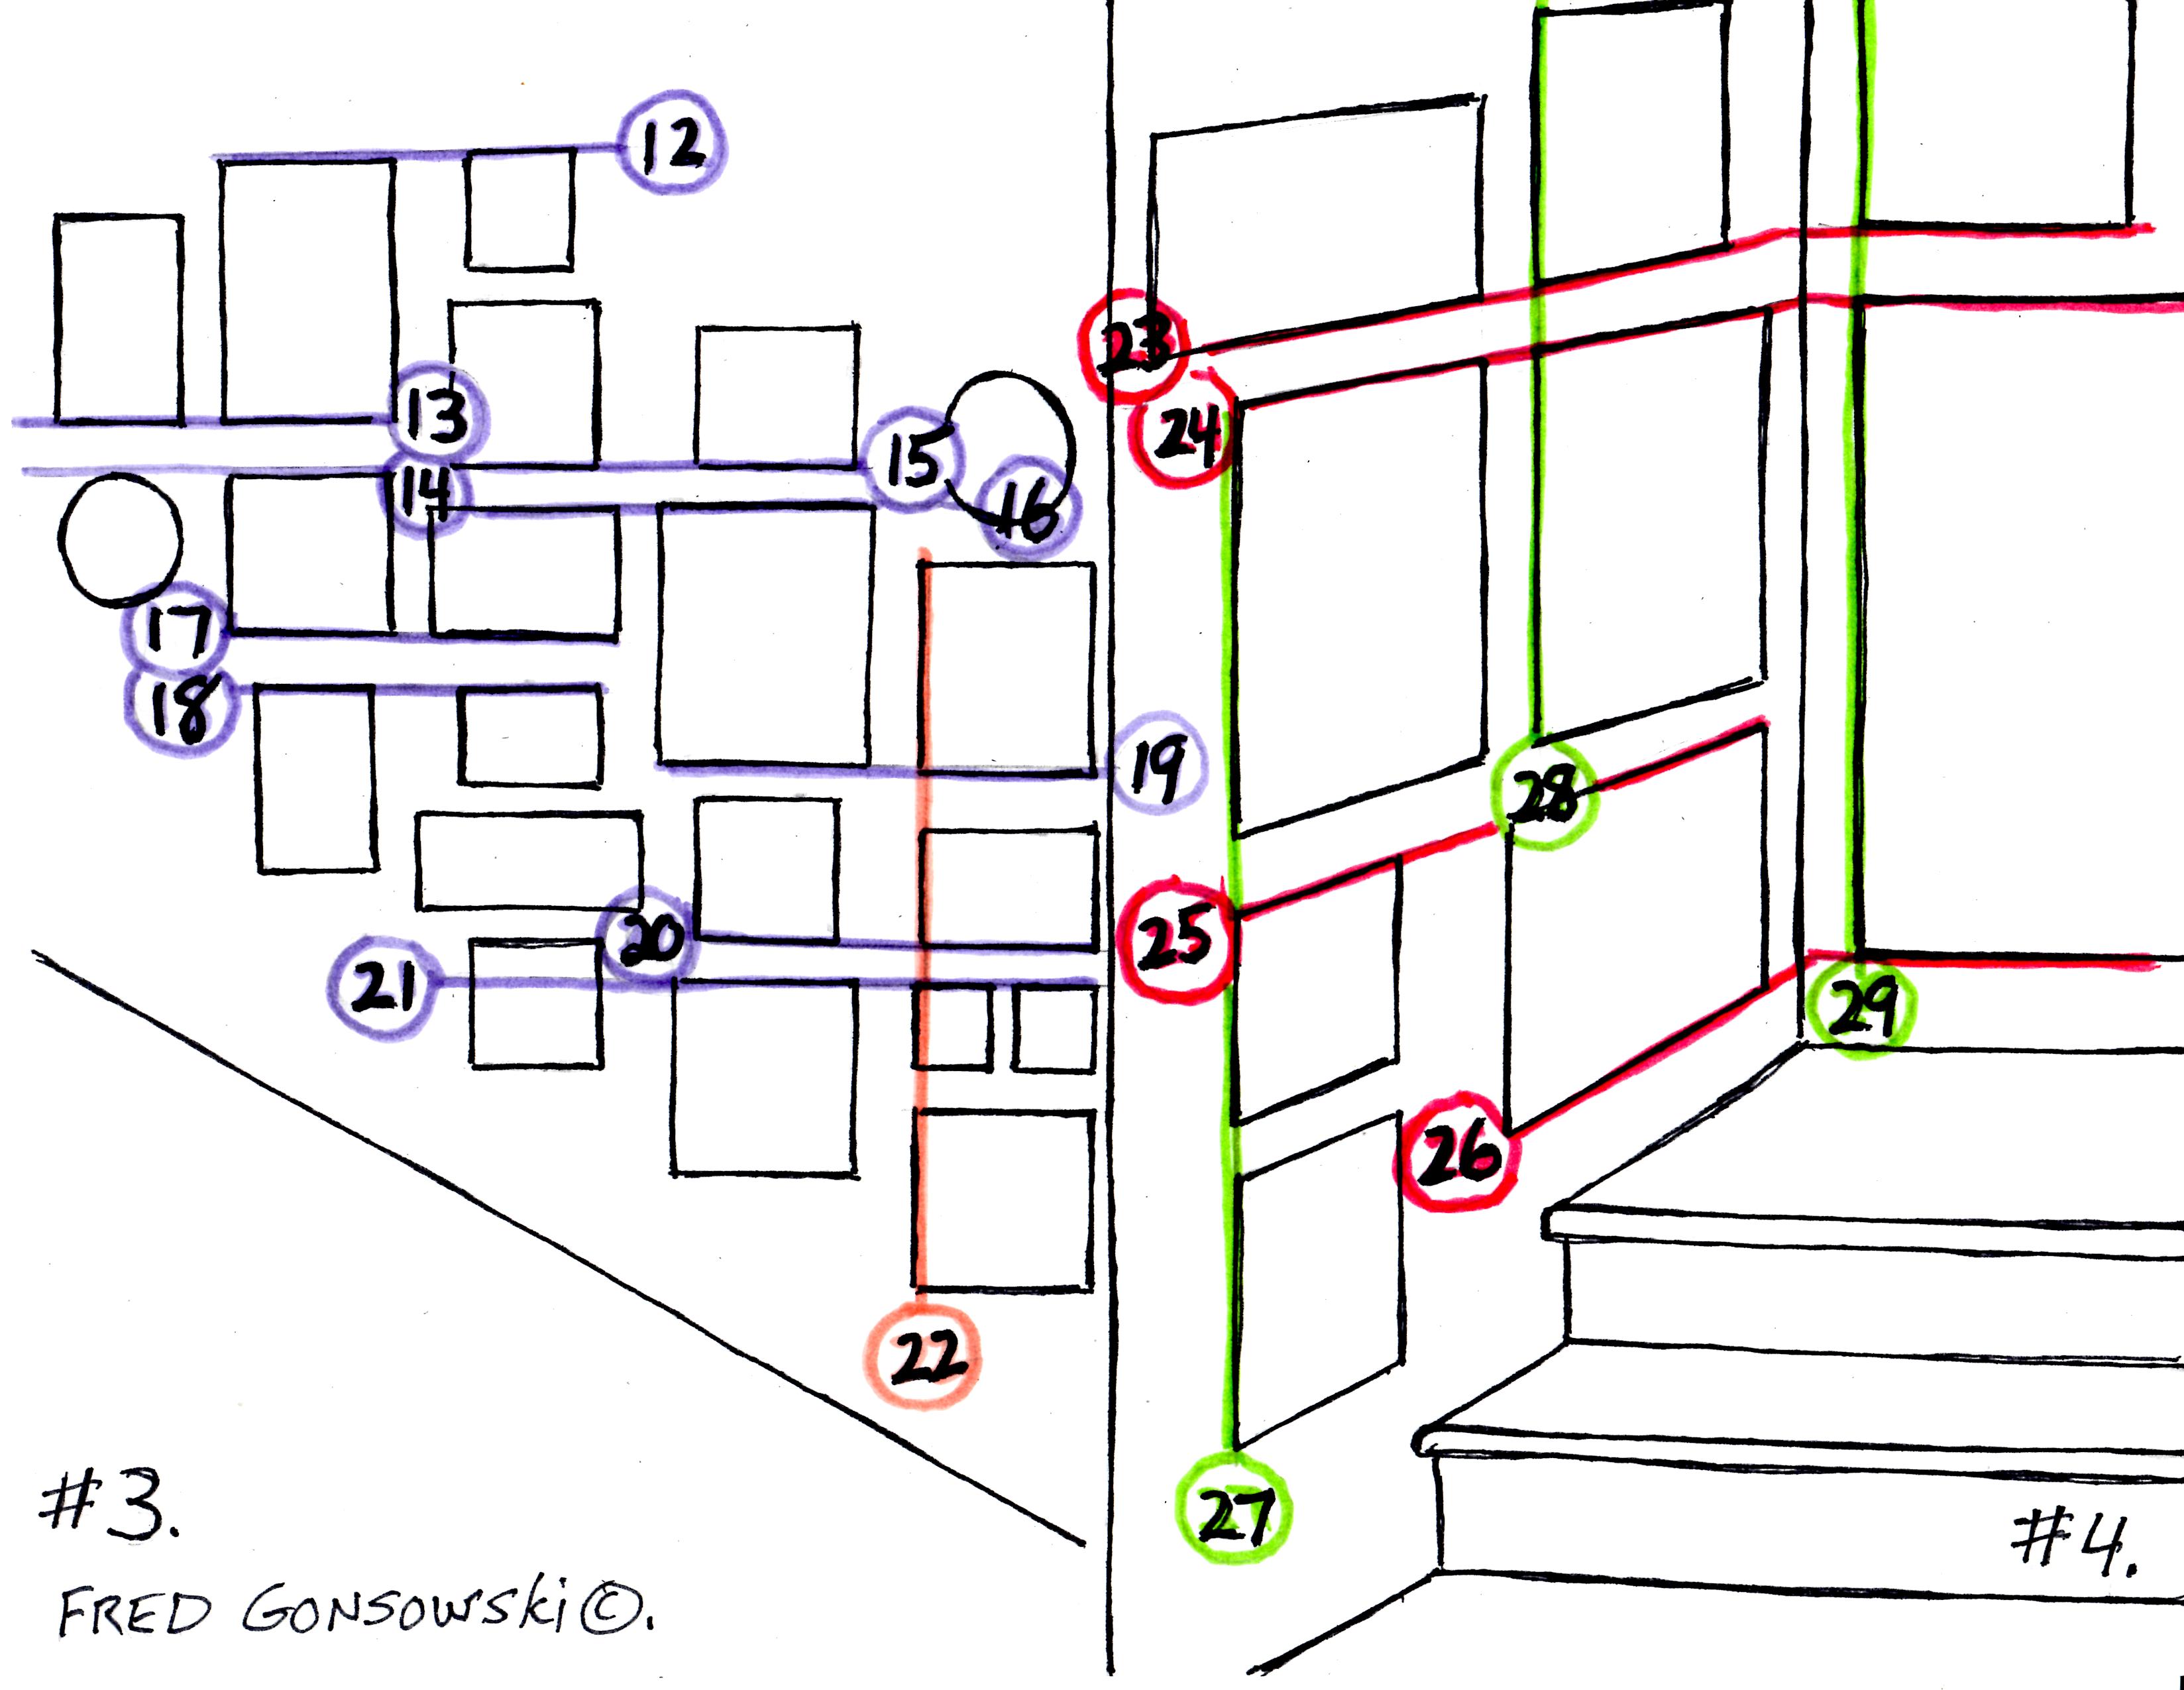 Now look at illustration #3 which is to the left of the center line on the above drawing. Illustration #3 is a bit different from the previous illustration, illustration #2 which had you looking at pictures that were lined up by either the right or left sides of their frames. In illustration #3 you will see that in most cases the framed pictures are hung up, one above the other, and are centered under each other. In illustration #3 you will see that the framed pieces, in most cases, only lined up with either by their top or bottom edges. Now look at numbers (12 through 21) and follow the different horizontal purple lines above and below the framed pieces as they form different parts of this gallery wall.
Next look at number (22) which has a vertical orange line and how pictures in that row line up with each other on their left, and yes right sides.
Our final bit of examination is illustration #4, seen on the right side of the center line. Illustration #4 shows a landing on a staircase and how you would continue lining up framed pictures as they are hung from one wall to another.
Look at numbers (23 through 26) which have horizontal red lines and how they line up with either the bottom or top edges of the frames as they go from one wall of the staircase to the other.
Next look at number (26) with its red line and the large picture on the landing that it lines up with. Notice how the bottom edge of that large piece, lines up with the bottom edge of the framed piece to its left. If possible ( if a person had an art work that fitted the space), the top edge of that large picture, hung on the landing, could/would also line up with the top edge of the picture seen to its left (24).
Finally, green lines numbered (27 through 29) show some of the vertical lines where edges of frames are lined up with with each other on the staircase.
So there you have it, a look at how easy it is to hang a gallery wall on a staircase. I would suggest that you first start composing your gallery wall by laying it out, in part, on your floor to make an arrangement of things that you like and then start hanging it up on the wall.
Take a tape measure and figure out how many inches up the wall your grouping should extend, then lay your tape measure on the floor and start laying out your things with your measuring tape as your guide for the height of the grouping.
If you are still a bit worried about hanging the grouping right, lay your framed pictures on sheets of brown craft paper or tracing paper and trace around them. Write the titles/names of the framed pictures on the tracing and cut them out. Using painters’ tape, tape them to the wall to see how your composition looks. At that point you can easily move things around until you get a grouping that smiles at your. Then read my post titled It’s Easy to Hang a Picture up on the Wall, which will show you how easy it is to get your picture hanging hook in the right spot every time. Secondly, look at Gallery Walls on Pinterest and see how different people have hung them and carefully look at how edges of pictures line up with each other, as I’ve gone over in this post.
I would also suggest that you read my posts titled… Making an Interesting Arrangement of Pictures which will help you to arrange pictures to make an eye-catching arrangement of subject matter, and Hanging Pictures Around a Room, which will help you to figure out how high up on the wall to possibly start your arrangement of framed things. If you have extra time look at It’s easy to make a grouping of Pictures, Picking and Hanging the Right size Picture or Mirror over a Fireplace , Step-by-Step instructions for Hanging a Gallery Wall and Hanging Pictures over a Sofa.


Thank you so much Fred! What an excellent post! I have a blank staircase that is in need a frames and now I know how to go about doing it.
Hi there Kim, all I can say is Have Fun ;-}
This is great timing for me, Fred! We just gave our staircase and upstairs hall a much needed facelift and I’ve been struggling with what to hang and how to do it. This post and your references to past ones should help a lot. Thanks so much for what you do!
.
Hi there Pat, thank you for your comment, happy picture hanging ;-}
I only continue to gain so much from your simple to follow seminars and illustrations.. I’ve told everyone i know about you and your blog! I cant think of one high end magazine that Fully explained about hanging pictures the right way–in all different kinds of scenarios. Amazing.
How DO you find the time to give us these articles (I call them seminars!) which I’m quite sure takes Many Hours to put together? PLEASE keep it up!
Your Talent and Generosity of your time is Very Much Appreciated.Best, Joy
Hi there Joy, Hi End magazines are not into telling you the rules of design, they are just into showcasing different talent that fits that month’s theme. If they told you what to look at, they might over-educate their readers, and possibly put some of the decorators out of business. I tell people to look at high end magazines, once I write a post, so my readers, knowing what they are now looking at, can get inspired from what the famous have done. Joy your up next, will start soon.
You did it again!!!!! Absolutely amazing the talent you have and the high skill level at which you are able to make it so understandable. A teachers heart…. Love you Fred!!!!!
Hi there Denise, I’m just letting out what’s inside of me, one post at a time. Years ago I used to make paintings and do art shows and sell things through galleries, (look at Fred Gonsowski artwork before the blog and A look at the Hand Painted Doors here in my House if you want to see some photos of things that I did back in the day). My creative outlet is now painting pictures with words to inspire the people who find me, and my bit for artistry is making pictures on printer paper, coloring them in with markers, sharpie pens and sometimes colored pencils, then scanning the quickie drawings and sending them up onto the internet for people to find. Thanks for your comment.
Hi Fred,
I recently came upon your cupcake pan planter and wanted to know if I could feature it in a story I’m working on. Let me know what you think. My email is nick.gerhardt@trustedmediabrands.com
Hi there Nick, Use it, no problem. Could you list my name or website name in the article; that would be a nice thing.
Just found your helpful site and I’m in the process of planning out my stairwell gallery. My question is, where is the best place to start – top corner, specific piece, centre and work outward? My stairwell is a ‘split level’ (entrance to house in a landing), large double doors with a transom type window. I also have trimwork halfway up the walls ending with a horizontal trim the height of the doors. Do I only place pieces above that trim or do I somehow follow the line of the railing?? Any thoughts greatly appreciated…