

An Easy to make Trellis for Climbing Vines
Here at Whimsey Hill, I have a dozen or so clematis and some decorative trellises that I’ve picked up over the years, but most of my vine supports are much less fancy. To me, a fancy trellis is fine in certain places in the garden, but most of the time I think it should be about the plant, not what it grows up on. This post is about how I make my inexpensive trellises for the clematis and morning glory vines I grow in my garden.
Trellises for Clematis…Supplies Needed
2 Eight Foot long Sturdy Sticks (plastic covered aluminum stakes available at garden centers everywhere and in garden centers in many big box retail stores)
22 or 20 gauge steel galvanized wire
a hammer
wire cutters
a yard stick or ruler
a step-ladder if needed
Step One.. Think about how wide you want your trellis to be; 18, 24, 30, or 36 inches wide. Any of those widths will work OK and I have them here in my garden.
Step Two.. Once you have decided how wide you want your trellis to be, hammer the two sturdy sticks into the ground so one foot to about eighteen inches of the sturdy sticks are under the ground. You want the two sticks firmly hammered into the ground so they can easily support the vine that will be growing up it, when you make your trellis, and you don’t want it to toppled when strong winds blow.
Step Three.. Starting at about one inch down from the top of the two poles, wrap your wire a few times around the first pole and twist it secure, then string your wire to the other pole, pulling it tightly and wrap it a few times around that pole and twist it and cut the wire. You have just made the top of your trellis. Step back and look to see if the wire looks straight from one pole to the other. If it looks crooked, undo one end and straighten it. (now look at the first illustration for this post).
Step Four.. If you are putting your trellis up against a privacy fence, with an extra piece of the galvanized wire, tie the top of the trellis on each side to the fence for extra support.
Step Five.. With your ruler or yard stick measure down 10 inches from the top (first wire you strung) and repeat step three (running your wire from one sturdy stick to the other). Again step back and see if the wire looks straight. Adjust if needed. Repeat the process of measuring down 10 inches and wiring until you have worked down to the bottom you your trellis. If you like, at the bottom most rung of your trellis, add another rung, spaced less than ten inches if you want. That rung will make it easier for your plant to start climbing up your trellis. The next photo shows one of my trellises.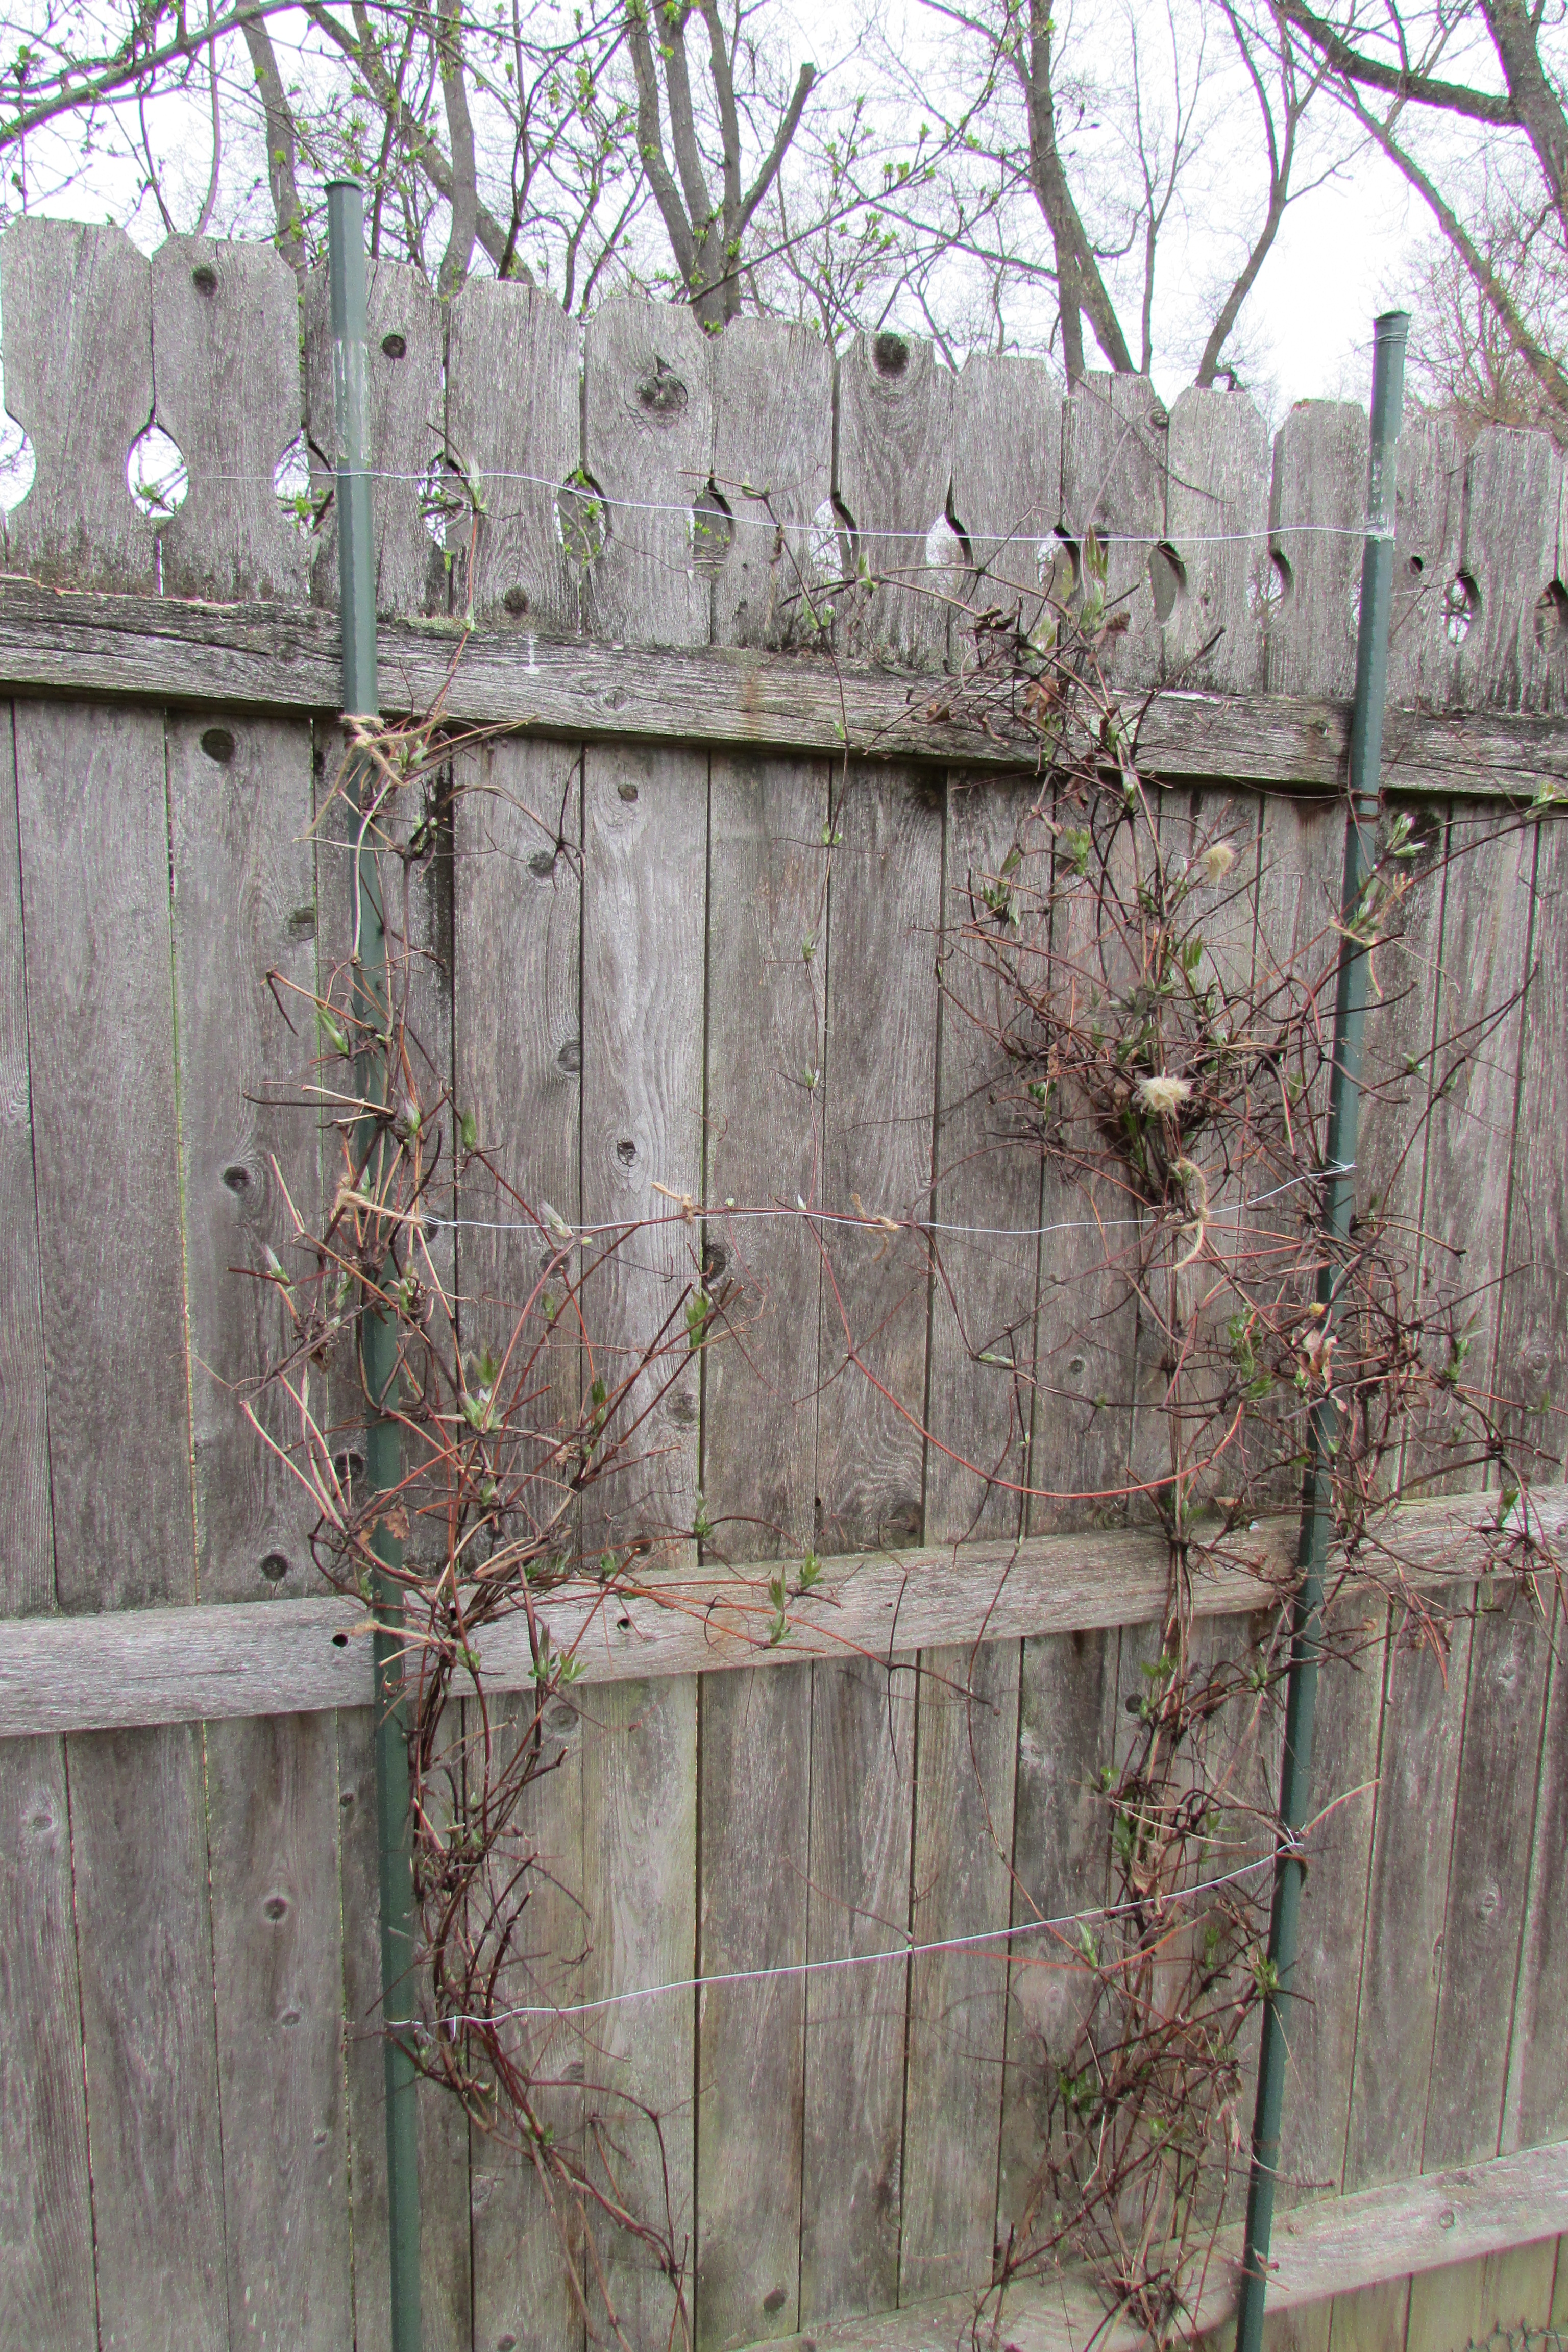
An Easy to Make Trellis for Morning Glory Vines
Trellises for Morning Glory Vines..Supplies Needed
2 Eight Foot Long Sturdy Sticks
2 four-foot long bamboo garden stakes (available at garden centers everywhere and some big box retail stores with garden centers)
Twisted Jute Twine (natural or green toned)
1/4 inch wide sisal rope (optional)
26 Gauge florist wire
a hammer
wire cutters
Scissors
hand pruners
a ruler or yard stick
a step ladder if needed
Step One.. Figure out how wide you want your morning glory support trellis to be; I like mine 36 inches wide.
Step Two.. Hammer the two sturdy sticks into the ground one foot to eighteen inches so your trellis is stable.
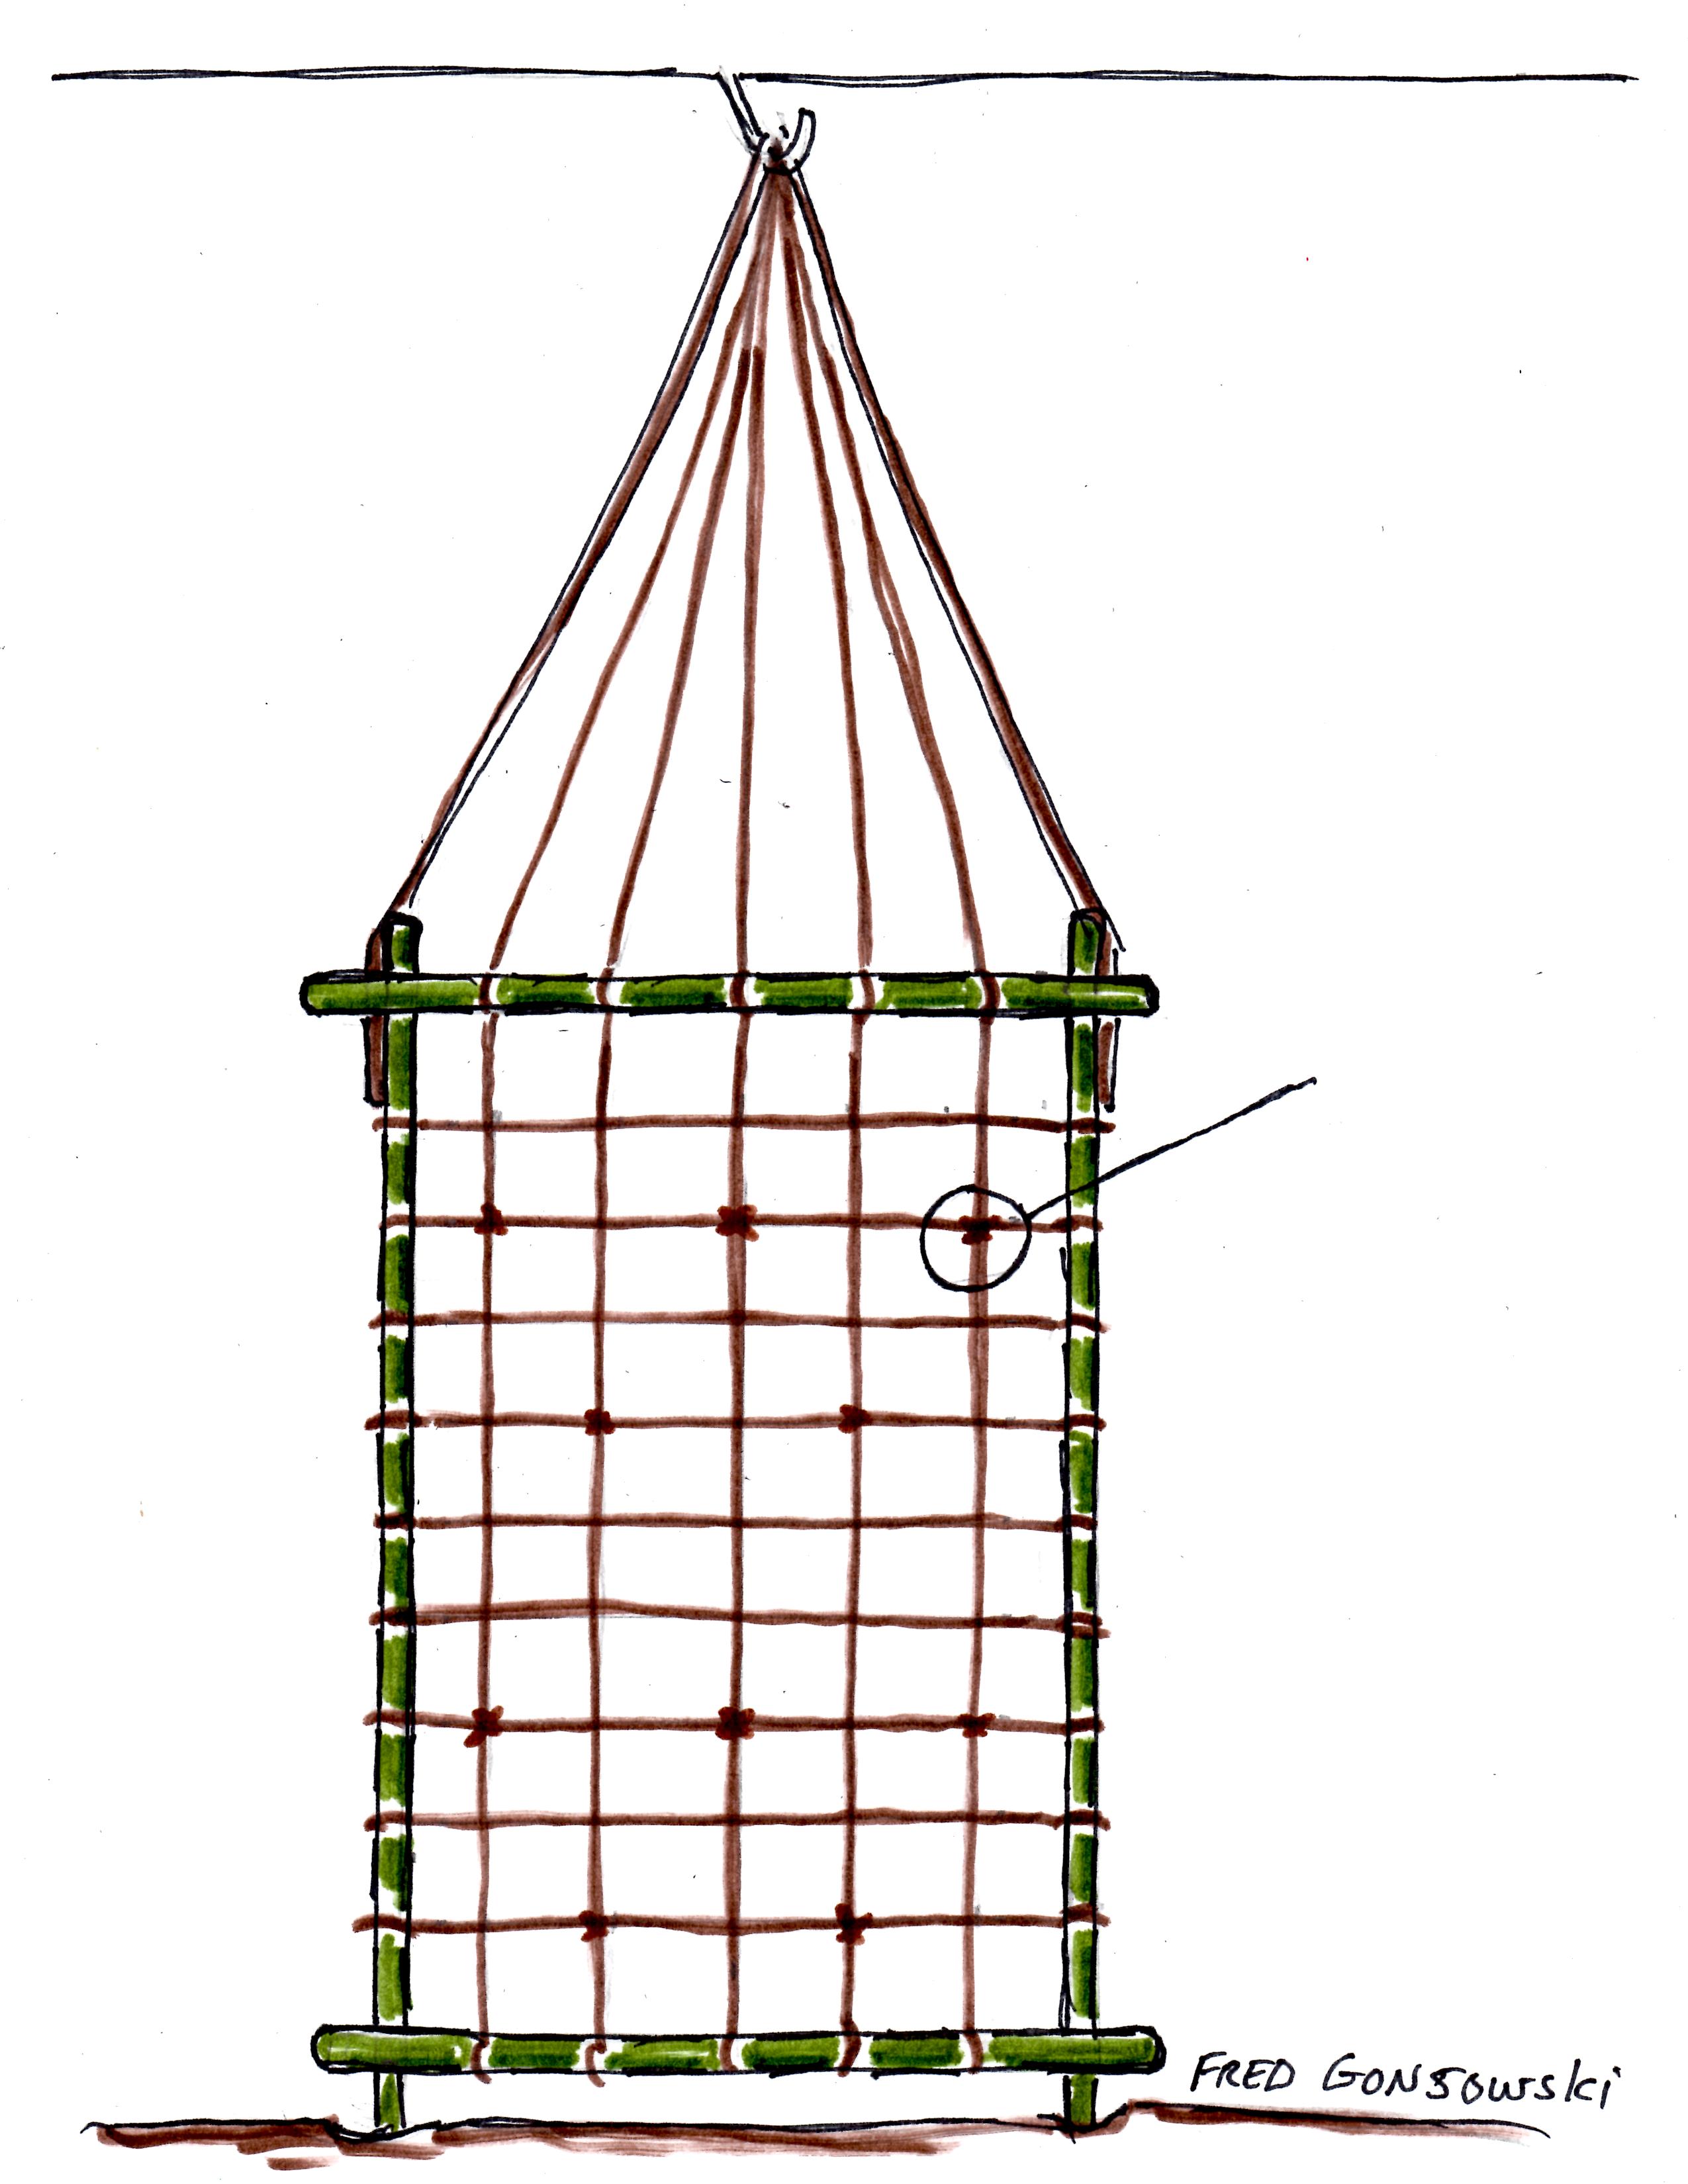
Step Three.. Two inches down from the top of the two sturdy sticks that make up the vertical sides of your trellis, wire one end of your first bamboo stick to the sturdy stick with the florist wire, leaving two inches of its length extending out past the sturdy sticks. After wiring that side, make sure your bamboo stick is level and wire the other end of that stick to the other sturdy stick and have two inches of extra stick extending past that side of the sturdy stick (as shown in the illustration). You have just made the top of your trellis. With your hand pruners cut off any extra bamboo that extending more than two inches past the sturdy stick. Step back to see if your bamboo stick looks level, adjust if needed.
Step Four.. A few inches above ground level, at the bottom of your trellis, take the second bamboo stick and wire it as you did across the top of your trellis. Have the bamboo stick sticking out two inches past the sturdy sticks, as you have done at the trellises top. Again, when finished step back to see if it looks level, adjust if needed.
Step Five.. With your ruler or yard stick, measure 6, 9, or 12 inches down from the top of your trellis (the top bamboo stick (I like 6 inches), and take your twisted jute twine and tie it to one of the sturdy stick and bring it horizontally across your trellis to the other sturdy stick and tie the twine to it. Step back to see if the string looks straight, adjust if needed.
Step Six.. Measure down 6, 9 or 12 inches, repeat step five, tying off row after row of your trellis until you have gotten to just above the bamboo stick, which forms the bottom of your trellis.
Step Seven.. Starting at the top center of your trellis (use your yard stick or ruler to find it), tie a length of the twisted jute twine to that bamboo stick and bring it down to the bottom bamboo stick and tie it to that. Step back to see if the string looks straight, adjust if needed.
Step Eight.. Measuring 6 inches out from your center most string, tie a second string and run it from the top of your trellis to the bottom as you did the first one. Measure 6 inches again, and repeat the process until you have finished that side of the trellis. After that repeat the process working from the center in the other direction.
Step Nine.. Cut many lengths of the twisted jute 5 inches long. Here and there, (two or three per vertical row, as show in the circle in the illustration), tie the strings together where the horizontal and vertical strings meet that make up your trellis, that will keep them in place. Finish by cutting off excess string so everything looks neat.
Step Ten (Optional).. At my house, I want my trellises to extend up two stories, so at the top of the wall where the overhang starts I screwed a large “J” shaped hook (look again at the illustration). At the top of one of the sturdy stick that makes up one sides of my trellis, with florist wire, I wire the heavy 1/4th inch wide sisal rope and run it up to the “J” hook at the eave and then back down to the other side of the trellis where it is again wired. Because of the weight of the vines growing up the side of the house, I like a heavier string on the outside for support. I then fill in the center of the upper trellis using the twisted jute that I made the trellis with. To keep things looking uniform, I match the same amount of strings going up the wall, with the number of strings that make up the vertical parts of the trellis.
At the end of the growing season. I cut the horizontal and vertical strings that make up the bottom of the trellis, after that I cut through the vines at the lower part of the trellis. Following that I go up on the ladder to the eave and cut the strings; and everything falls to the ground. The vines and strings are then rolled up and thrown away.
The next photo shows two trellises waiting for the planting of morning glory vines on the side of my house.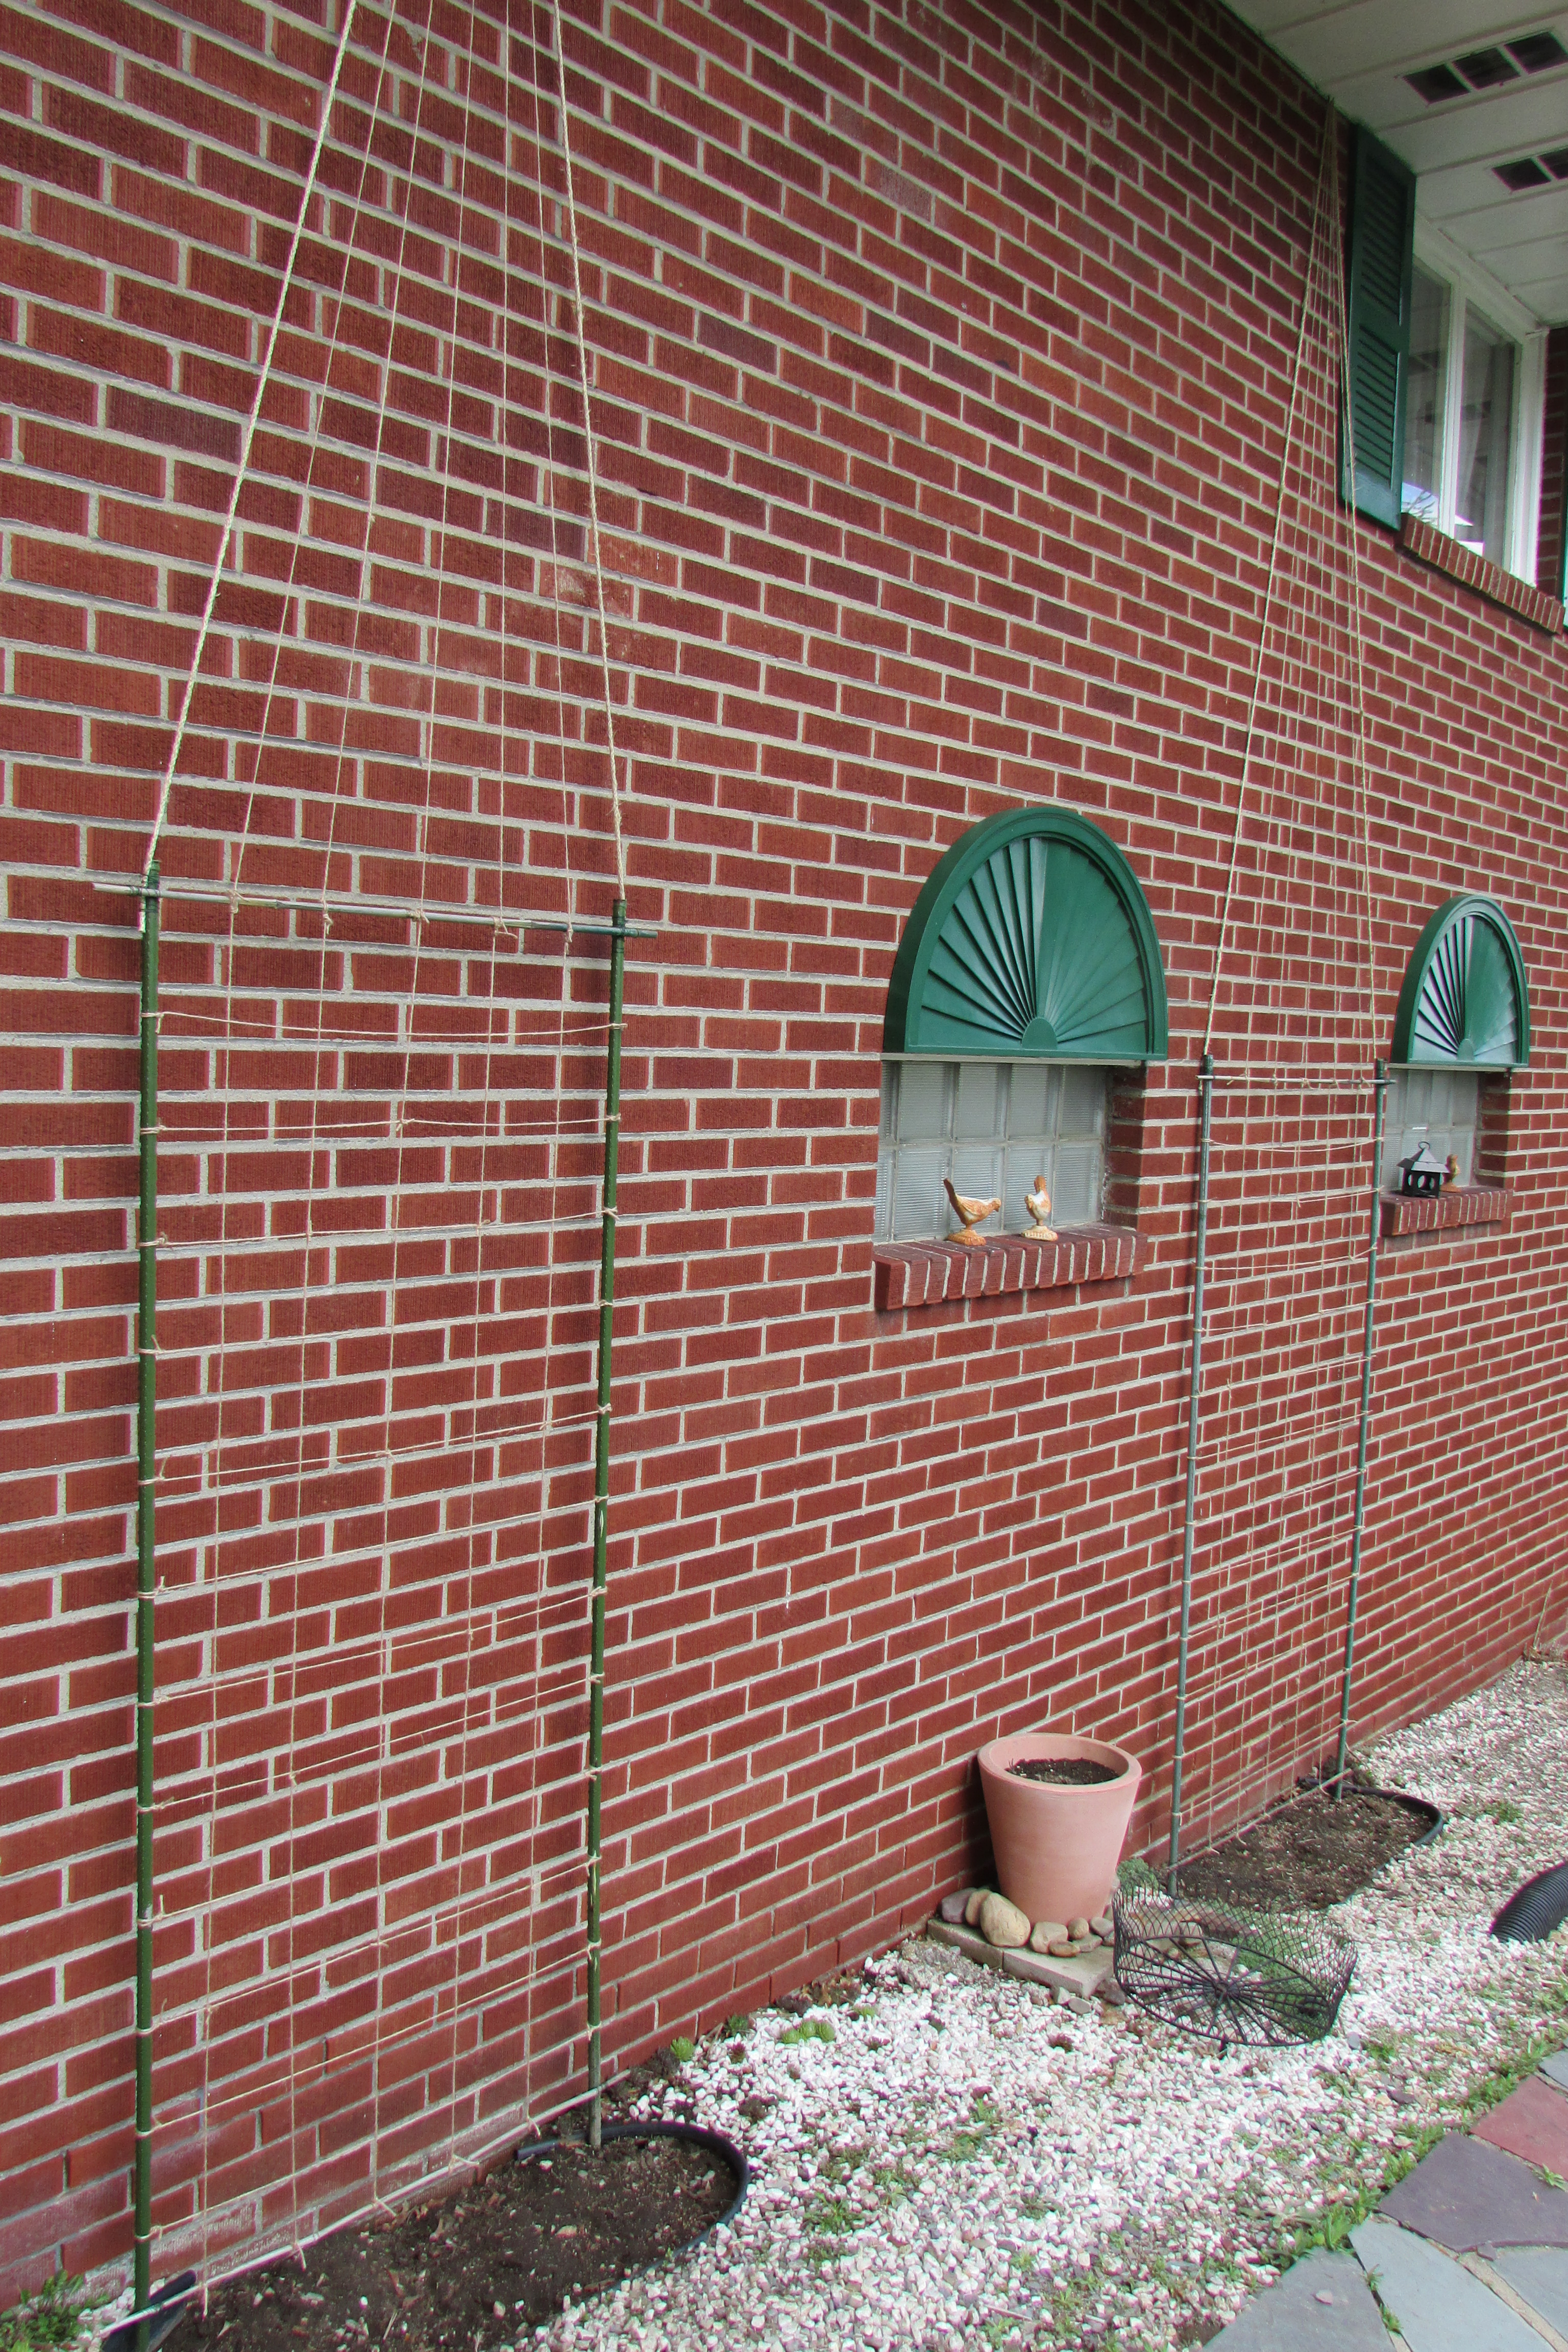
So there you have it, my way of supporting clematis and morning glory vine in my garden. I hope my way of doing it is something you might try. Happy Gardening!
Companion Posts..
Plant (Start) a Flower Garden for Sun or Shade, Celebrate Spring 3-31-2012,
Designing / Laying out Flower Beds 5-4-2013,
Some Ideas about using Garden Ornaments, They add that Finishing Touch to a Garden 6-29-2013,
Thirteen Ideas for Decorating Your Country Garden 7-20-2013,
Planting a Garden Room on Your Property 2-17-2013.


I just spent a couple hours scanning your blog and picking out articles to read and bookmark for our first new home. I got all the way back to November 2010 and read your post about commenting. So here I am. 🙂 You have so many great ideas for a new homeowner, and I am excited about so much of what you’ve posted. I came here looking for help with placing furniture in a smallish, narrow great room (Long solid wall across from kitchen counter/bar, front door with no foyer and windows on one short end, sliding door to yard on the other.) While I didn’t find that, I did find decorating ideas, and lots of garden/landscaping ideas, and ideas about color, and how to mix this and that, and lamps, and why to never buy a loveseat and so much more. Thank you.
Hi there Joy, did you read my post titled Arranging Furniture in a 12 foot wide by 24 foot long living room, or arranging furniture so Sofas talk to chairs, like the Pros do. Those two posts might help you, or you will get ideas from them. Thanks for your comment ;-}
If I wanted to plant two clematis plants next to each other and possibly have them mix so the colours are intertwined. How would you suggest I accomplish that?
Hi there Jane, plant the two clematis, one at each end of your trellis, and as the two plants grows direct the growth tips of the two vines as you would like them to be and loosely tie them to the trellis with some jute twine. Some clematis grow (re-sprout out) on old wood, growth that grew last year, and once you get the plant as you like it, it will kind of stay as you want it to grow. There are also clematis plants that die back to the ground each Winter, and each Spring new shoots emerges that will have to be directed to grow the way you want it to be. Good luck with your project.
Thank you for posting! This design is perfect as I already have all of the supplies. You’re the best!!!
Hi there SSF, have fun with your project, and Happy Summer!
Hi! Thank you so much for sharing this awesome idea!! I have been looking for an easy, sturdy homemade trellis for my clematis! This is it! Also the morning glories, which I love! Off to get my supplies!
Hi there Annie, glad to have inspired, I have a mix of trellises here at Whimsey Hill, some bought at garden centers and others homemade, but the ones that I’ve described in the post I have the most of. Happy Summer and Happy Gardening to you, THANKS for your comment ;-}
I have had a mess with my clematis for years. I was always trying a store bought trellis and they are just not big enough or look nice. Thank you for your simple but much more adaptable ideas! Kristi
Hi there Kristi, glad to be of help. Happy Spring, keep safe and Garden On ;-}
Can I use jute for clematis or does it have to be wire?
Hi there Pamcrei, I would say wire, as the jute will break down quickly, probably only lasting one year.
Hi there, do you think a morning glory trellis built this way can be a free standing one, not leaning against the wall? Just wondering if the two poles being one foot in the ground will withstand the winds.
Hi there Julia, probably NOT. With all of the leaves acting like a sail on a ship, the whole thing will probably blow over. If I were going to try doing a freestanding trellis. I would make it with three or four poles all tied together in a pyramid kind of shape, and stabbed deep into the ground to stabilize it. A pole going right up through the center, and all of the other rods tied to it could also help keeping it in place.
Pingback: 10 ideas de paisajismo en el patio delantero para su hogar - AFCE
Pingback: 10 ideas de paisajismo en el patio delantero para su hogar - Decorar interiores